- 25 Nov 2024
- 5 Minutes to read
- Print
- DarkLight
- PDF
Export Module: Post-Export Management
- Updated on 25 Nov 2024
- 5 Minutes to read
- Print
- DarkLight
- PDF
This article provides guidance on managing exports after an export job is completed, including key post-export actions and configurations within the Export Module.

Export Module Navigation – After the export has successfully completed processing, the
 icon will be displayed in the Module Navigation. If the export had any issues, the
  icon will be displayed in the Module Navigation. Next to the Export icon is the Export Name. The Export Tree View when expanded has the following values:
Scoped Doc Count – This is the export’s expected native files count to be copied out to the Export Location. This count should match the Actual Count.
Export Engine – This notes the machine that processed the export.
Export Date – The date on which the export was run.
Export Explorer – To view an export for QC purposes, select the export by clicking on it, and then click the Export Explorer button in the Export Ribbon. Depending on the size of the export, this can take a little bit of time to open.
Note
Once opened, it is possible to group the load file by a certain field/column by dragging and dropping that field/column to the top of the table above the first field/column. For example, it might be part of the QC workflow to group the Export Explorer by Custodian to make sure that all Custodians were properly included in the load file.
Export Folder – To go directly to the export folder in Windows Explorer, click the Export Folder button in the Export Ribbon.
Validate Natives – After selecting an export, if the Actual and Expected Count does not match click the Validate Natives button in the Export Ribbon. Click the Validate Natives button to create a log (TVFILEID, NATIVEFILE) of the files where the native file was not successfully copied to the export location.
Note
If any results are returned please use the TVFILEIDs to create a Selective Set of these error files using the File ID List tab in Selective Set. Once the Selective Set is created try exporting the files out again to see if this was a hiccup or a true issue. If the files error out again, first email [email protected] alerting the Reveal Technical Support Team of your issue. Then please export the Selective Set out using the Natives Only Export setting, zip the results up, and FTP the data to the Reveal Technical Support Team.
Delete Export – To delete an export first select the export in the Export Module Navigation and then click the Delete Export button in the Export Ribbon.
Delete Template – To delete a project level export template, click the Delete Template button in the Export Ribbon and select the template to be deleted.
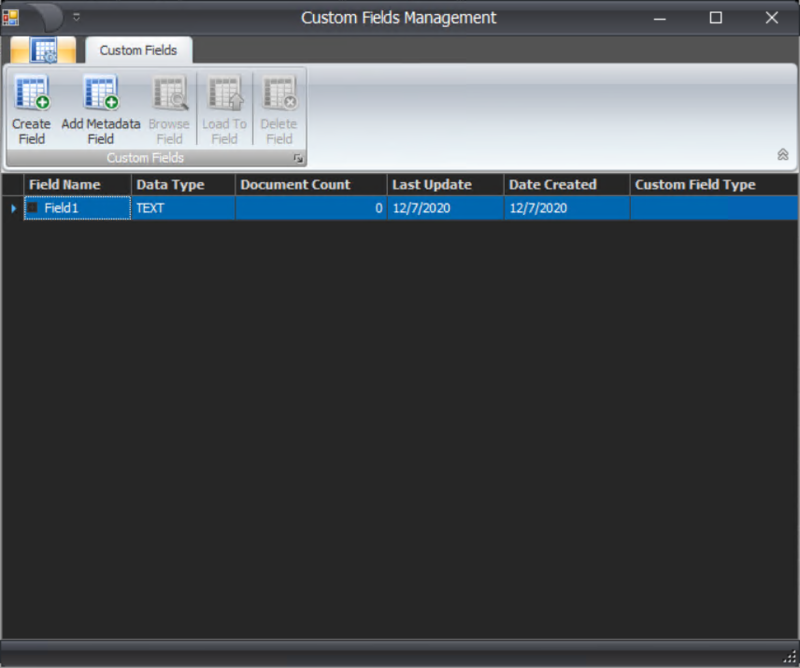
Custom Fields – Custom Fields is a way for users to bring external data into Discovery Manager to use the data as a field in a load file. An example of a custom field would be to bring coding in from an external review tool to include that coding in the load file. Another example might to create custom universes of files like a custom Index Status for the files etc. To create a custom field, click the Custom Field Management button to launch the Custom Field Management form seen below:

Create Field – Click the Create Field button to create a new field.
Add Metadata Field - Select an existing field to add.
Browse Field – Choose a field and click the Browse Field button to view the field’s contents in a table to validate the results of uploaded data to the field.
Load To Field – Choose a field and click the Load To Field button to launch the Load Data to Custom Field form. This form allows a user to upload or overlay a load file into the field.

Set Name – The name of the set that is being uploaded to the field. It is possible to have more than one import or load per field.
Matching Field – This field should be the first field in the load file. When uploading information into the custom field, this field is used to pair the information with the file’s unique identifier. The information in the second field or column of the load file will be added to the field. There are only three matching fields allowed when populating a field:
TVFILEID – The default Matching Field is the TVFILEID, which is the Discovery Manager FileID or unique identifier. Using this field is recommended as there will never be a duplicate value in this field in Discovery Manager.
FILEID – The exported FileID. This is the file level file number generated at export time.
BEGBATES – The exported BEGBATES. This is the file level bates number or BegBates generated at export time.
Load Type – There are three load types:
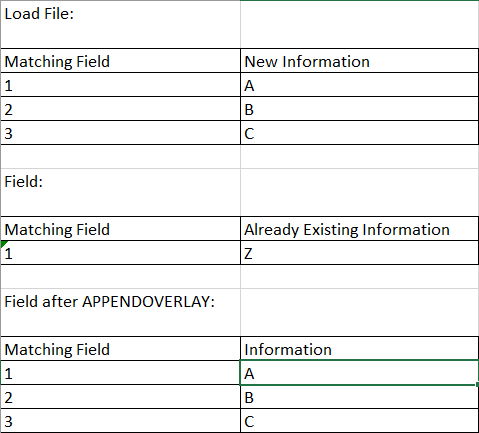
APPENDOVERLAY – The default Load Type is APPENDOVERLAY. If no fielded information exists for the Matching Field in the field, the data will simply be added to the field. If information exists in the field and the load file contains information for a Matching Field value which already exists in the field, the new information will overwrite the existing value and new information will be added to the fields as seen below:

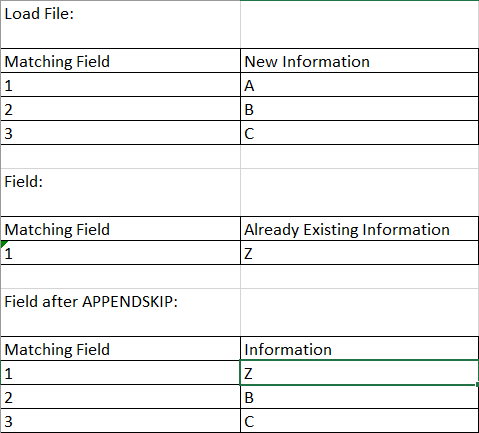
APPENDSKIP – If no fielded information exists for the Matching Field in the field, the data will simply be added to the field. If information exists in the field, and the load file contains information for a Matching Field value which already exists in the field as well as new information, the existing value will be skipped and the new information will be added to the fields as seen below:

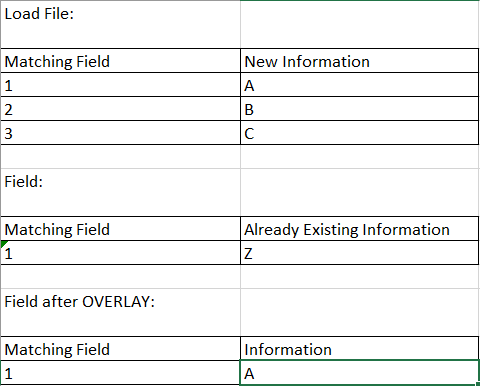
OVERLAY – If no fielded information exists for the Matching Field in the field, the data will simply be added to the field. If information exists in the field, and the load file contains information for a Matching Field value which already exists in the field as well as new information, the existing value will be overwritten, but the new information will not be added to the fields as seen below:

Ignore First Line – If the first line of a load file contains column headers or field labels click the
 checkbox to skip this line when uploading data from the load file into the field.
Delimiters – This allows the user to choose the delimiters within the load file. The default for Delimiters is Concordance Default.
Load File – Click the
 button to browse to the load file that will be used to upload information into the field.
Delete Field -- Select a field from the list and click Delete Field to remove it.
.png)
 icon will be displayed in the Module Navigation. If the export had any issues, the
  icon will be displayed in the Module Navigation. Next to the Export icon is the Export Name. The Export Tree View when expanded has the following values:


 checkbox to skip this line when uploading data from the load file into the field.
 button to browse to the load file that will be used to upload information into the field.