Image QC Workflow Overview
The Reveal QC application quality checks Imaging Jobs within the project. Even though Discovery Manager only images original files, all counts displayed are total counts meaning they have both original and duplicate files included in the counts.
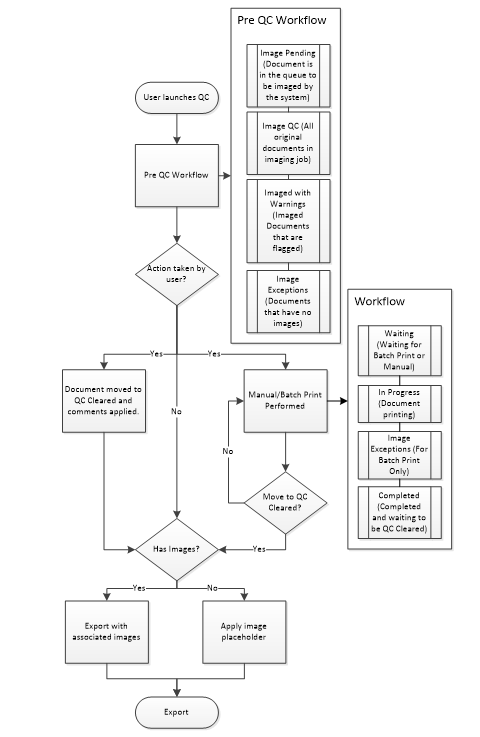
QC allows a user to quality check all Imaging Jobs or individual Imaging Jobs within the selected project. The QC workflow flowchart is displayed below. The end goal of QC is to find all files that do not have images or files that need to be printed manually, and move them to QC Cleared. All files do not have to be moved to QC Cleared. Any files that are moved to QC Cleared can have a comment associated with the files which can be exported as a field in the Export Load File, or used as a custom field on the brand of the image placeholder for files with no images.
All files that do not have images will be exported from Discovery Manager with an image placeholder. Because of this, starting with these files when quality checking an Imaging Job is recommended. All files that do not have images will be found in Image QC -> Image Exceptions. The idea here is to determine which files will have no images even when manually printed (e.g., executable files) and to move them to QC Cleared with a comment applied if necessary.
After the files that cannot be imaged are moved out of Image Exceptions, the files remaining will need to be printed manually. This can be done directly from Image QC, Image Exceptions or Imaged With Warnings, or these files can be moved to Manual where they will be placed in Manual Waiting for others to pick up and print manually as needed. After these files have been manually printed successfully they should be moved to QC Cleared and a comment applied if necessary.
It is advised to look at the files under Imaged With Warnings to see if any of the files within this group need to be put through the above workflow. These are files that have images but were also annotated with one or more of the QC Flags. If it is determined that a QC Flag is not needed, they can be removed from the user’s view as described below. All files that are within Imaged With Warnings do not have to be moved to QC Cleared. Only the files that need special handling through the QC workflow should be moved to QC Cleared (i.e. moved to QC Cleared via printing manually or erroring out the files removing all images).
Finally, it is recommended to do a spot check on the items within Image QC. All files that are within Image QC do not have to be moved to QC Cleared. Only the files that need special handling through the QC workflow should be moved to QC Cleared (i.e. moving to QC Cleared via printing manually or erroring out the files removing all images).

Quality Checking an Imaging Job

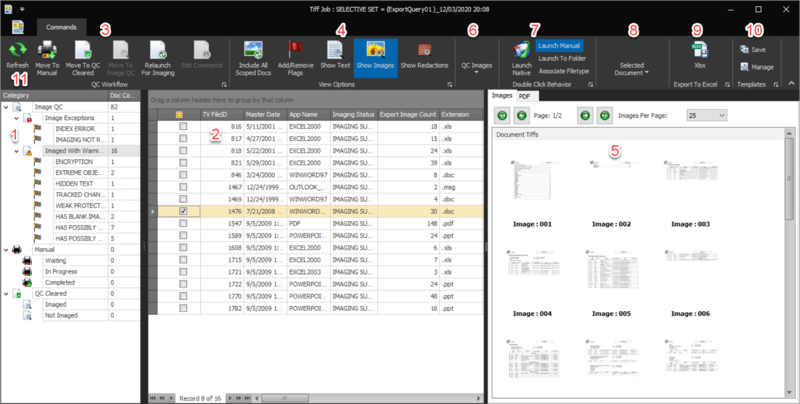
Category – The QC workflow has 3 top level categories. Each top level category also contains subcategories. When a user clicks on one of these categories, the QC table will be restricted to the view of just those files. As files are worked on in QC, the files will be moved from one category to another depending on the action taken on the file and when the user clicks the Refresh button. The following gives a breakdown of the categories:
Image QC – All original files within the Imaging Job.
Image Exceptions – All files that have no corresponding images.

Note
This is typically the best place to start within QC as these files do not have images and they may or may not be able to be imaged.
Imaged With Warnings – All files that have images but were also flagged by one or more QC Flags.
Manual – All files within the manual workflow. It is possible to manually print more than one file at a time on a single machine. There is no limitation on this; the files actually print within the printer one file at a time but multiple files can be sent to the printer.
Waiting – File(s) that have been moved to Manual in the QC workflow.
In Progress – When a file has been opened with the Double Click Behavior of Launch Manual or is in the process of being printed manually.
Completed – File(s) that have completed printing manually.
QC Cleared – The purpose of QC Cleared is to move files from Image QC to QC Cleared because they cannot be imaged (e.g. executable files) or from Manual Completed to QC Cleared. When moving files to QC Cleared, a custom comment can be added to the file(s) and can be used as a field in the Export Load File or as a custom field on the image placeholder for files with no images. These comments can be edited after the files are moved to QC Cleared as well. Files moved to QC Cleared are organized into the following two categories:
Imaged – Files that have images.
Not Imaged – Files that do not have images. These images will have an image placeholder when exported out of Discovery Manager.
Note
More than 1 file can be moved to QC Cleared, and the same controls that exist in Previews can be used. For example, a user can group the QC Documents Table by the Extension field to find all files with the same extension to move to QC Cleared.
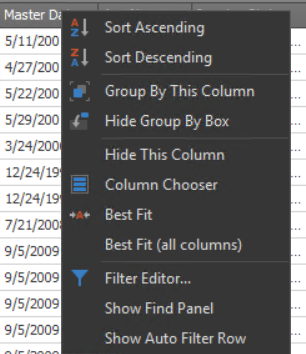
QC Table – The QC table is used to navigate file by file within QC. Files may be selected for action using the checkbox for each row. To view a file within the viewer, click on the row in the table and the file’s images and text (depending on the View settings) will be displayed in the viewer. The up and down keys can be used to go from/to the previous/next file. To see the available settings/options, right click on the table column headers and the following form will appear:

Sort – To sort the table by a particular column, click the column header or right click on the column headers and choose Sort Ascending or Sort Descending.
Group By – To group the table by a particular column, drag and drop that column above the column headers or right click on the column headers and choose Group By This Column. To clear a grouping right click next to the field the table is grouped by and choose Clear Grouping.
Column Management – To add or remove columns within the table, click Column Chooser and a listing of all available fields will be displayed. To add the field as the last field in the table, double click on the field in the Column Chooser box. To add the field to a certain location in the table, drag and drop the field to the desired position.
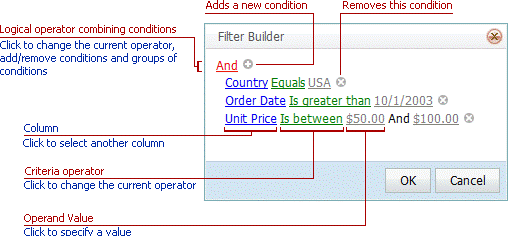
Filter Preview Table – To filter the Preview table, click on the Filter Editor and the following form will appear:

QC Workflow – To move a file(s) in the QC workflow, click the checkbox
 next to the file(s) in the QC Table and click the applicable QC Workflow button. The file(s) will receive an icon in the Pending Action column within the QC table providing the user the location where the file(s) will be moved in the QC workflow once the user clicks the Refresh button
Move To Manual – To move files to the Manual Imaging Workflow, select the file(s), click the Move To Manual button, and click the Refresh button. This will move the files to Manual Waiting. Alternatively, a file can be printed manually immediately out of the Image QC population. To launch a file to print it manually, click the Launch Manual button, double click on the row within the QC table for the file, format the file if needed and print it manually.
Note
When a file is launched to print manually, the print driver is set automatically to the appropriate driver.
Move to QC Cleared – The purpose of moving files to QC Cleared is to add the custom comment to the files. For example, if a file is an executable file, no images will be created for this file, so this file could be moved to QC Cleared with the comment ‘Cannot Image’. This comment field can be used to brand on the image placeholder as well as within the DAT file at export time. To move files to QC Cleared, select the file(s), click the Move To QC Cleared button, and click the Refresh button.
Move To Image QC – If a file needs to go through QC again (i.e. from QC Cleared), select the file(s), click the Move To Image QC button, and click the Refresh button.
Relaunch For Imaging – If having the system image errored files again is desired, select the file(s), click the Relaunch For Imaging button, and click the Refresh button.
Edit Comments – To edit the comments applied to files moved to QC Cleared, select the file(s), click the Edit Comments button, and click the Refresh button.
View Options – There are three different View Options that can all be enabled or singularly enabled:
Include All Scoped Docs – All documents within the selected QC scope will be viewable by default.
Add/Remove Flags – QC Flags are the individual flags that are displayed underneath the QC categories. By default, all QC Flags are shown when QC is launched for an Imaging Job. To remove a QC Flag from the view, click the Add/Remove Flags button and deselect the flag(s) that need to be removed.
Show Text – The Text tab for the selected file within the QC table will not be displayed within the viewer by default. To show the Text tab for the selected file, click the Show Text button.
Show Images – The images tab for the selected file within the QC Table will be displayed within the viewer by default. To remove the image tab from the viewer, click the Show Images button.
Show Redactions – Any redacted images and text for the selected file within the QC table will not be shown within the viewer by default. To show the redacted images and text for the selected file click the Show Redactions button.
Viewer – The viewer within QC can display images and text depending on the View Options selected within QC. By default, images will display within the viewer.
Images Viewer – Displays page images for the file selected within the QC table. The following are settings within the Images Viewer:
Page Navigation – To go to the previous or next page within the images viewer click the

 buttons respectively. To go to the first or last page within the file click the
 buttons respectively.
Images Per Page – By default, the Images Viewer will display 25 images per tab page at one time. To change this, click the
 drop-down menu and choose a different value.
Text Viewer – The text viewer will automatically highlight any search term(s) to which the file is responsive. To navigate between hits, click the Previous/Next Hit buttons.
Find – To search the file for a term that has not been added to the project, type the term into the Find textbox and click the Find button. The Previous/Next Hit buttons can be used to navigate between hits.
Note
To clear this term from the Previous/Next Hit navigation, remove the term from the Find textbox and click the Find button and this will clear the search.
QC Images – The goal of QC Images is to remove any blank pages from a file. To assist in this, Discovery Manager has the following features:
Blank Page Detection – Images identified as being blank are not exported by Discovery Manager. These images are represented in the Images Viewer with red text for their page number. To isolate these files within the QC table, click the HAS BLANK IMAGES flag under Add/Remove Flags. To view just the images that are blank, deselect Show Valid Images and Show Possibly Blank Images.
Possibly Blank Pages Detection – Images identified as being possibly blank will be exported by Discovery Manager. These images are represented in the Images Viewer with orange text for their page number. To isolate these files within the QC table, click the HAS POSSIBLY BLANK IMAGES flag under Add/Remove Flags. To view just the images that are possibly blank, deselect Show Valid Images and Show Blank Images.
Mark Blank – To mark a page blank, click on the page in the Images Viewer and click the Mark Blank button. To mark several pages blank, hold the Ctrl button while selecting several pages and click the Mark Blank button. Any image marked blank will have its page number text changed to red and will not be exported out by the system.
Mark Valid – To mark a page valid that was marked as blank by the system or by a user, click on the page in the Images Viewer and click the Mark Valid button. To mark several pages valid, hold the Ctrl button while selecting several pages and click the Mark Valid button. Any image marked blank will have its page number text changed to black and will be exported out by the system.
Double Click Behavior – The double click behavior defines what will happen when a user double clicks on a row within the QC table. There are three settings only one of which can be used at a time:
Launch Native – This is the default setting. When a user double clicks on a row within the QC grid, it will launch that file to the native application that file is associated with within Windows.
Launch Manual – To launch a file to print it manually, click the Launch Manual button, double click on the row within the QC table for the file, format the file if needed, and print it manually.
Note
When a file is launched to print manually, the print driver is set automatically to the appropriate driver.
Launch To Folder – To launch the native file to a folder to get a working copy of the native file, click the Launch To Folder button and double click on the row within the QC table.
Associate Filetype – If it is preferred that the file launch to a different application when the file is launched natively, click the Associate Filetype button, then double click on the row within the QC table and change the default application that the native file is associated with within windows. This is applicable when an alternative application is found to view the native file that is preferred over the previous native application, for example, WinWord Viewer as opposed to Word 2016.
Selected Document – The Selected Document section within QC provides the file’s Discovery Manager FileID as well as the file name of the document selected within the Preview table.
Export To Excel – To export the QC Documents table to an Excel file holding its groupings, counts, and columns, click the Export To Excel button.
Note
There is a grouping expand/collapse navigation within the Excel file. To use this navigation, open the Excel file and notice the numbers in the upper left hand corner next to the column A. This number will correlate to the number of grouping within the QC Documents table. For example, when exporting the Processing Exceptions -> File Exceptions this navigation will look like
 when it is opened. If ‘1’ is selected, all groupings will be collapsed to the top level, and so forth. Alternatively, the
 buttons can be used to expand/collapse individual groupings within the Excel file.
Templates – Templates provide the user the ability to save the current Preview settings, including selected fields, field groupings, etc., on the project and global level. This feature coupled with the Export To Excel feature allows users to create customizable reports. There are two buttons associated with Templates that manage these features:
Save – To save the current Preview’s settings, click the Save button, give the template a name, choose the Project Scope (Project to save the template only within the project, and Global to save the template across projects), then click Save.
Manage – To load a previously saved template, click the Manage button, choose the template, and click the Load Template button. There is also an option to select and delete a template here.
Refresh – To move files to their proper QC Category, click the Refresh button and the file will be moved to the proper location within the workflow.