Creating, Adding, and Managing Custom Fields
- 20 Jun 2024
- 7 Minutes to read
- Print
- DarkLight
- PDF
Creating, Adding, and Managing Custom Fields
- Updated on 20 Jun 2024
- 7 Minutes to read
- Print
- DarkLight
- PDF
Article summary
Did you find this summary helpful?
Thank you for your feedback

In this article you will learn:
What is a Custom Field?
How to Create a New Custom Field
How to Add a Custom Field
How to Manage Custom Fields
What is a Custom Field?
Onna admins (or members with special permissions to ‘manage custom fields’) have the ability to create new custom fields to be used across their Onna site. Custom fields can be added to workspaces and/or files to keep your data organized. Custom Fields are different from the tags in Onna as custom fields are rigid fields that associate a value to a field and are configured to files within a workspace.
How to Create a New Custom Field
To create a new custom field in Onna follow the steps below:
Step 1:
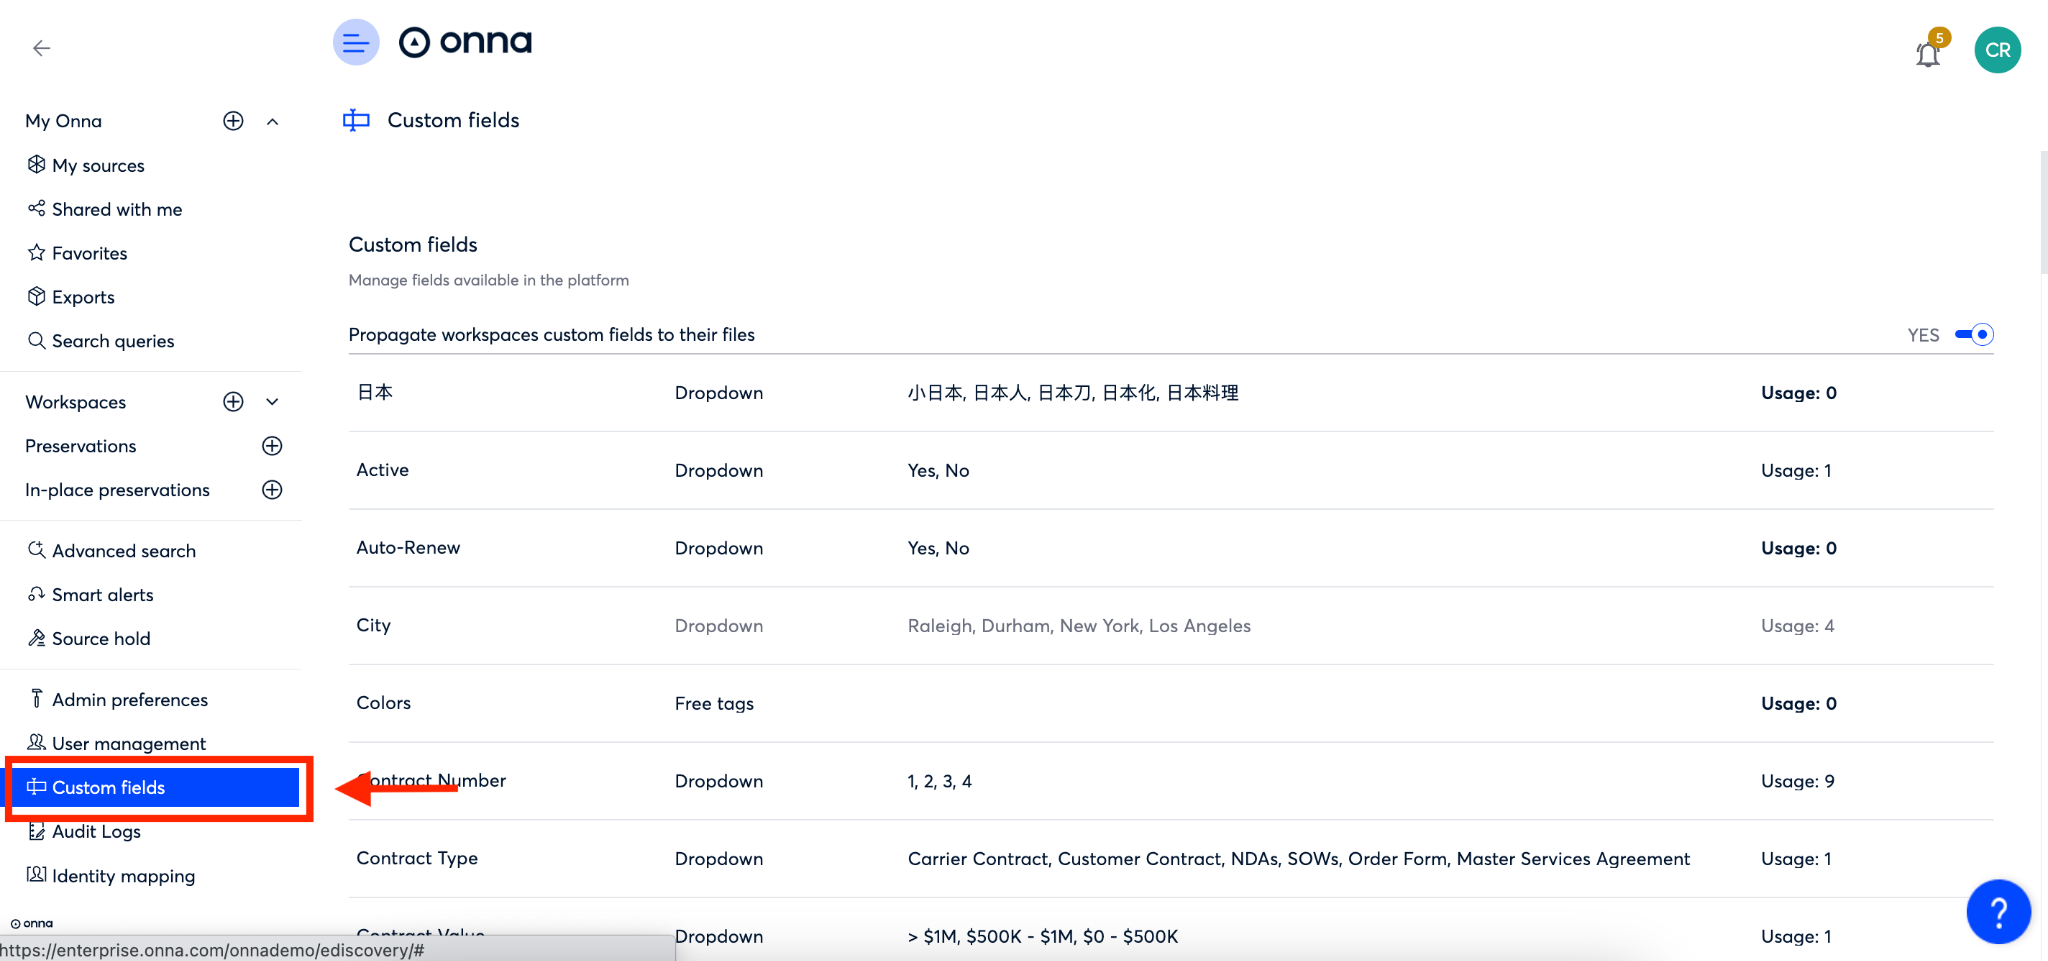
From the main menu select ‘Custom Fields’
Step 2:
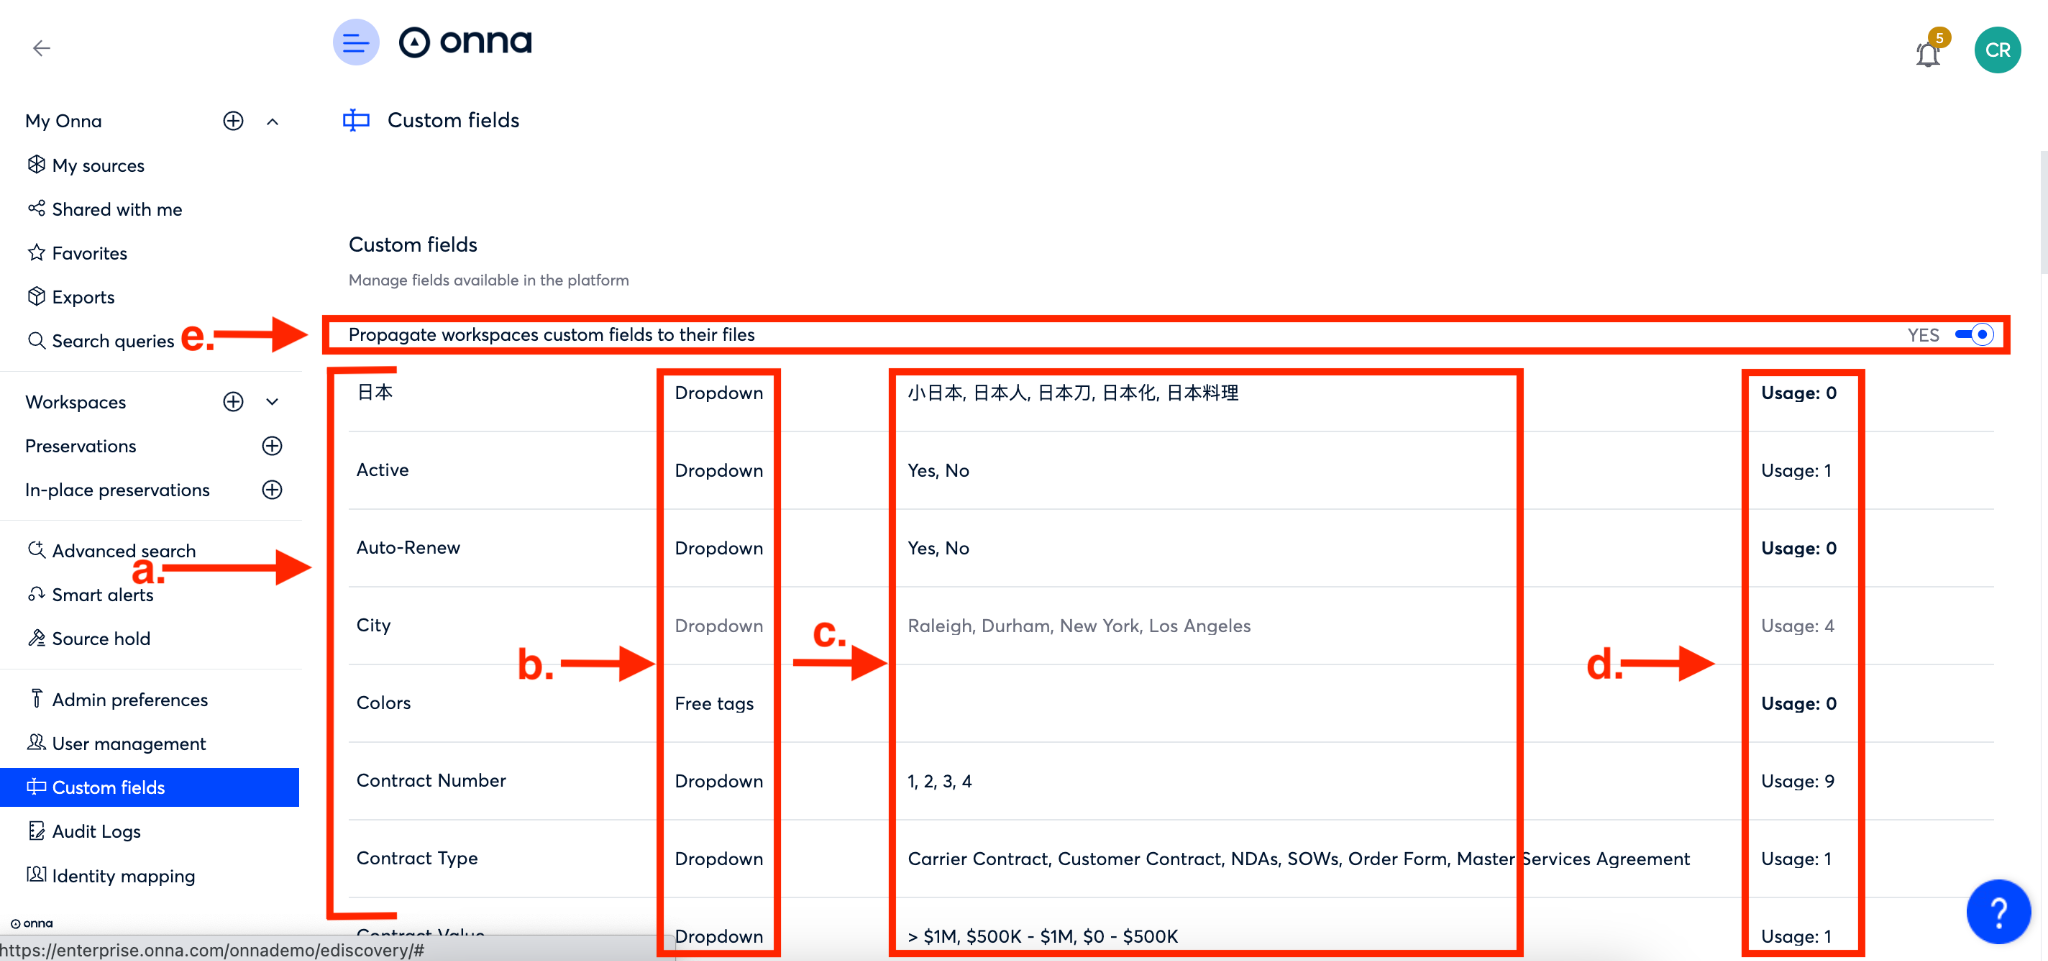
Once you’re on the ‘Custom fields’ page you will see a list of all your current custom fields. You will find the following details:
The name of the custom field
The type of custom field
The options available for the custom field (if applicable)
How many times that custom field has been used across the workspaces and files in your site.
At the top of the page there is also an option to ‘Propagate custom fields to their files’. If selecting this option, all custom fields added to a workspace will automatically be added to the files within that workspace.By default this feature is not turned on. To enable it, toggle to ‘Yes’.
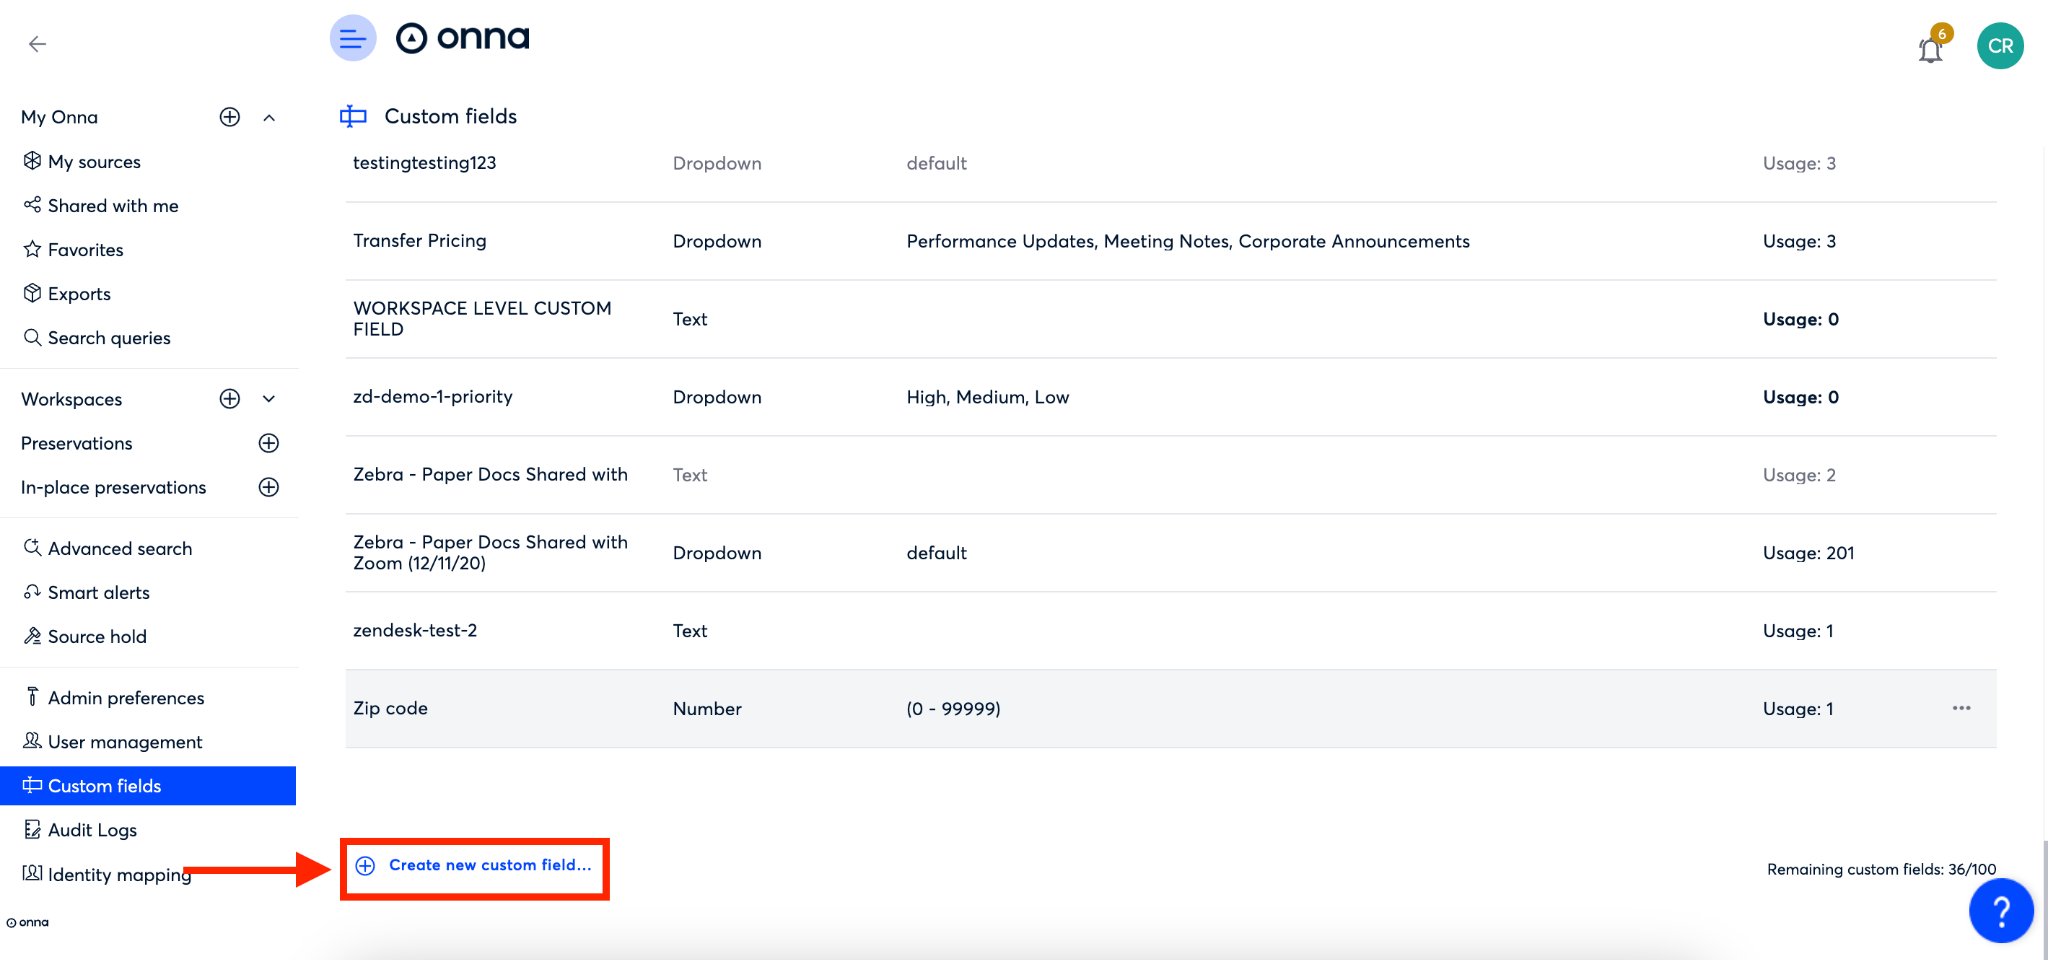
Step 3:
To add a new custom field scroll to the bottom of your list of current custom fields and click on ‘+ Create new custom field’
You will now have multiple options for types of custom fields. See below:
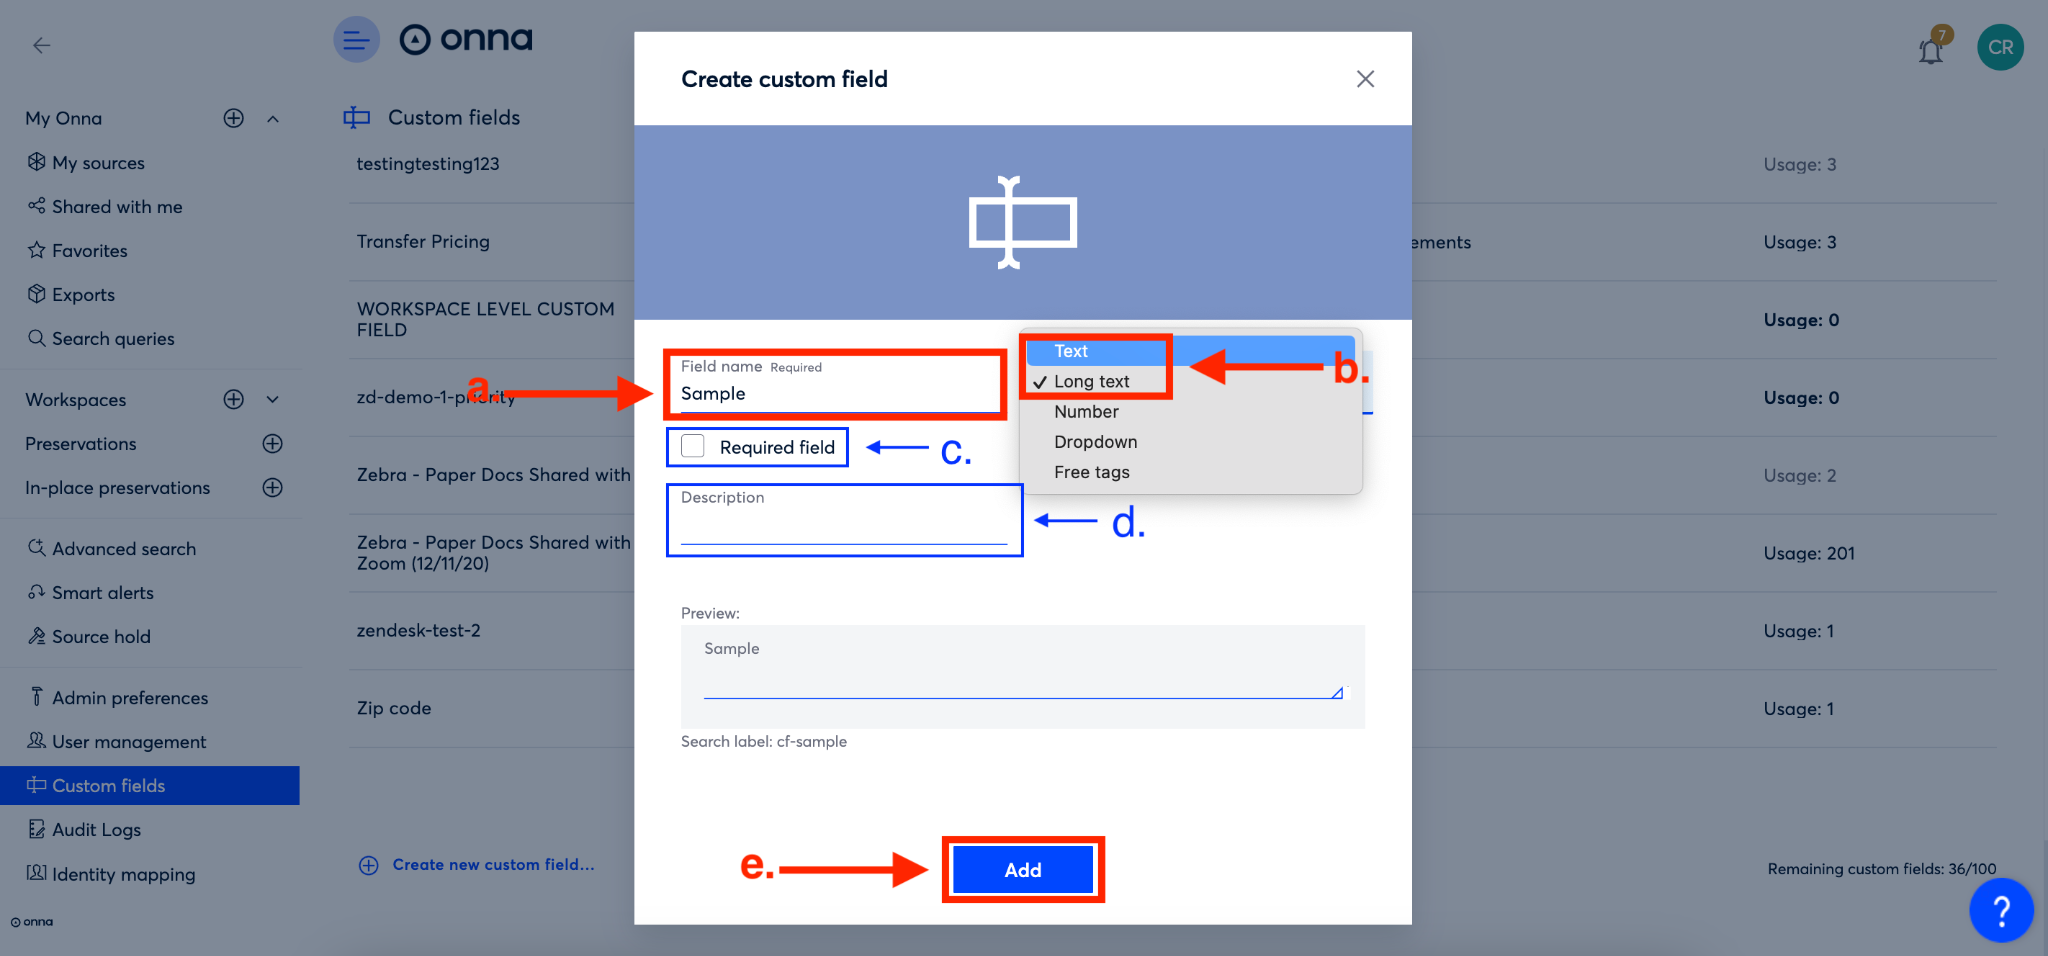
Option 1: Text/Long Text
These types of custom fields allow for the user to type one or multiple lines (Long text) of text into the field. To create:
Name your custom field
Select either ‘Text’ or ‘Long text’ from the ‘Type’ dropdown
(Optional) Mark as a required field
(Optional) Add a description of the field
Click the blue ‘Add’ button
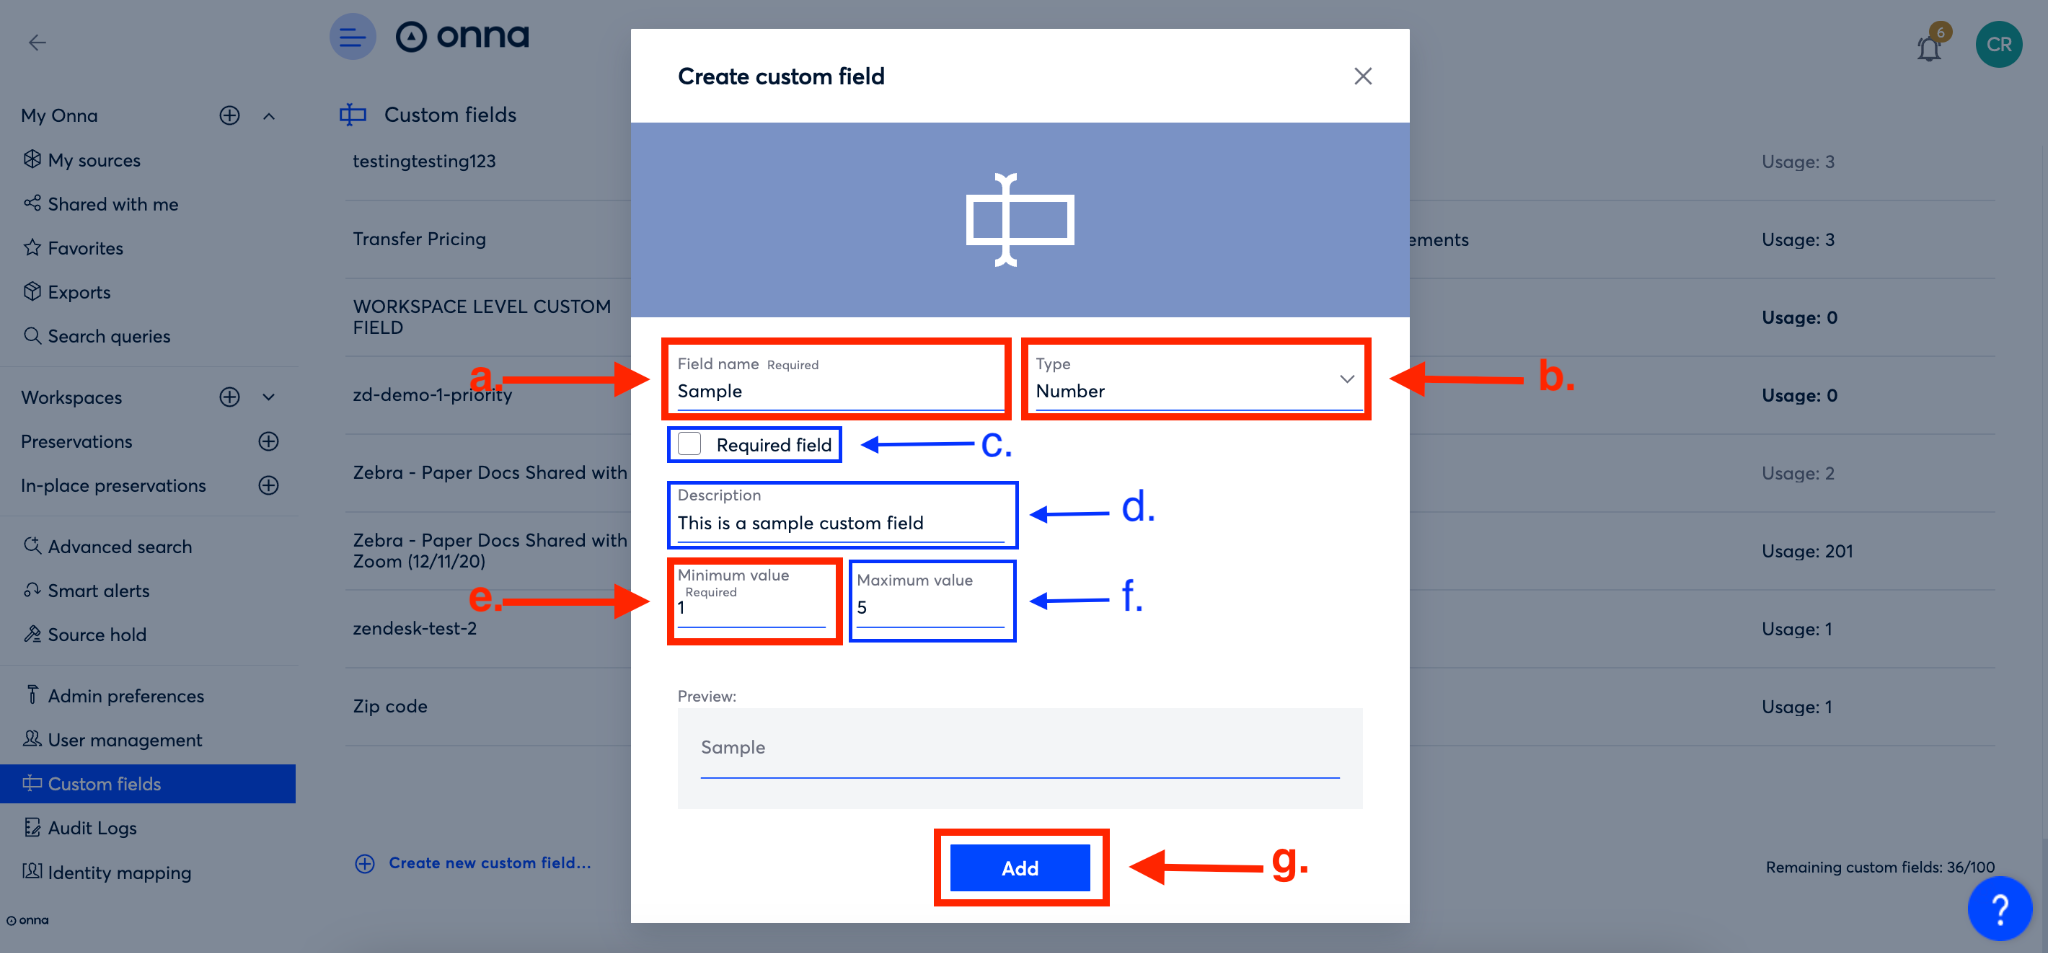
Option 2: Number
This type of custom field allows the user to enter a specific number into the field. While you must require a minimum value, you don’t need to have a maximum value for this field to create it. To create:
Name your custom field
Select ‘Number’ from the ‘Type’ dropdown
(Optional) Mark as a required field
(Optional) Add a description of the field
Set a minimum value
(Optional) Set a maximum value
Click the blue ‘Add’ button
Option 3: Dropdown
This type of custom field allows the user to make a selection from a set of options created by the admin. To create:
Name your custom field
Select ‘Dropdown’ from the ‘Type’ dropdown
(Optional) Mark as a required field
Add options for the choices in your drop down
Click the blue ‘Add’ button

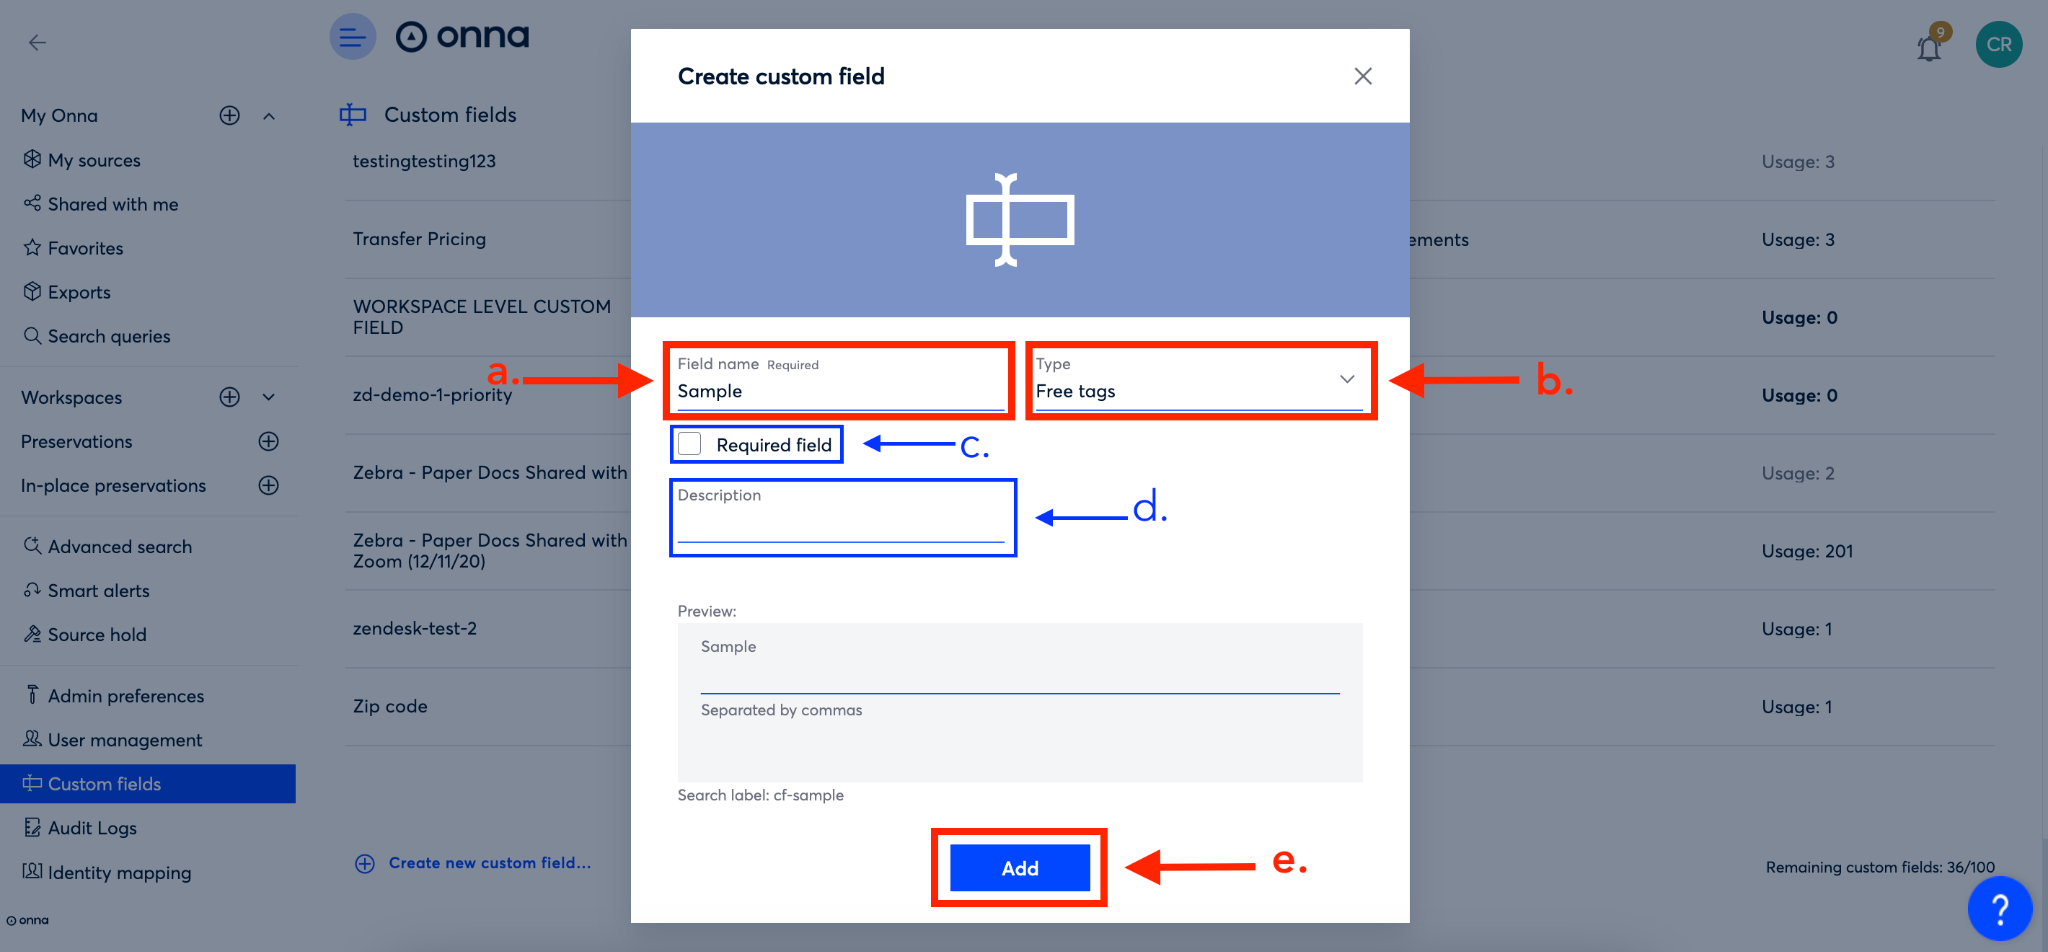
Option 4: Free Tags
This type of field may be used to add the option of free tagging only to certain workspaces or files if you don’t want to have free tagging universally available throughout the workspaces and files in your site. However, the field functions like the tagging feature in Onna. To create:
Name your custom field
Select either ‘Free tag’ from the ‘Type’ dropdown
(Optional) Mark as a required field
(Optional) Add a description of the field
Click the blue ‘Add’ button
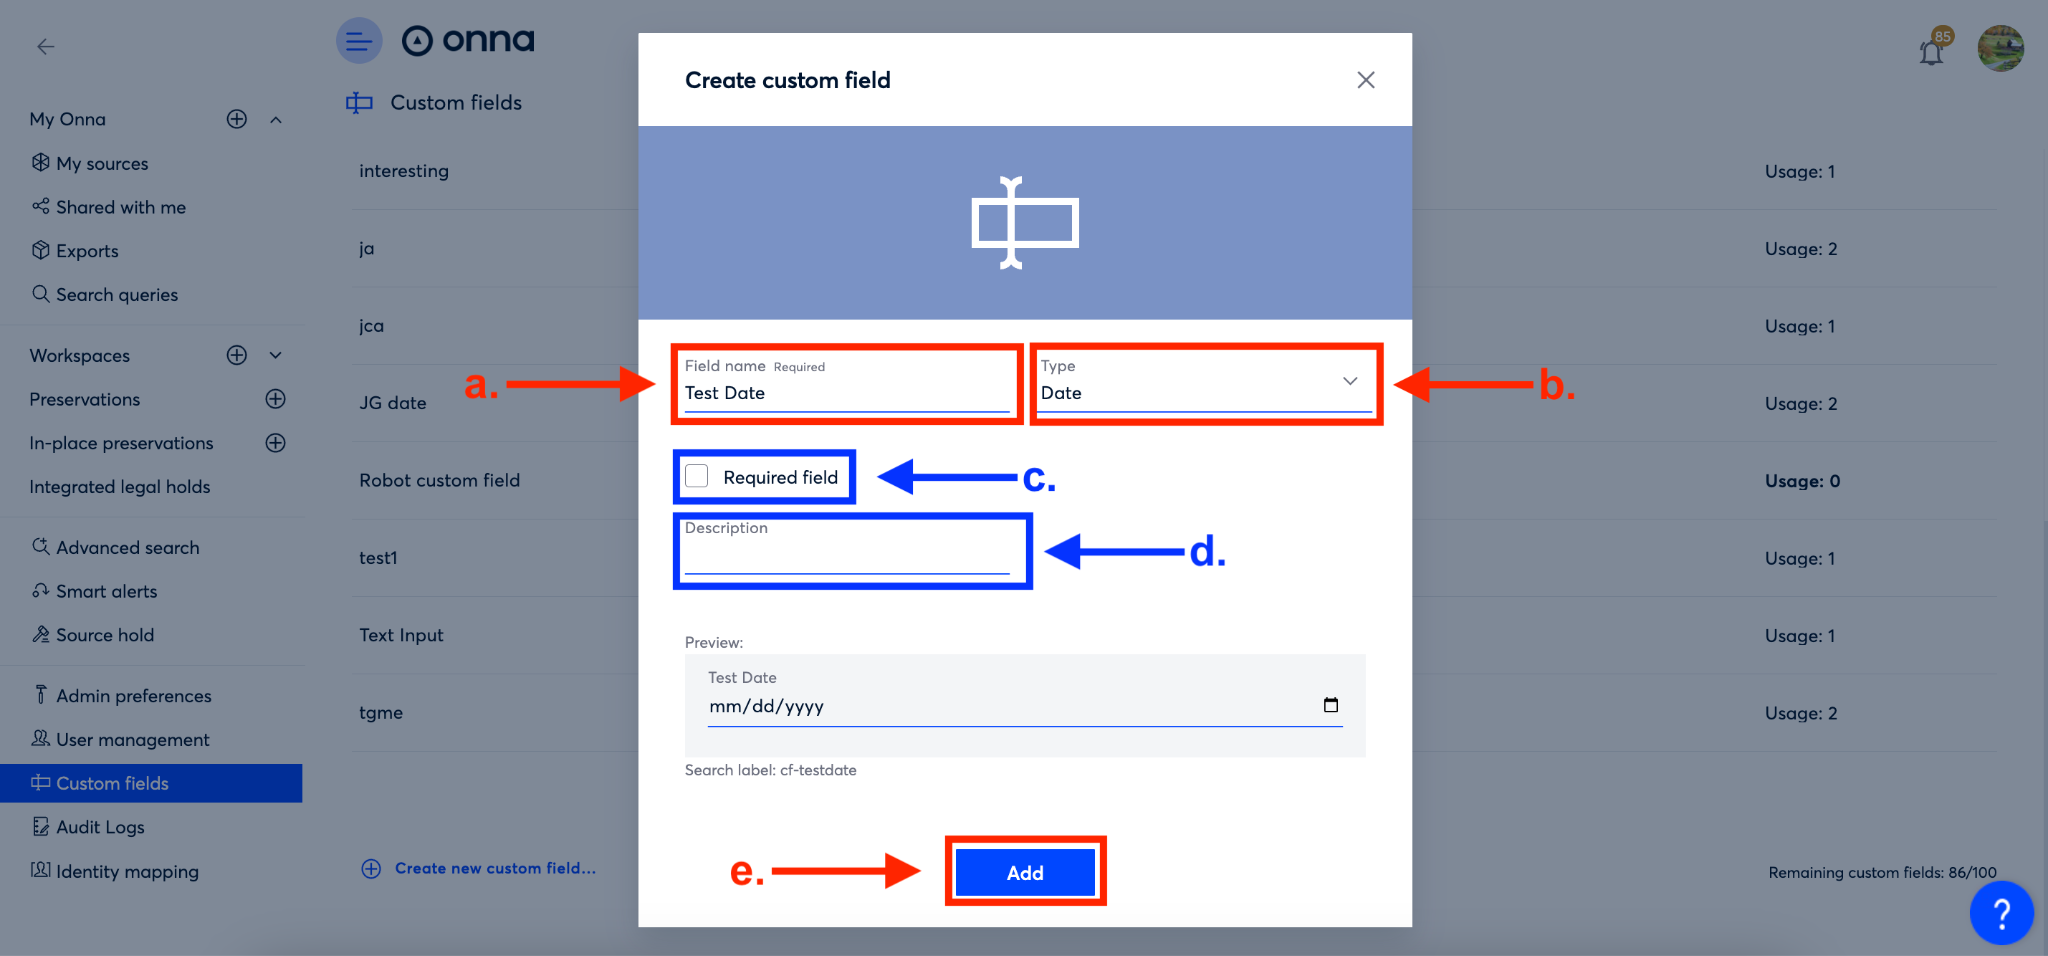
Option 5: Date
This type of custom field allows the user to enter a date into the field. To create:
Name your custom field
Select ‘Date’ from the ‘Type’ dropdown
(Optional) Mark as a required field
(Optional) Add a description
Click the blue ‘Add’ button
How to Add a Custom Field
Before a custom field can be seen in the information panel for the workspace or file so a value can be entered, the custom field must first be added to a workspace or file. Only workspace members with ‘manage’ permissions within the workspace can add custom fields to a workspace or workspace files. Additionally, workspace managers can only add custom fields that have already been created by an admin or member with special permissions to ‘manage custom fields’.
When adding custom fields it is helpful to understand that if your Onna admin has selected the option to ‘Propagate workspace custom fields to their files’ that any custom field you add to a workspace will also be added to all the files within that workspace. |
To add a custom field to a workspace or files follow the steps below:
How to Add a Custom Field to a Workspace
Step 1
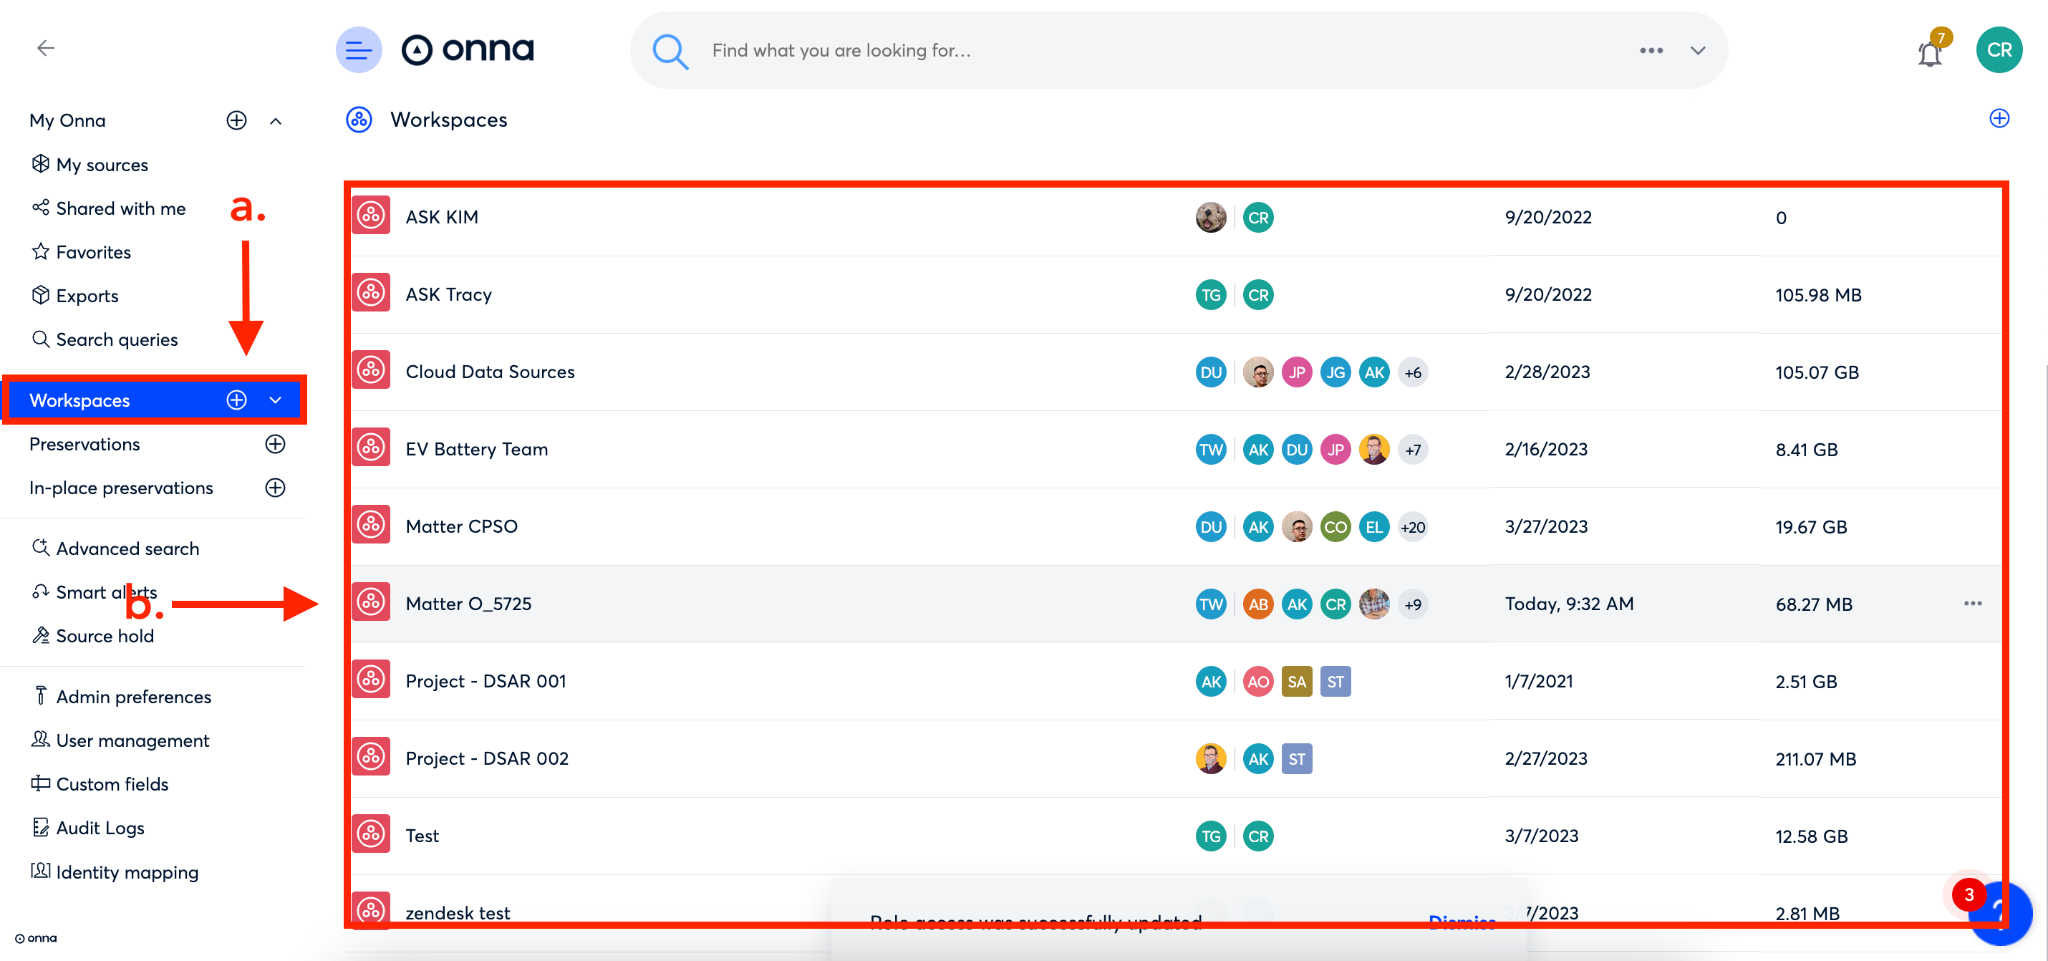
Navigate to your workspaces page from the main menu (a). Once on your ‘Workspaces’ page click into the workspace you want to add a custom field to (b).
Step 2
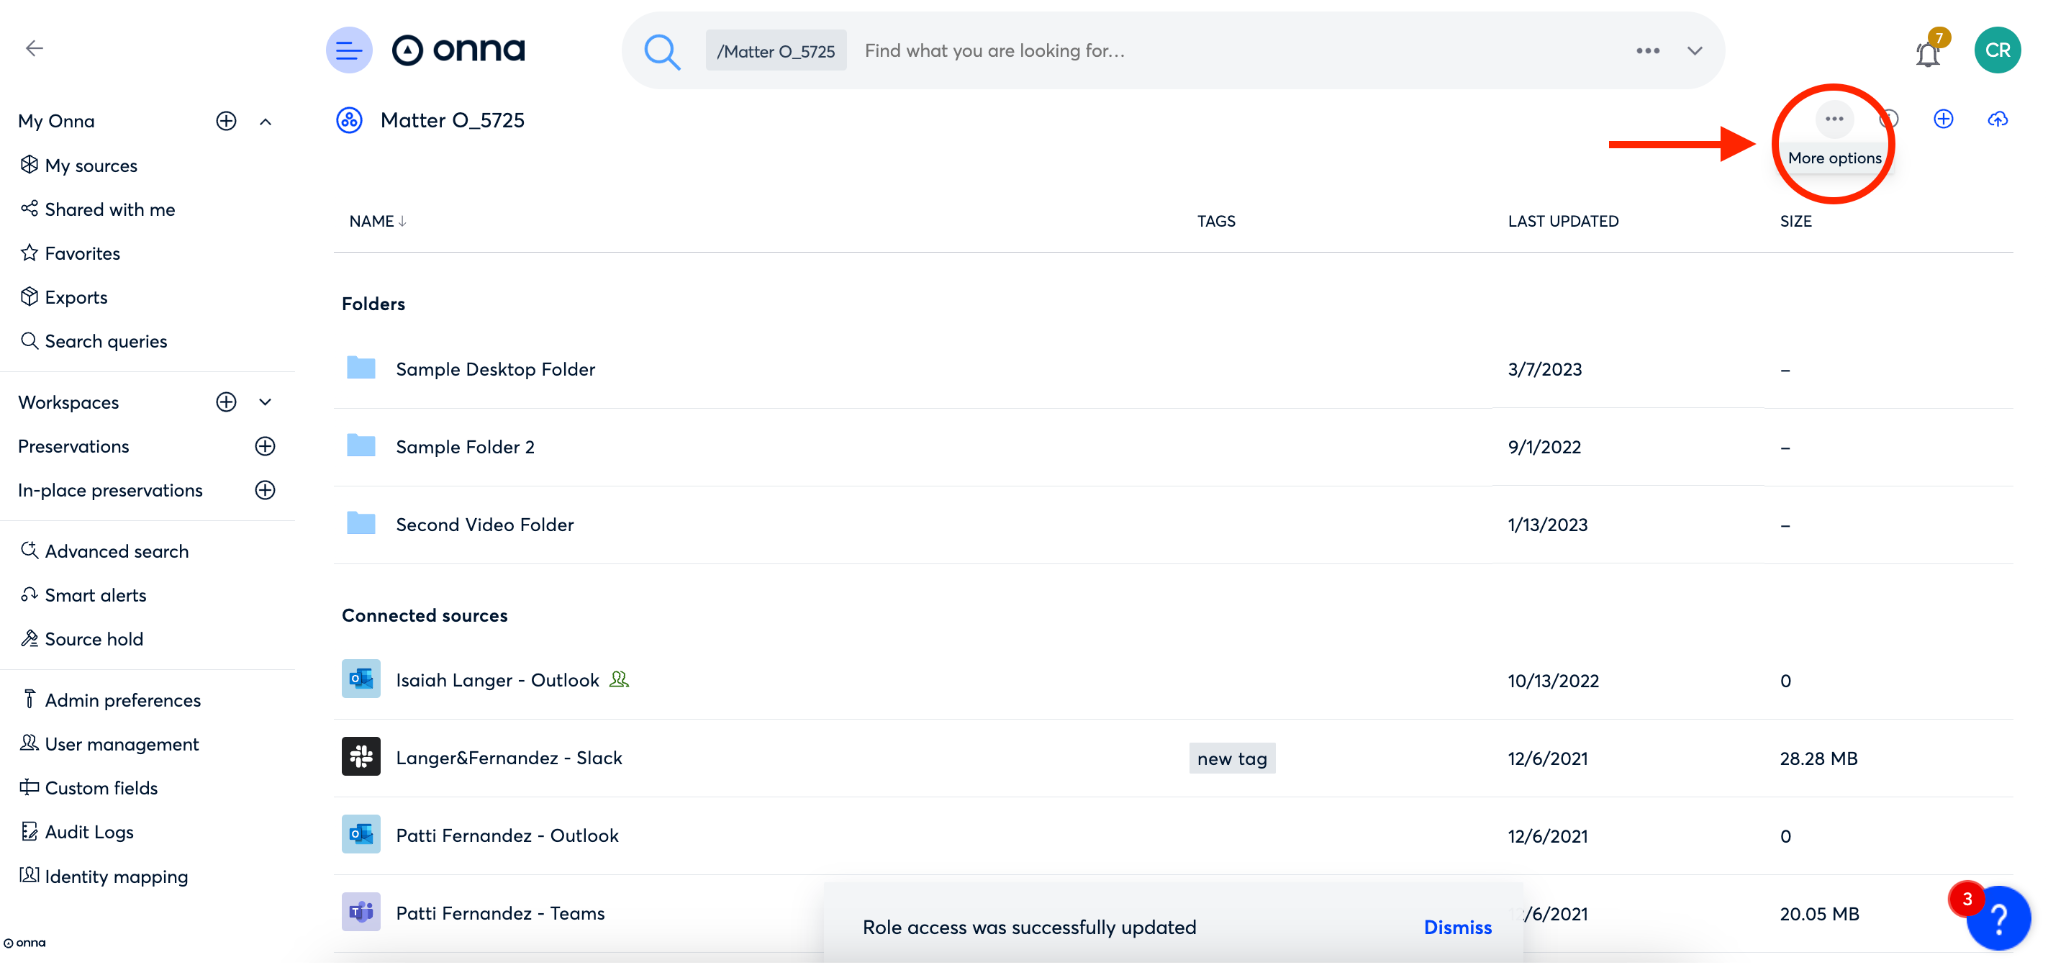
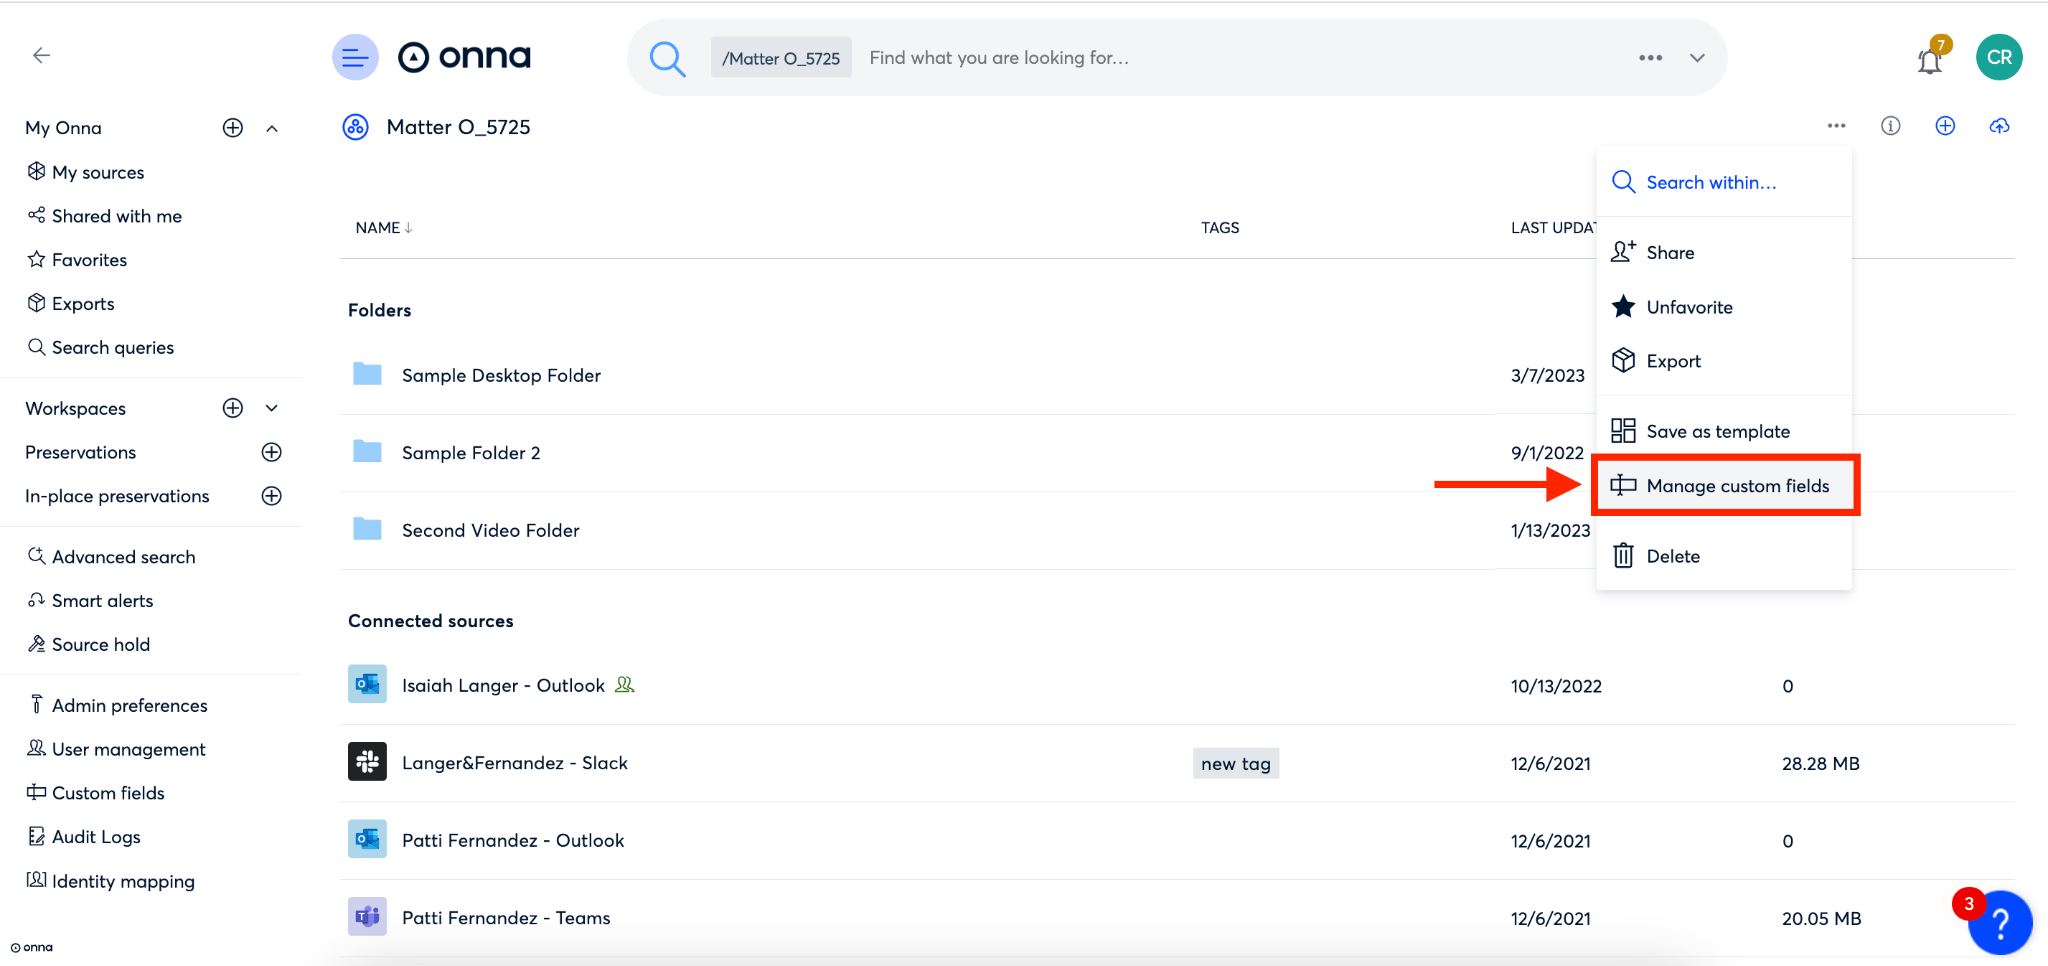
Once inside the workspace click on the ‘More options’ ellipsis icon in the upper right corner of the screen.
Step 3
From the dropdown menu that appears select ‘Manage custom fields’.

Step 4
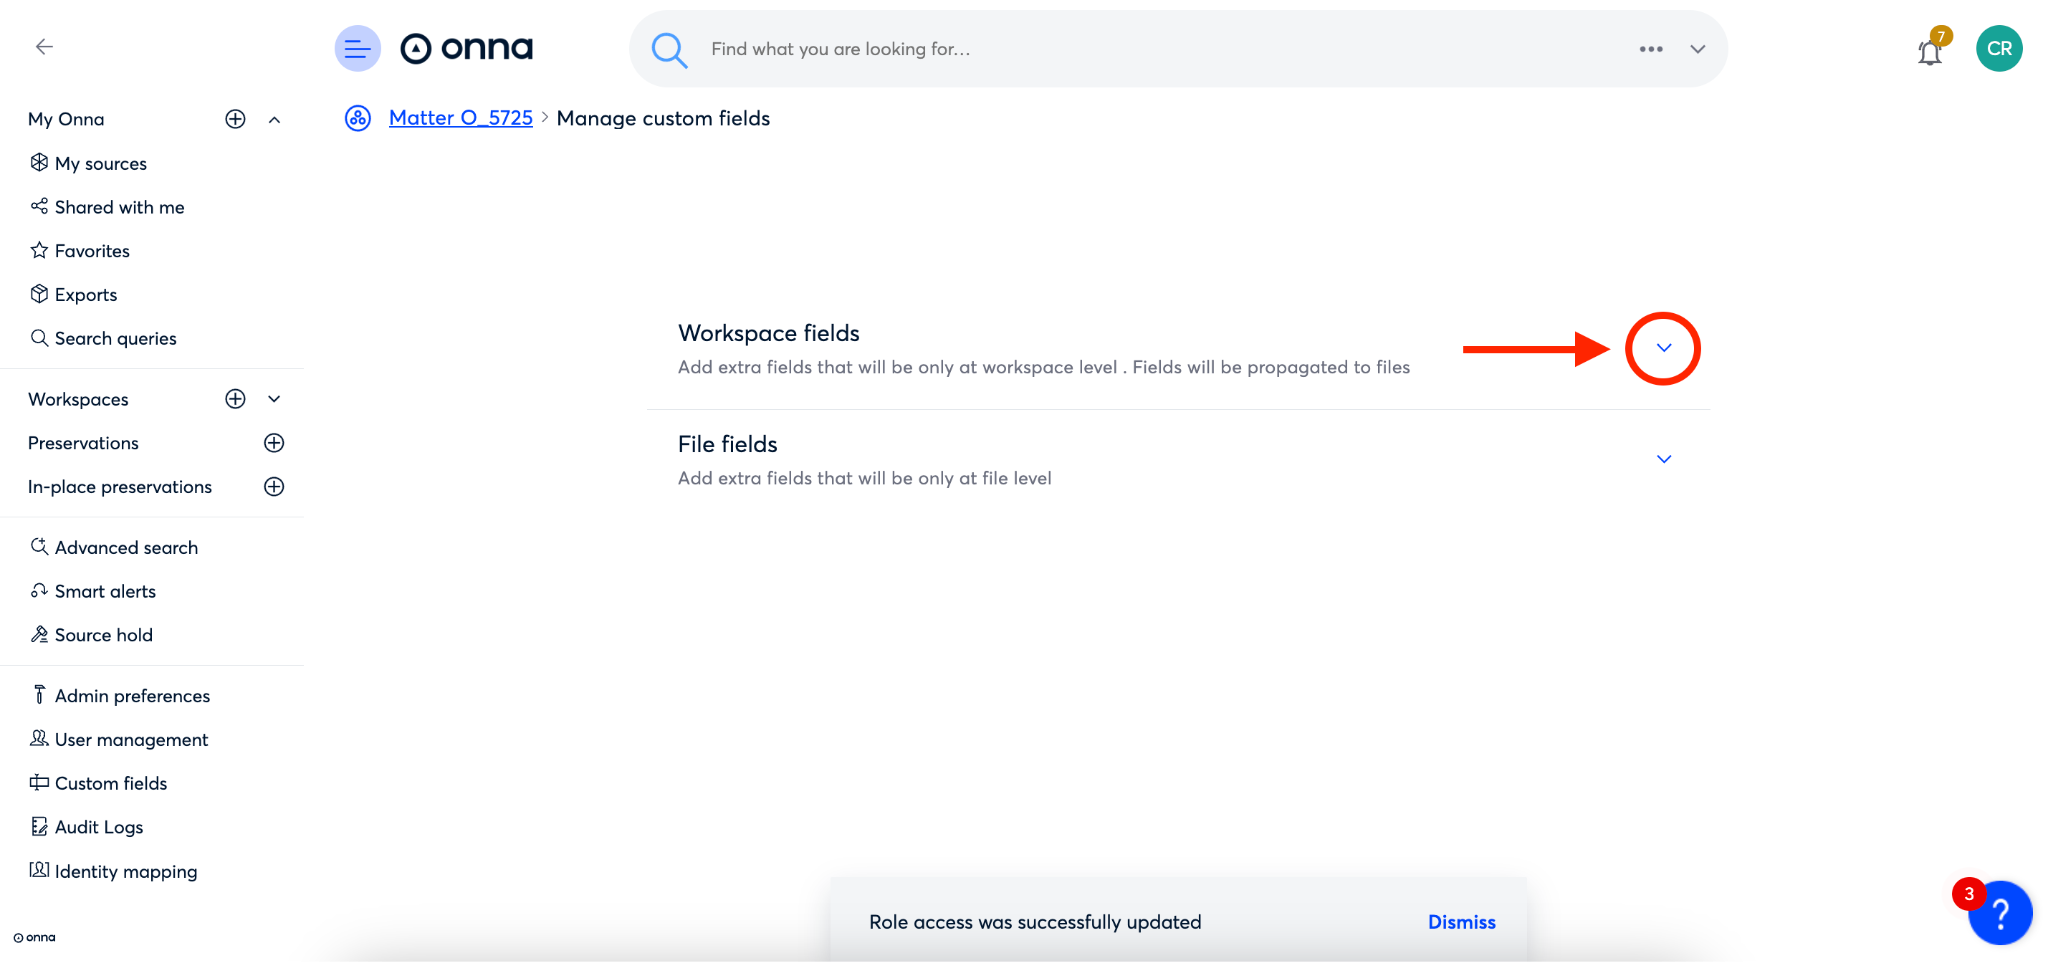
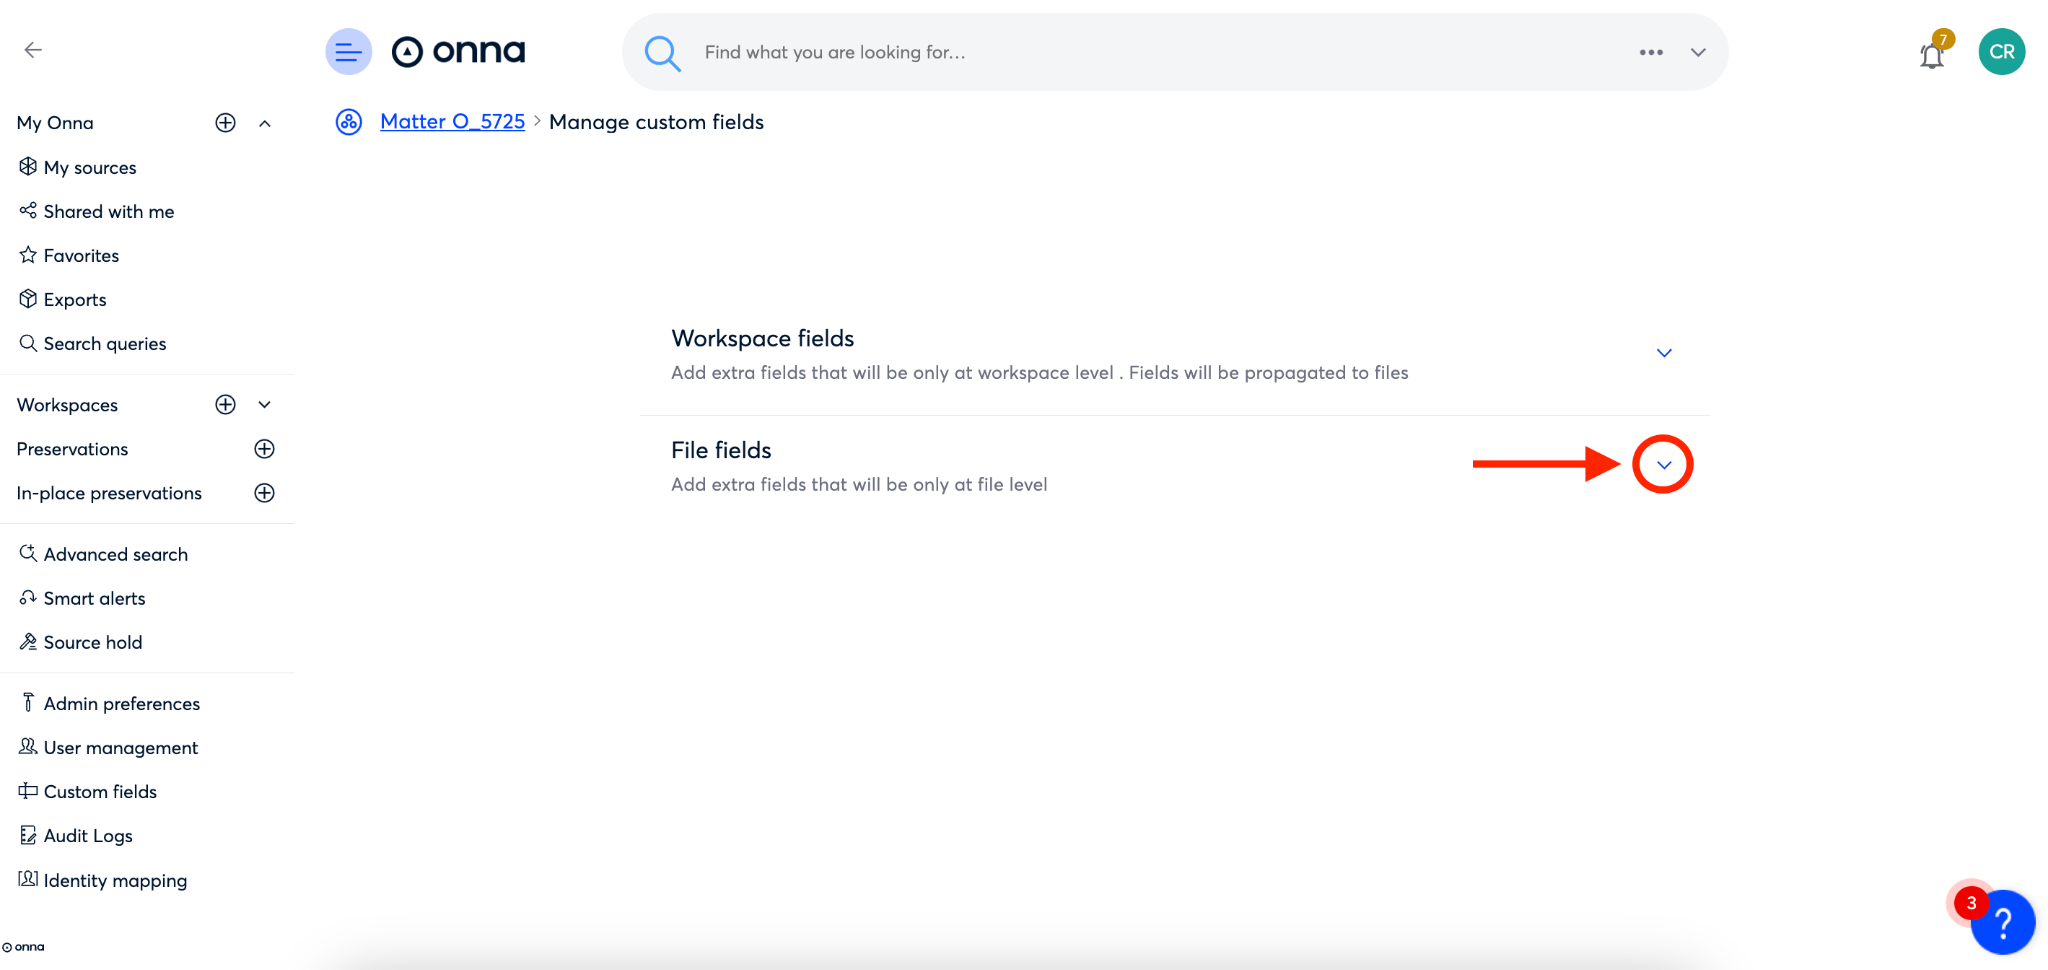
Once on the ‘Manage custom fields’ page click on the arrow to the right of ‘Workspace fields’
Step 5
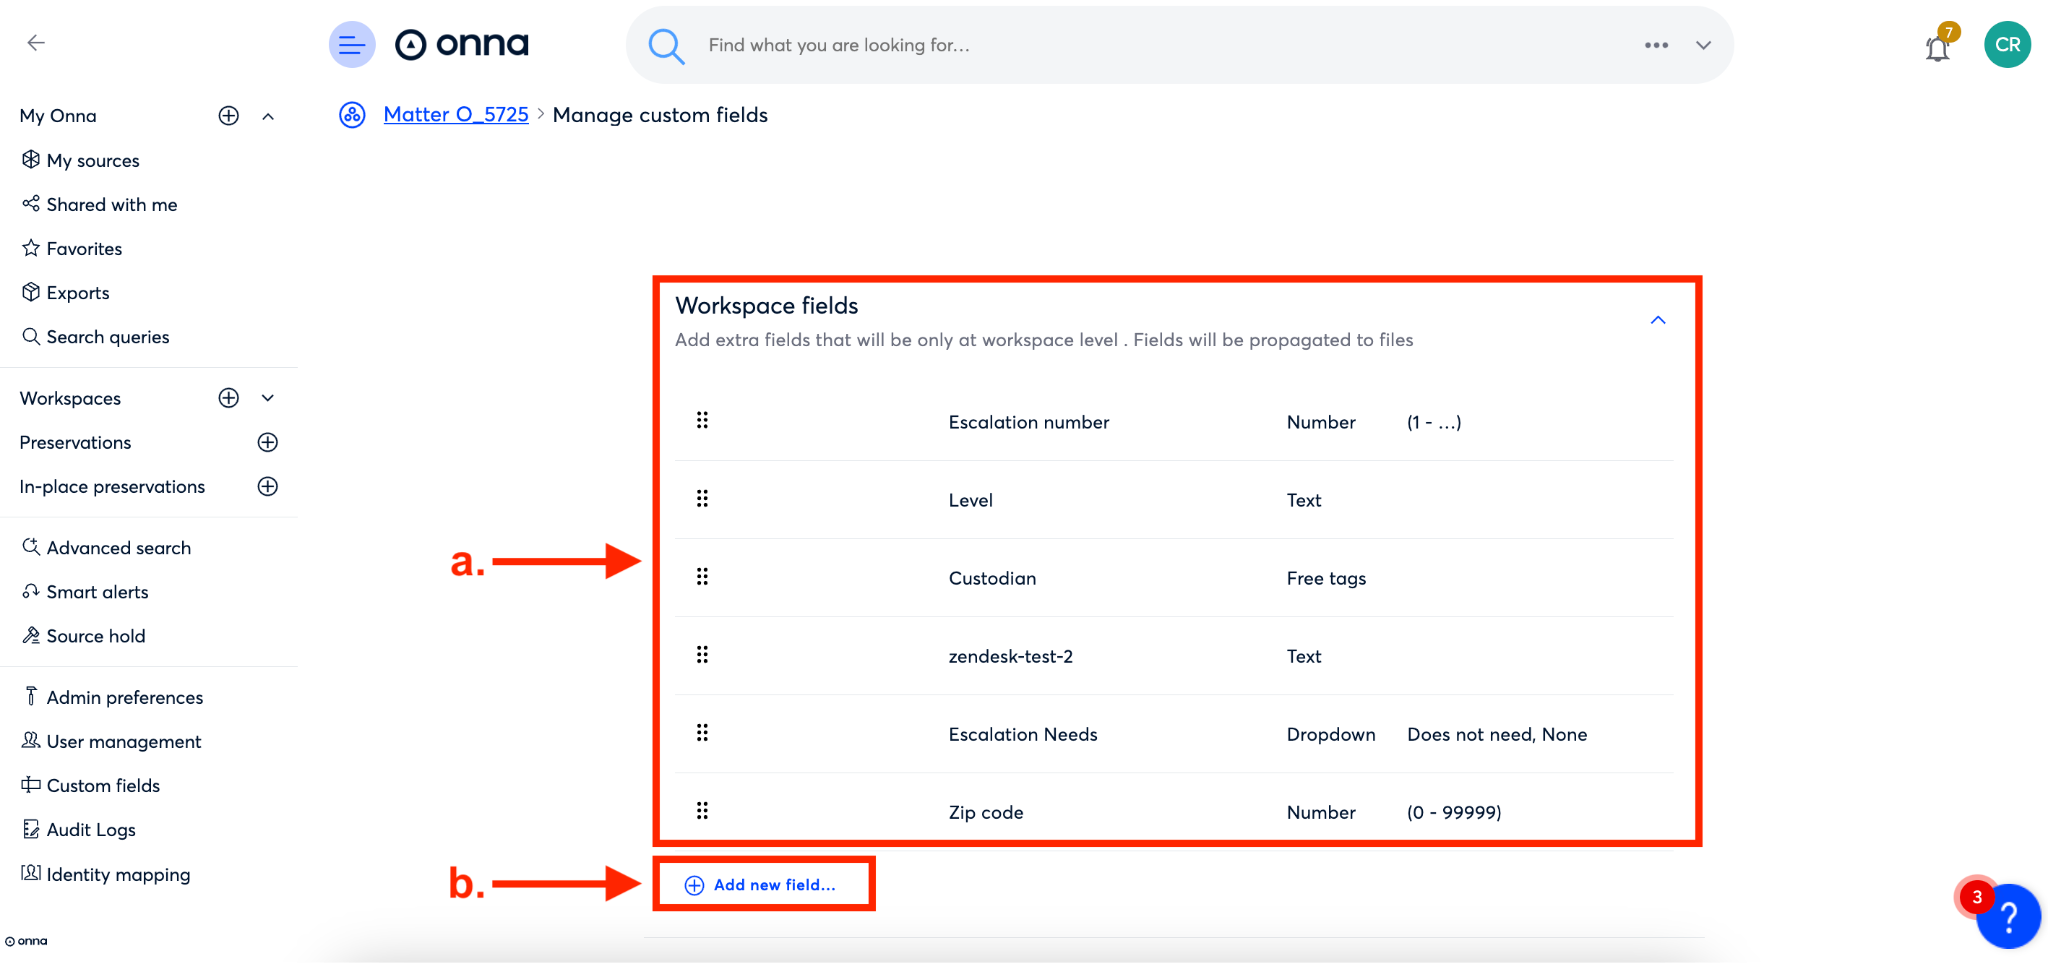
You’ll now see a list of custom fields that are already attached to this workspace (a). To add a new custom field that is not already on the list, click ‘Add new field’ (b) at the bottom of the list.
Step 6
You’ll now see a dropdown appear that includes all custom fields available for use on your site. You can search this list for a specific custom field using the search bar at the top, or you can scroll to find the custom field you need. Once you’ve found it simply click on the custom field you want to add.
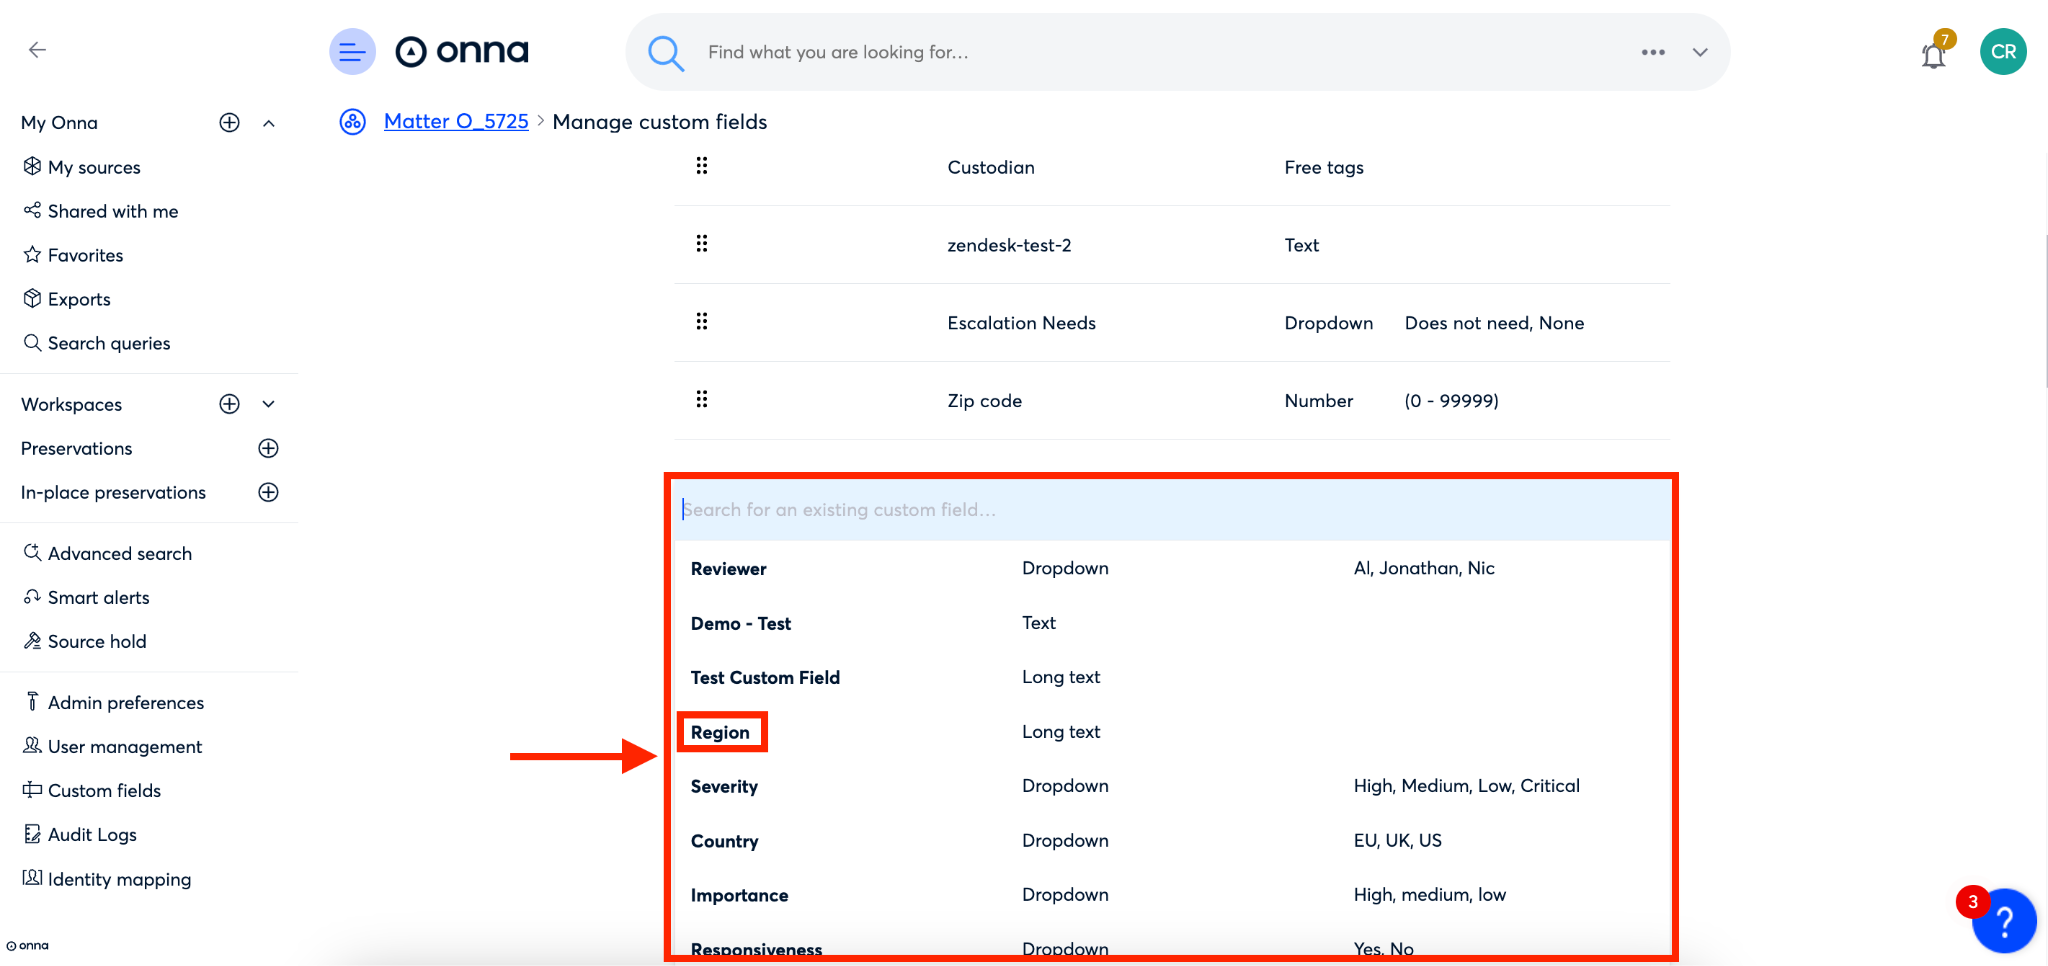
Step 7
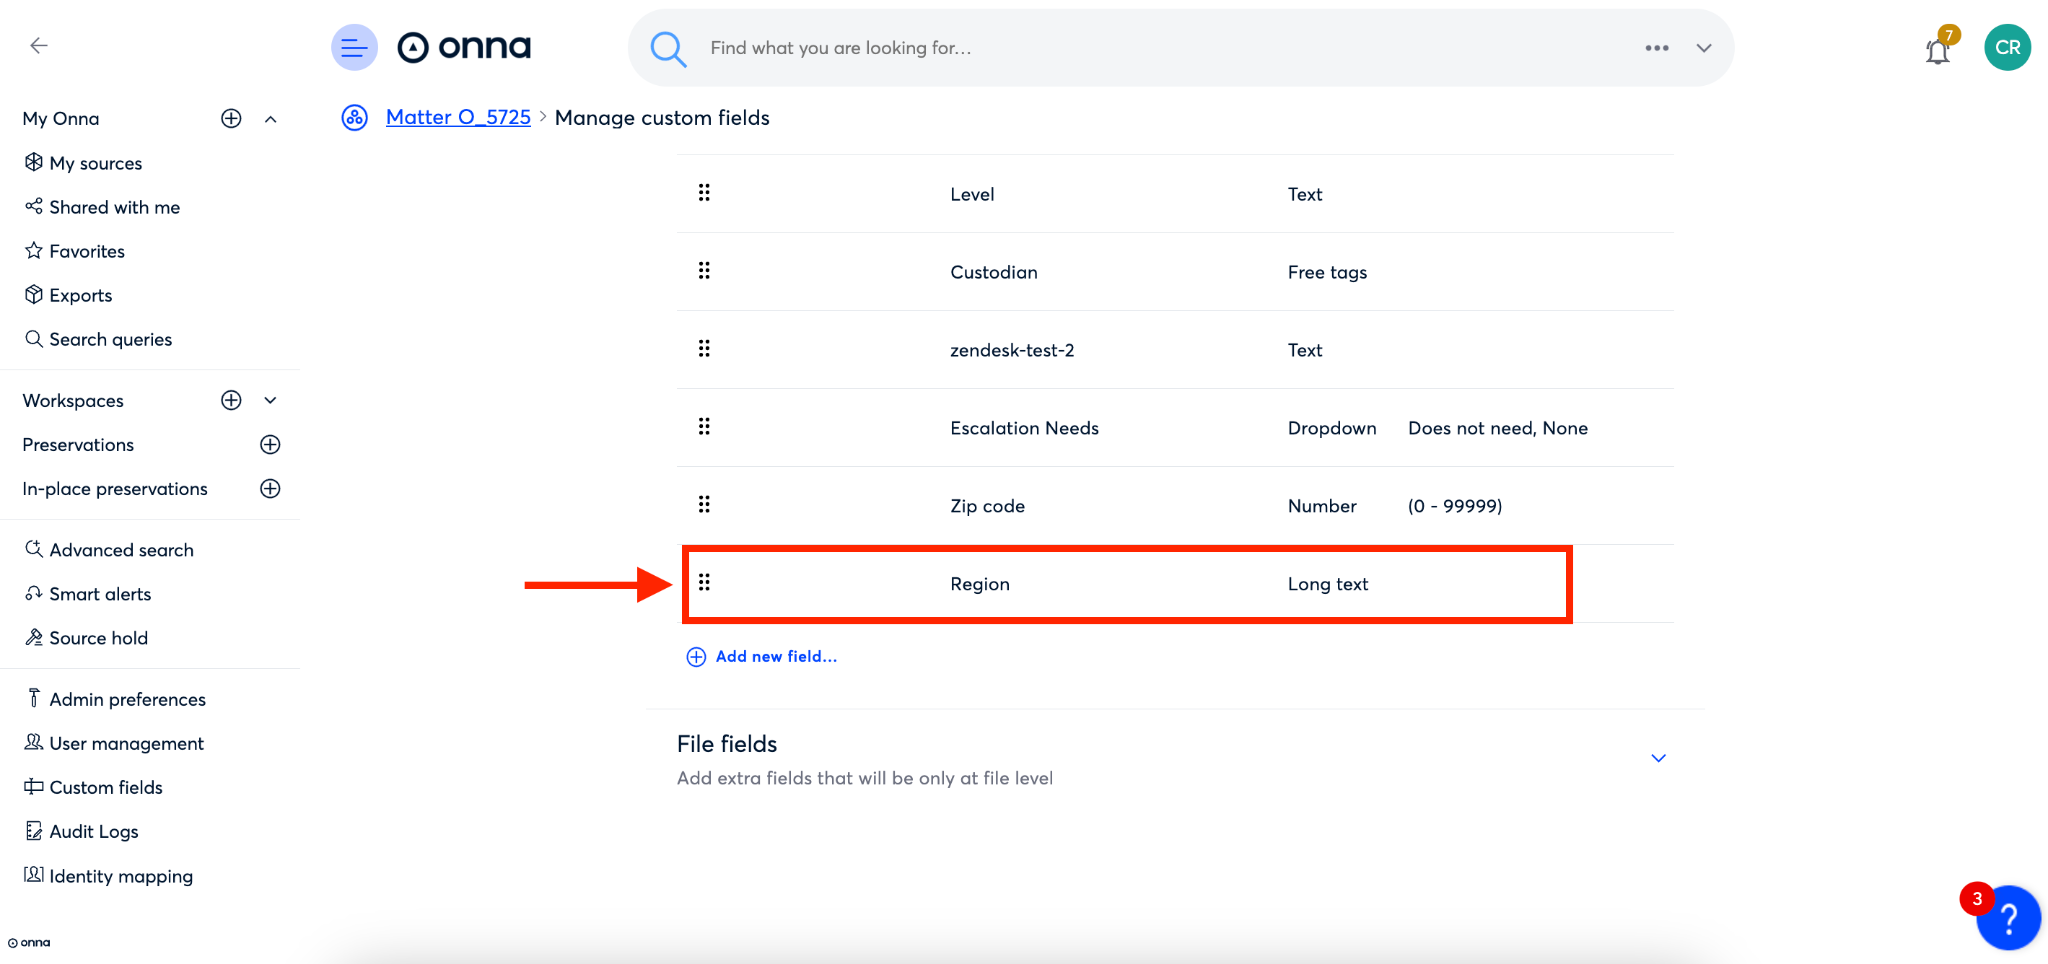
You’ll now see that the custom field you selected has been added to the list of custom fields associated with that workspace.
How to Add a Custom Field to Files
Step 1
Navigate to your workspaces page from the main menu (a). Once on your ‘Workspaces’ page click into the workspace where the files are located that you want to add a custom field to (b).

Step 2
Once inside the workspace click on the ‘More options’ ellipsis icon in the upper right corner of the screen.

Step 3
From the dropdown menu that appears select ‘Manage custom fields’.
Step 4
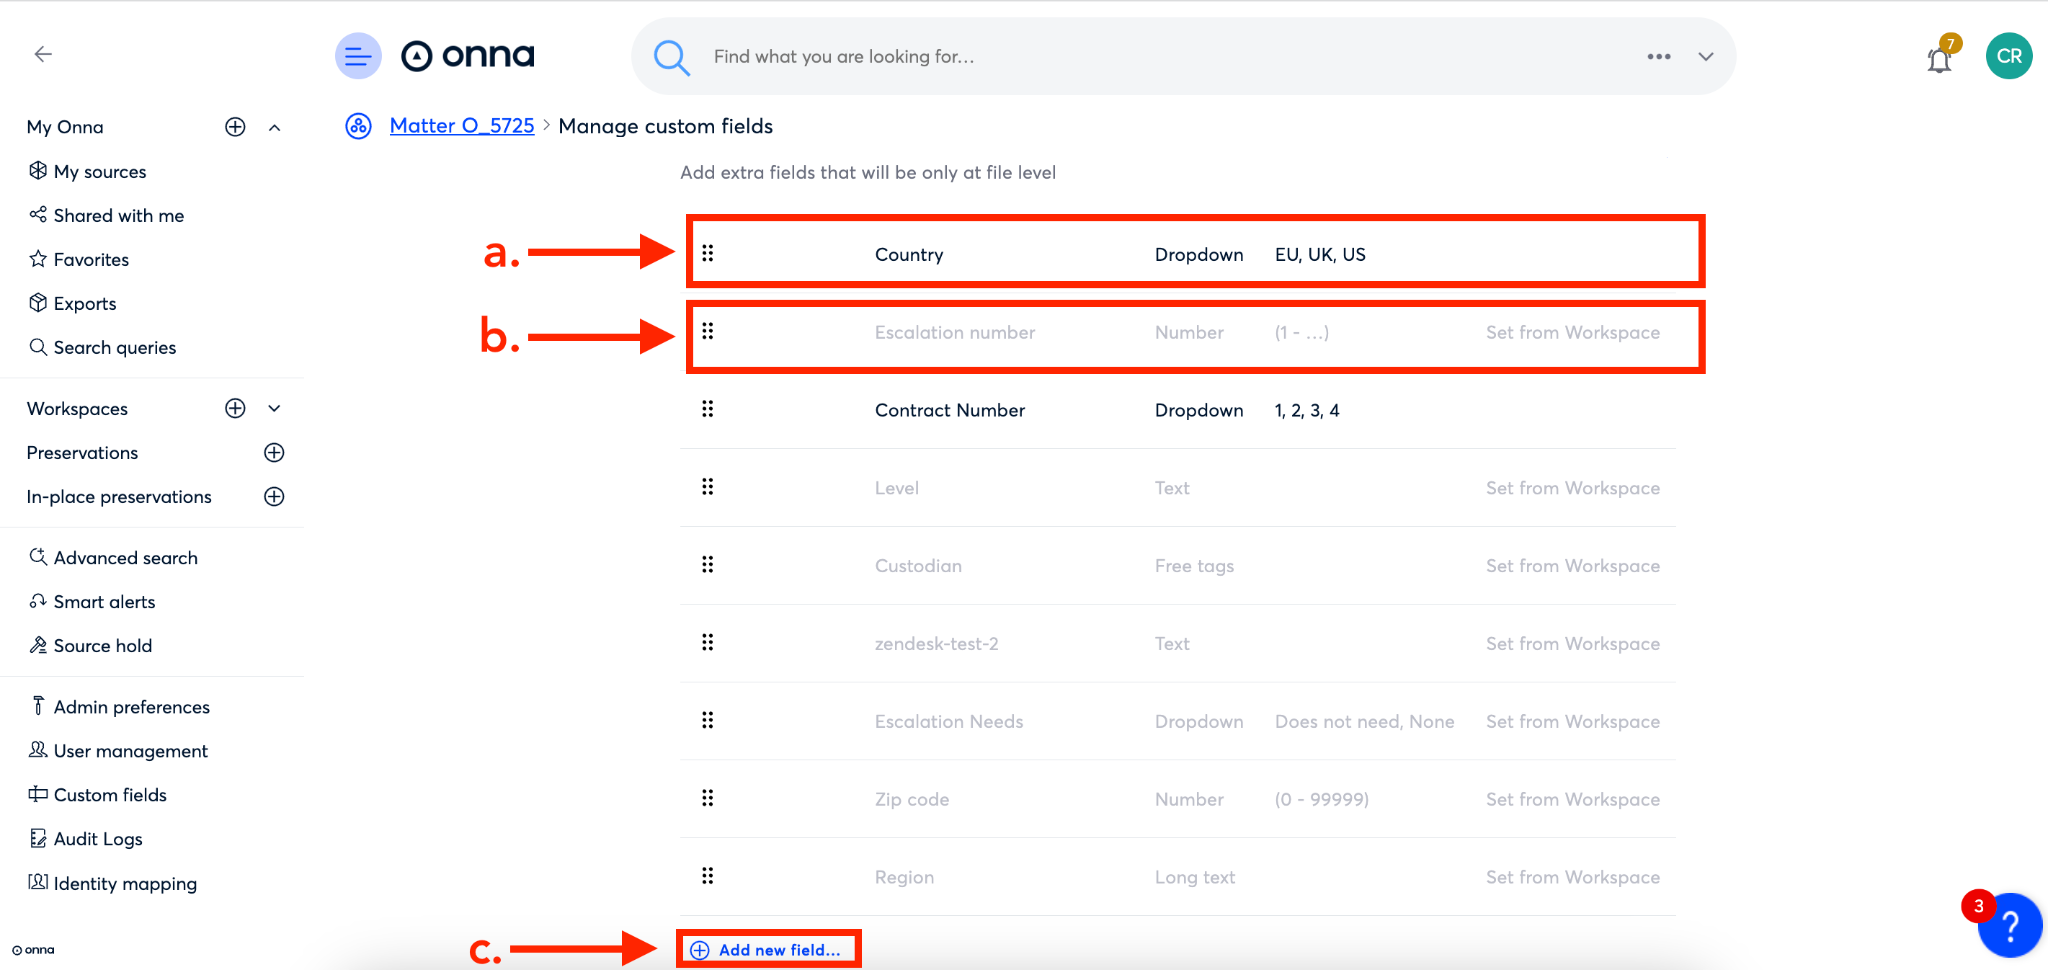
Once on the ‘Manage custom fields’ page click on the arrow to the right of ‘File fields’
Step 5
You’ll now see a list of custom fields that are already attached to files in this workspace.
Notice that some custom fields are listed in black (a), meaning that it is only attached at the file level. Others are listed in gray and say ‘Set from Workspace’ to the right of the field (b), meaning that this custom field was set at the workspace level and is also attached to the workspace.
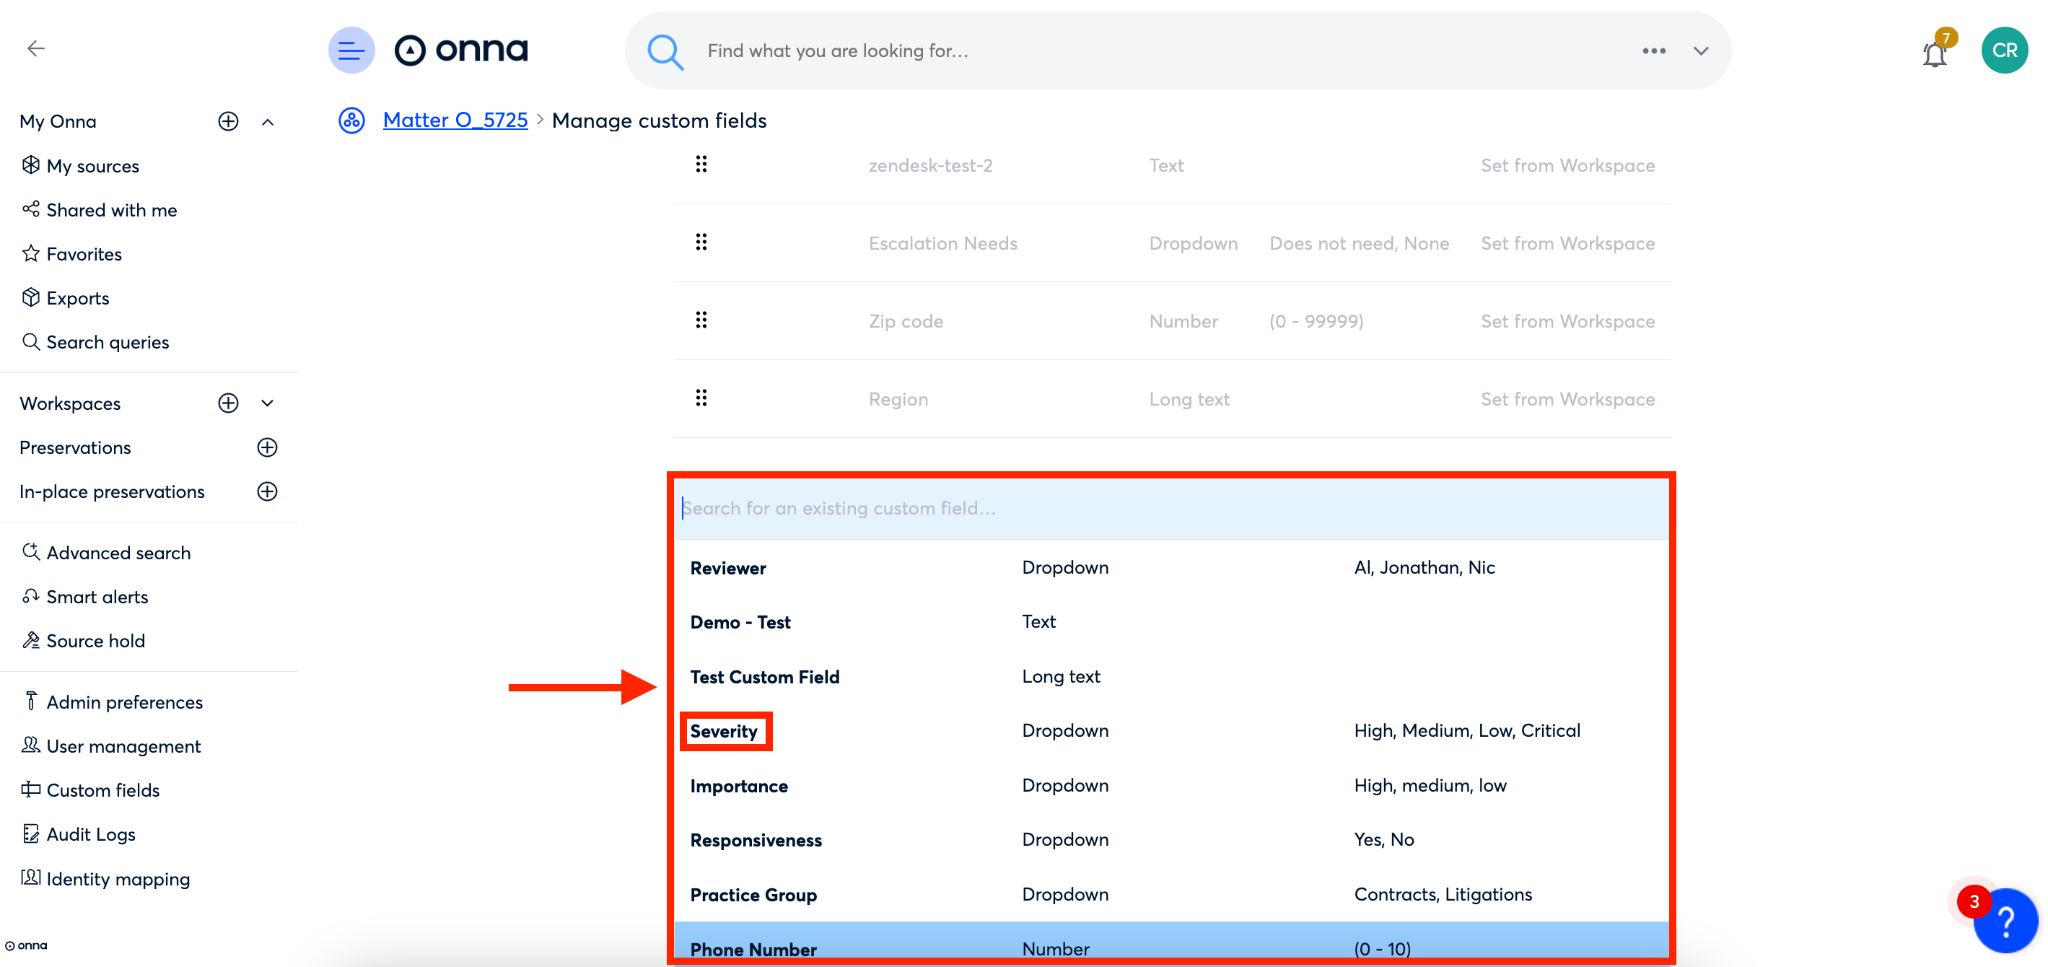
To add a new custom field that is not already on the list, click ‘Add new field’ (c) at the bottom of the list.
Step 6
You’ll now see a dropdown appear that includes all custom fields available for use on your site. You can search this list for a specific custom field using the search bar at the top, or you can scroll to find the custom field you need. Once you’ve found it simply click on the custom field you want to add.
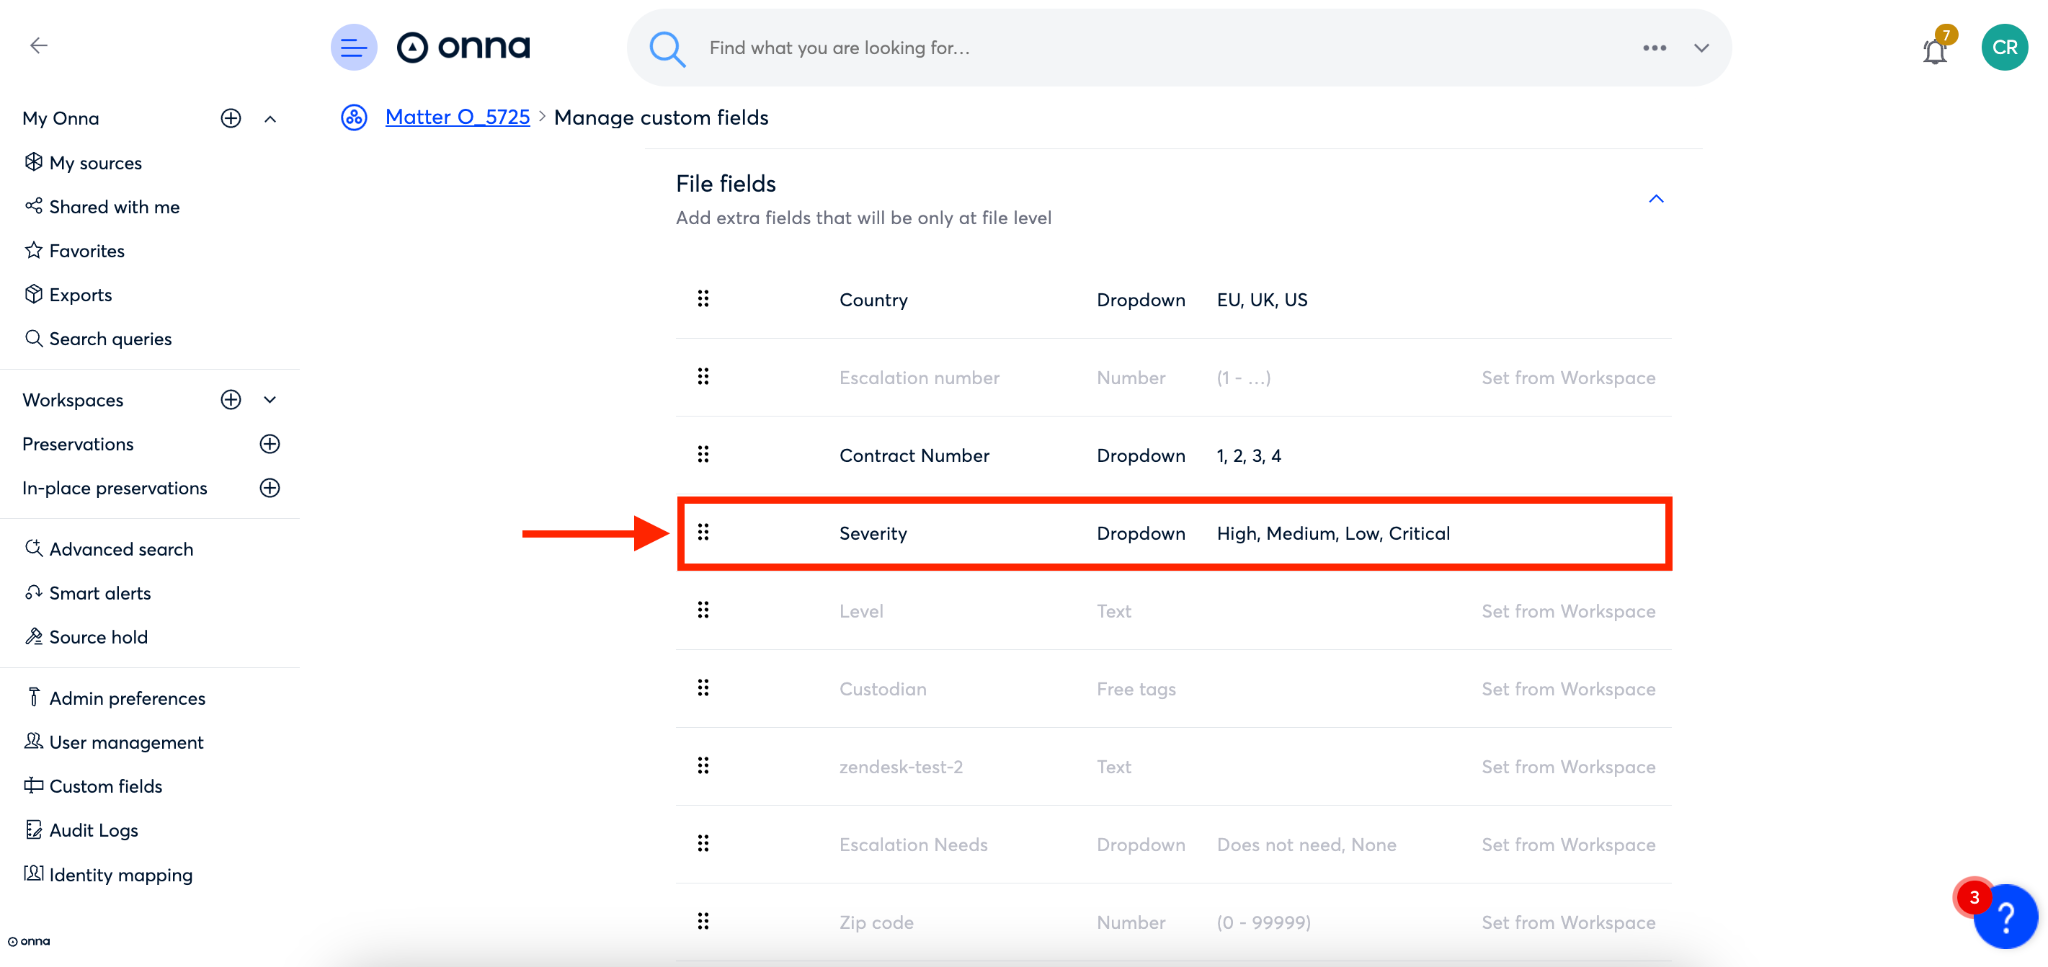
Step 7
You’ll now see that the custom field you selected has been added to the list of custom fields attached to files in this workspace. You will also see that it is listed in black, meaning it is attached only at the file level and not at the workspace level.
How to Manage Custom Fields
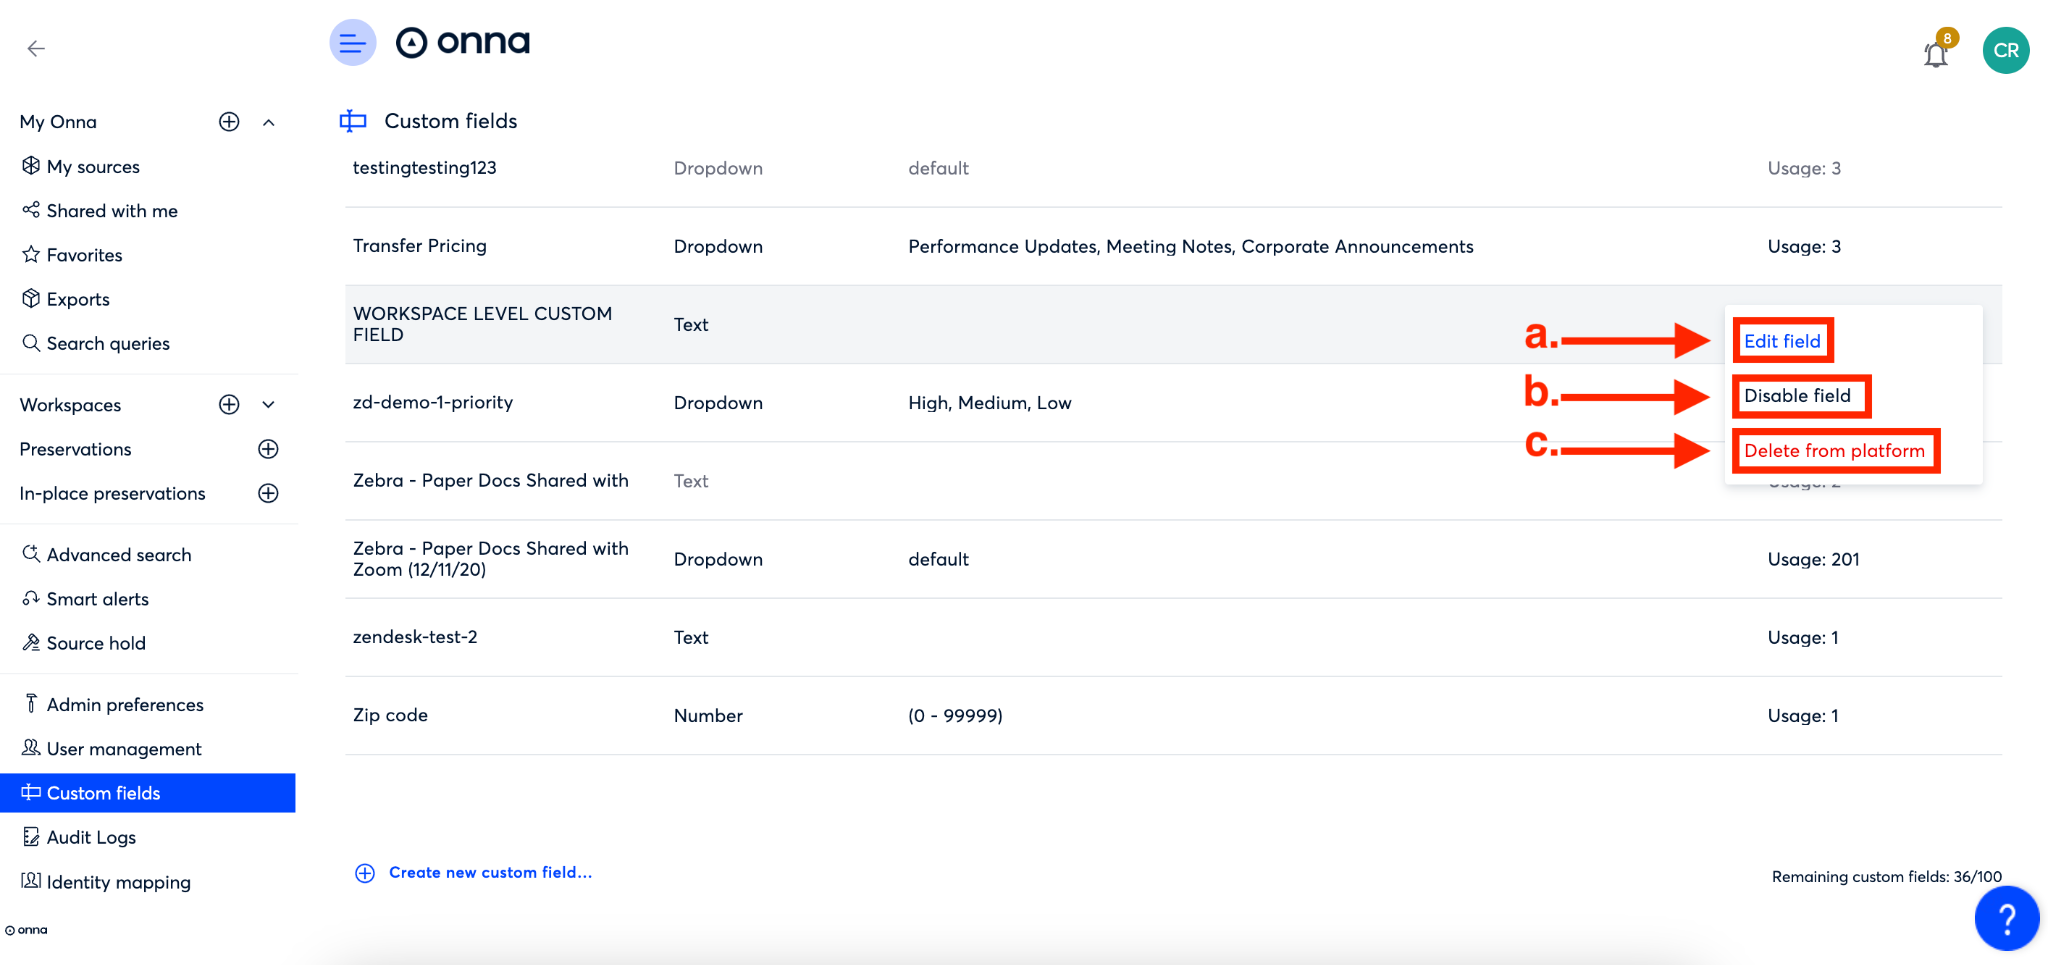
There are three ways you can manage your custom fields: edit, disable, or delete.
Editing the field will allow you to change any part of the custom field including the name, description, type, or whether it is required or not.
Disabling the field will prevent users from adding the field to workspaces or files, while keeping the editing data that was entered into the field attached to the workspace or file.
Deleting the field will delete the field entirely from the platform and is only an option if the custom field has a Usage of 0 in your site.
Admins are allowed up to 100 custom fields at any time. If a custom field is not being used in any workspace or file in Onna you can delete it. However, if a custom field has been used, you will not be able to delete it from Onna, but you can disable it so it can no longer be used. For more information see How to Manage Custom Fields (below). |
To manage your custom fields, follow the steps below:
Step 1:
From the ‘Custom fields’ page, navigate to the custom field you’d like to manage and click on the ellipsis to the right side of that custom field row.

Step 2:
From the drop down that appears, select the option you’d like. You can choose from:
Edit field
Disable field
Delete from platform