- 25 Jun 2024
- 5 Minutes to read
- Print
- DarkLight
- PDF
How to Create and Manage Export Templates
- Updated on 25 Jun 2024
- 5 Minutes to read
- Print
- DarkLight
- PDF

In this article:
How to Create an Export Template
How to View Your Export Templates
How to View Export Template Configuration Details
How to Rename an Export Template
How to Share an Export Template
How to Remove Export Template Members
How to Delete an Export Template
How to Create an Export Template
If you need to configure exports in the same way multiple times, you can create an export template to speed up your export workflow. Once a template is created, you’re able to access that template from the export configuration workflow the next time you need to export data from Onna. To create an export template, follow the steps below:
Step 1
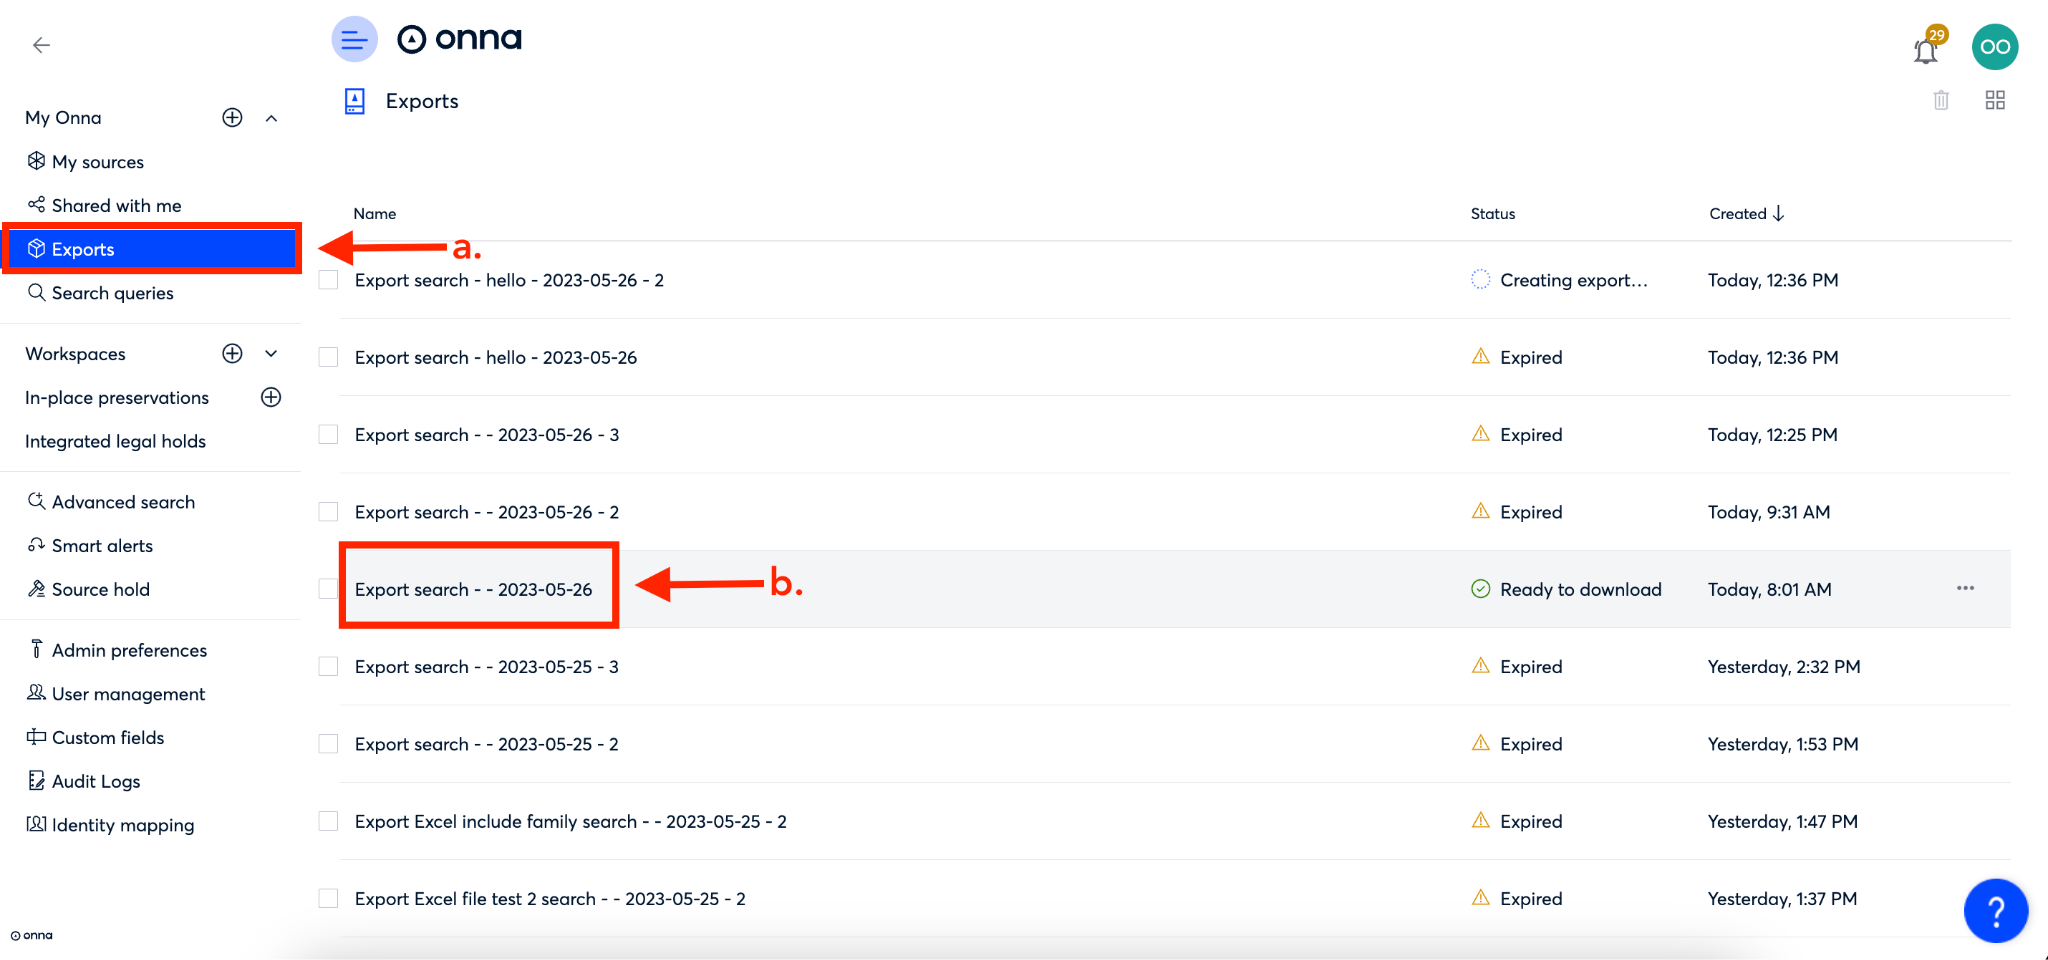
To begin creating an export template, click on ‘Exports’ from the main menu (a).
Once on the ‘Exports’ main page, click on the name of the export you want to create a template for (b).
Step 2
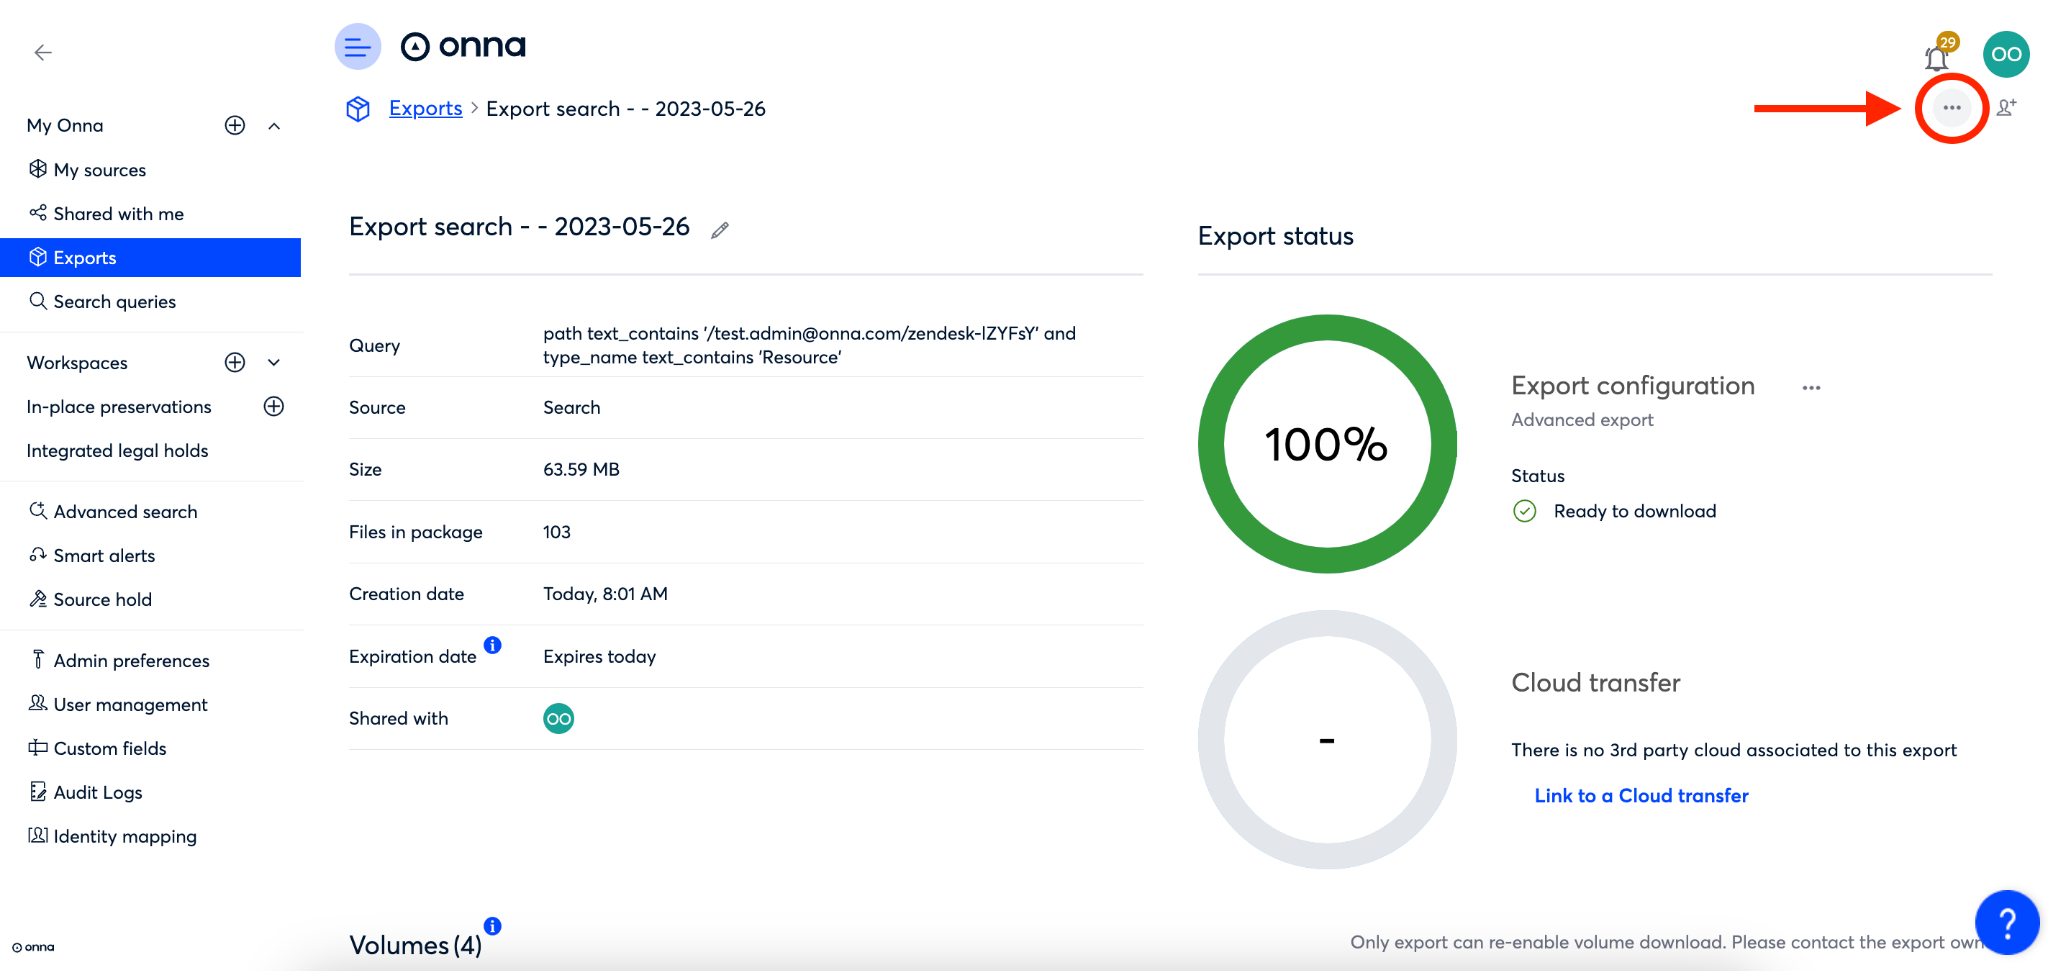
Once on the details page for the export, click on the ellipsis in the upper right corner of the screen.
Step 3
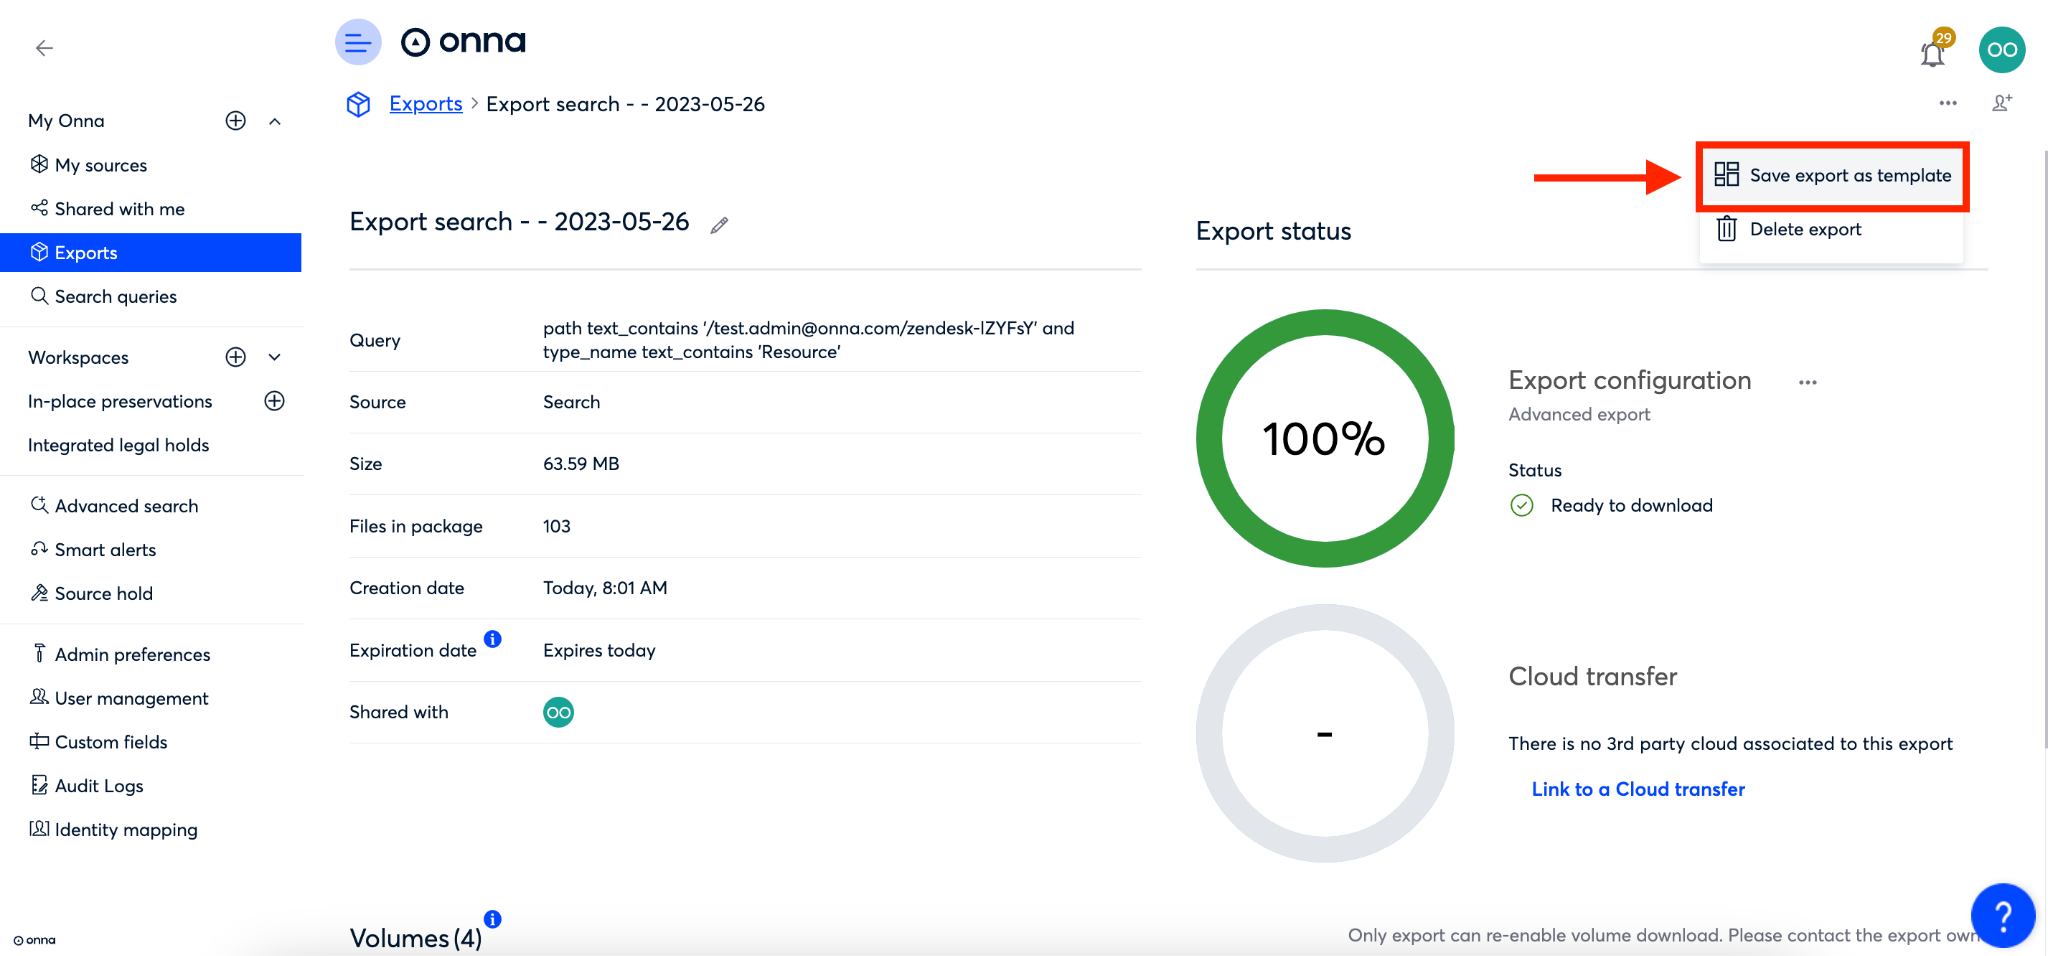
From the dropdown menu that appears, select ‘Save export as template’
Step 4
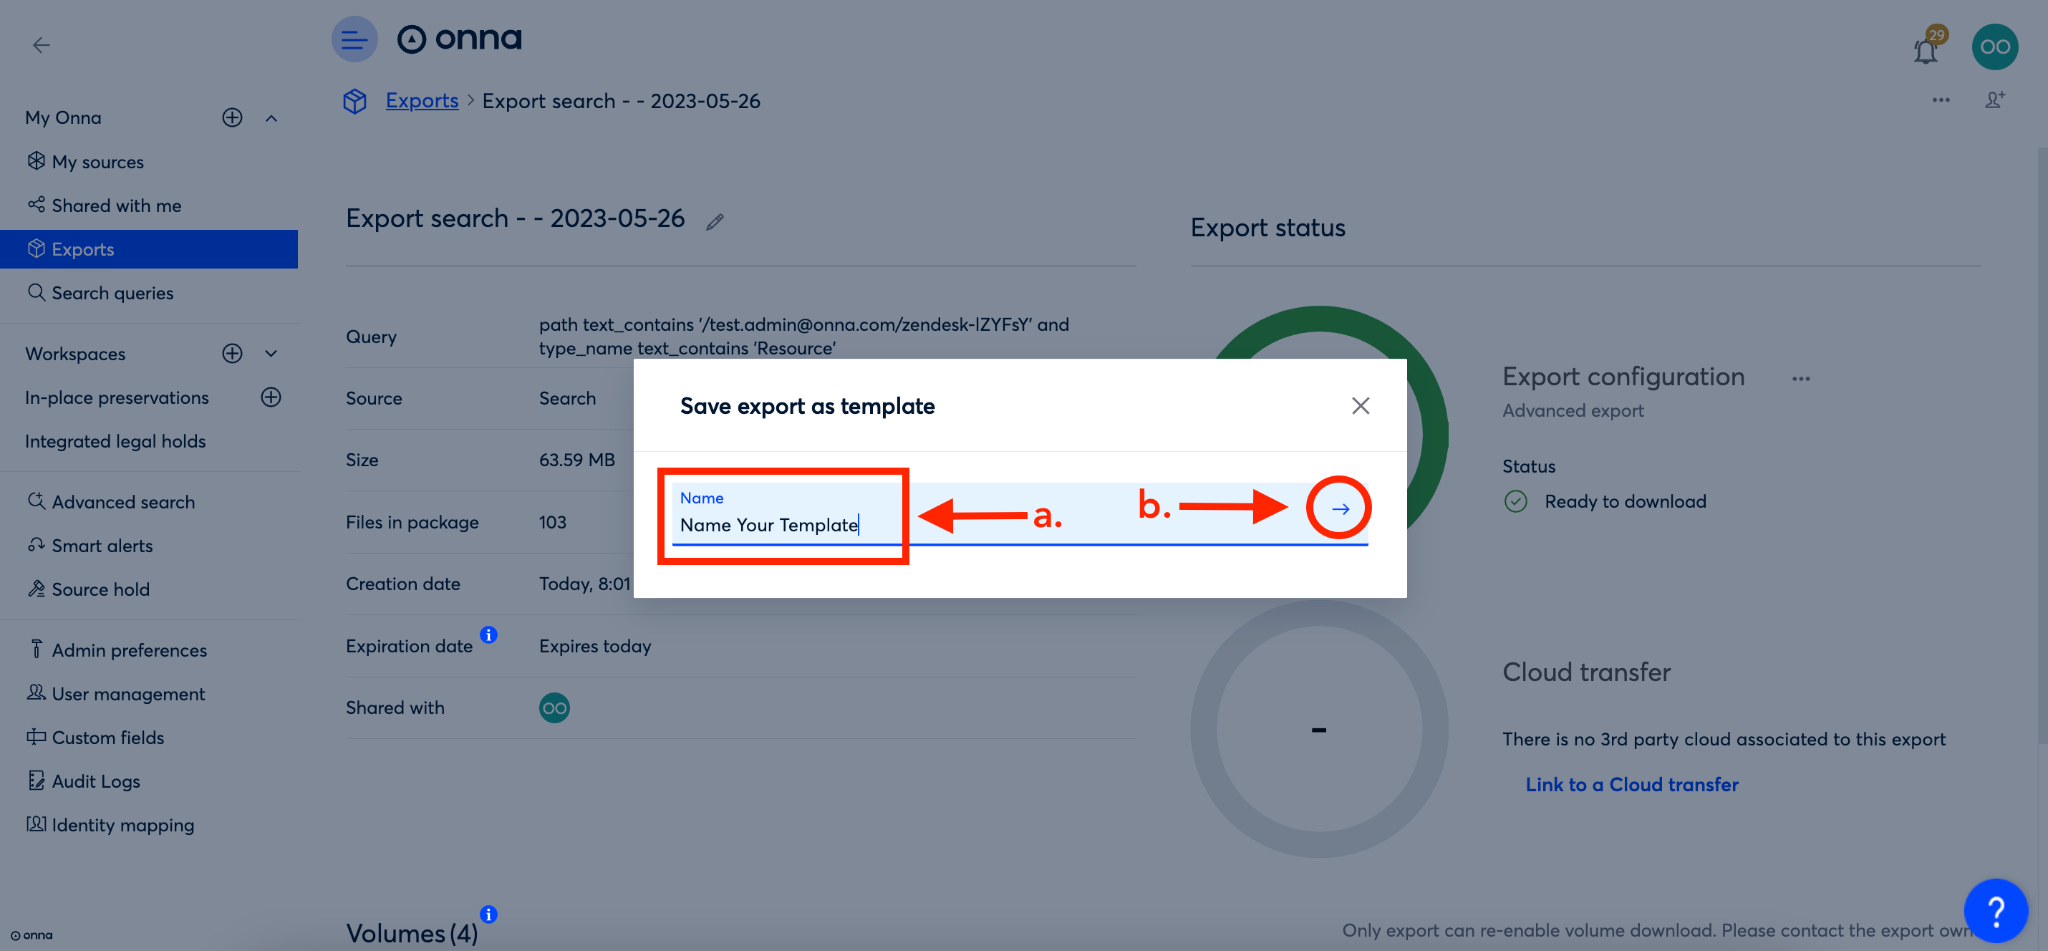
You’ll then see a pop-up appear. In that pop-up, enter the name of your export template in the ‘Name field’ (a).
Then, click on the blue arrow to the right of the export template name (b).
You have now created a new export template.
How to View Your Export Templates
To view all your export templates, follow the steps below:
Step 1
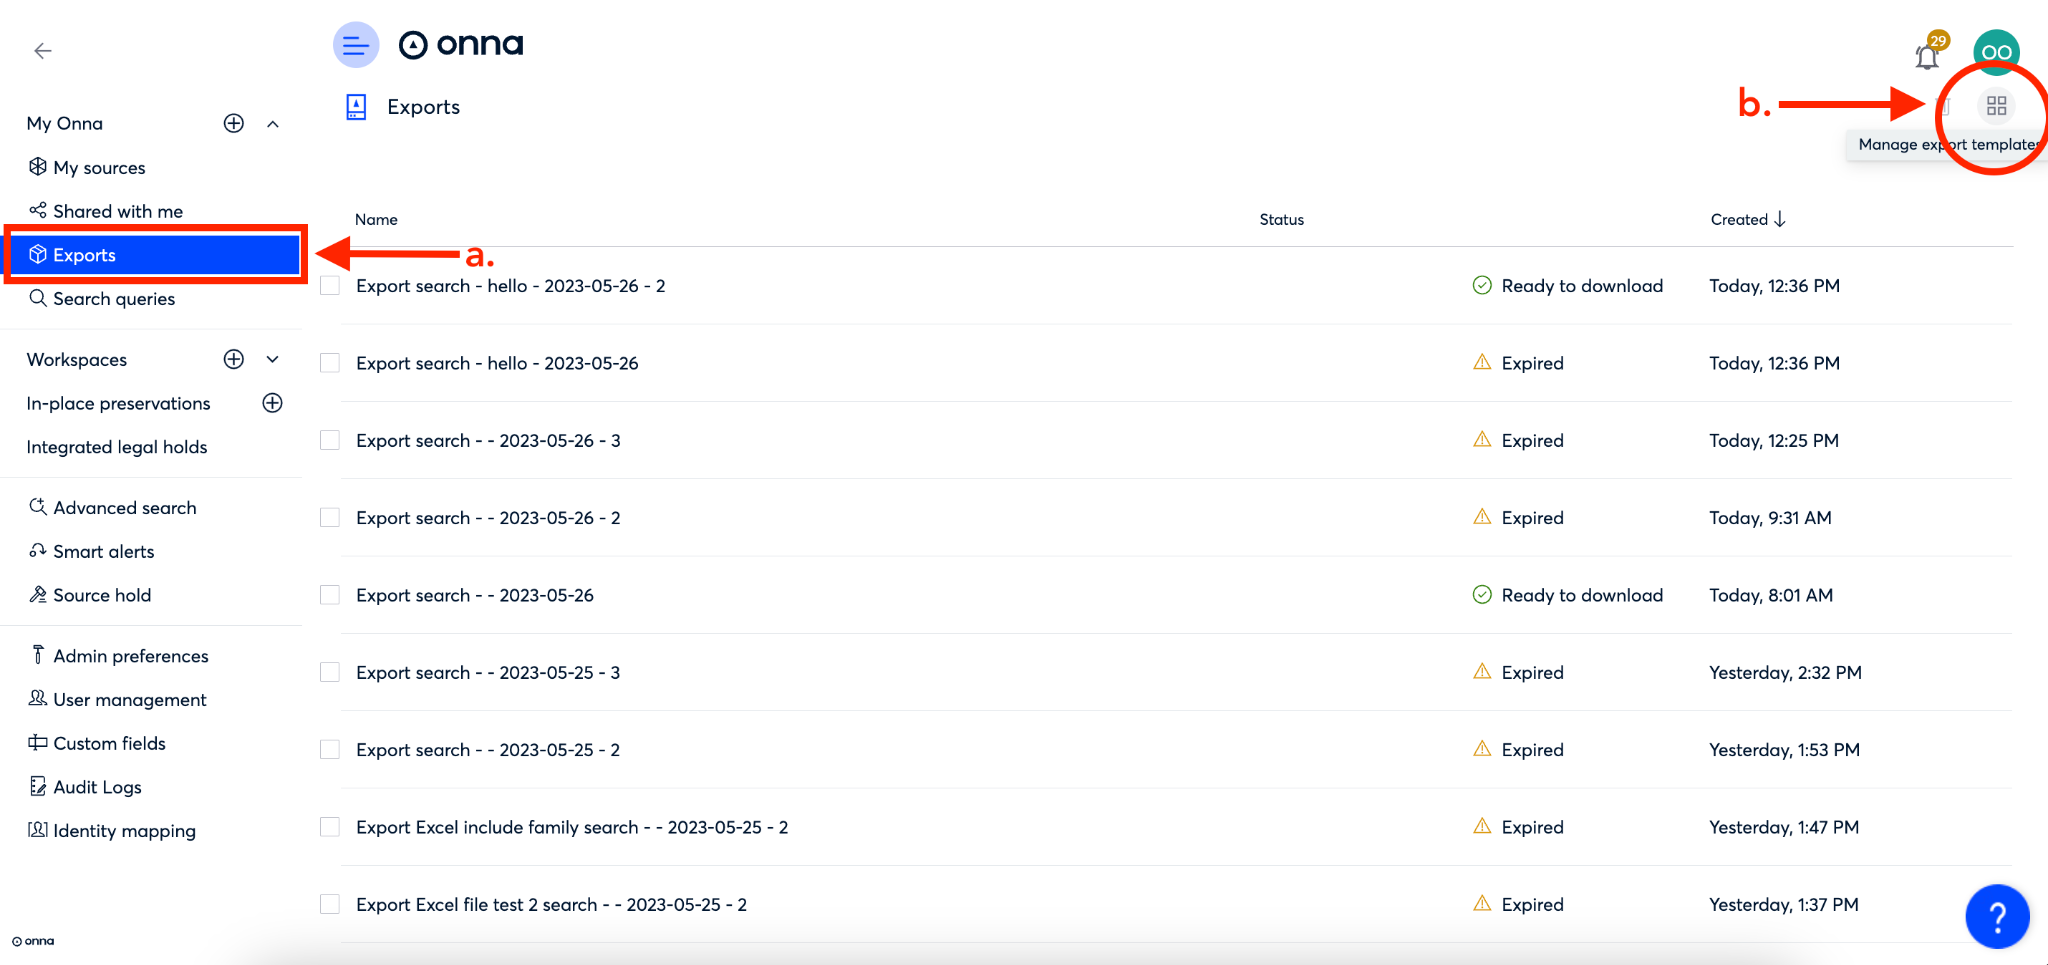
To begin viewing your export templates, click on ‘Exports’ from the main menu (a).
Then, from the ‘Exports’ main page, click on the ‘Manage export templates’ icon in the upper right corner of the screen (b).
Step 2
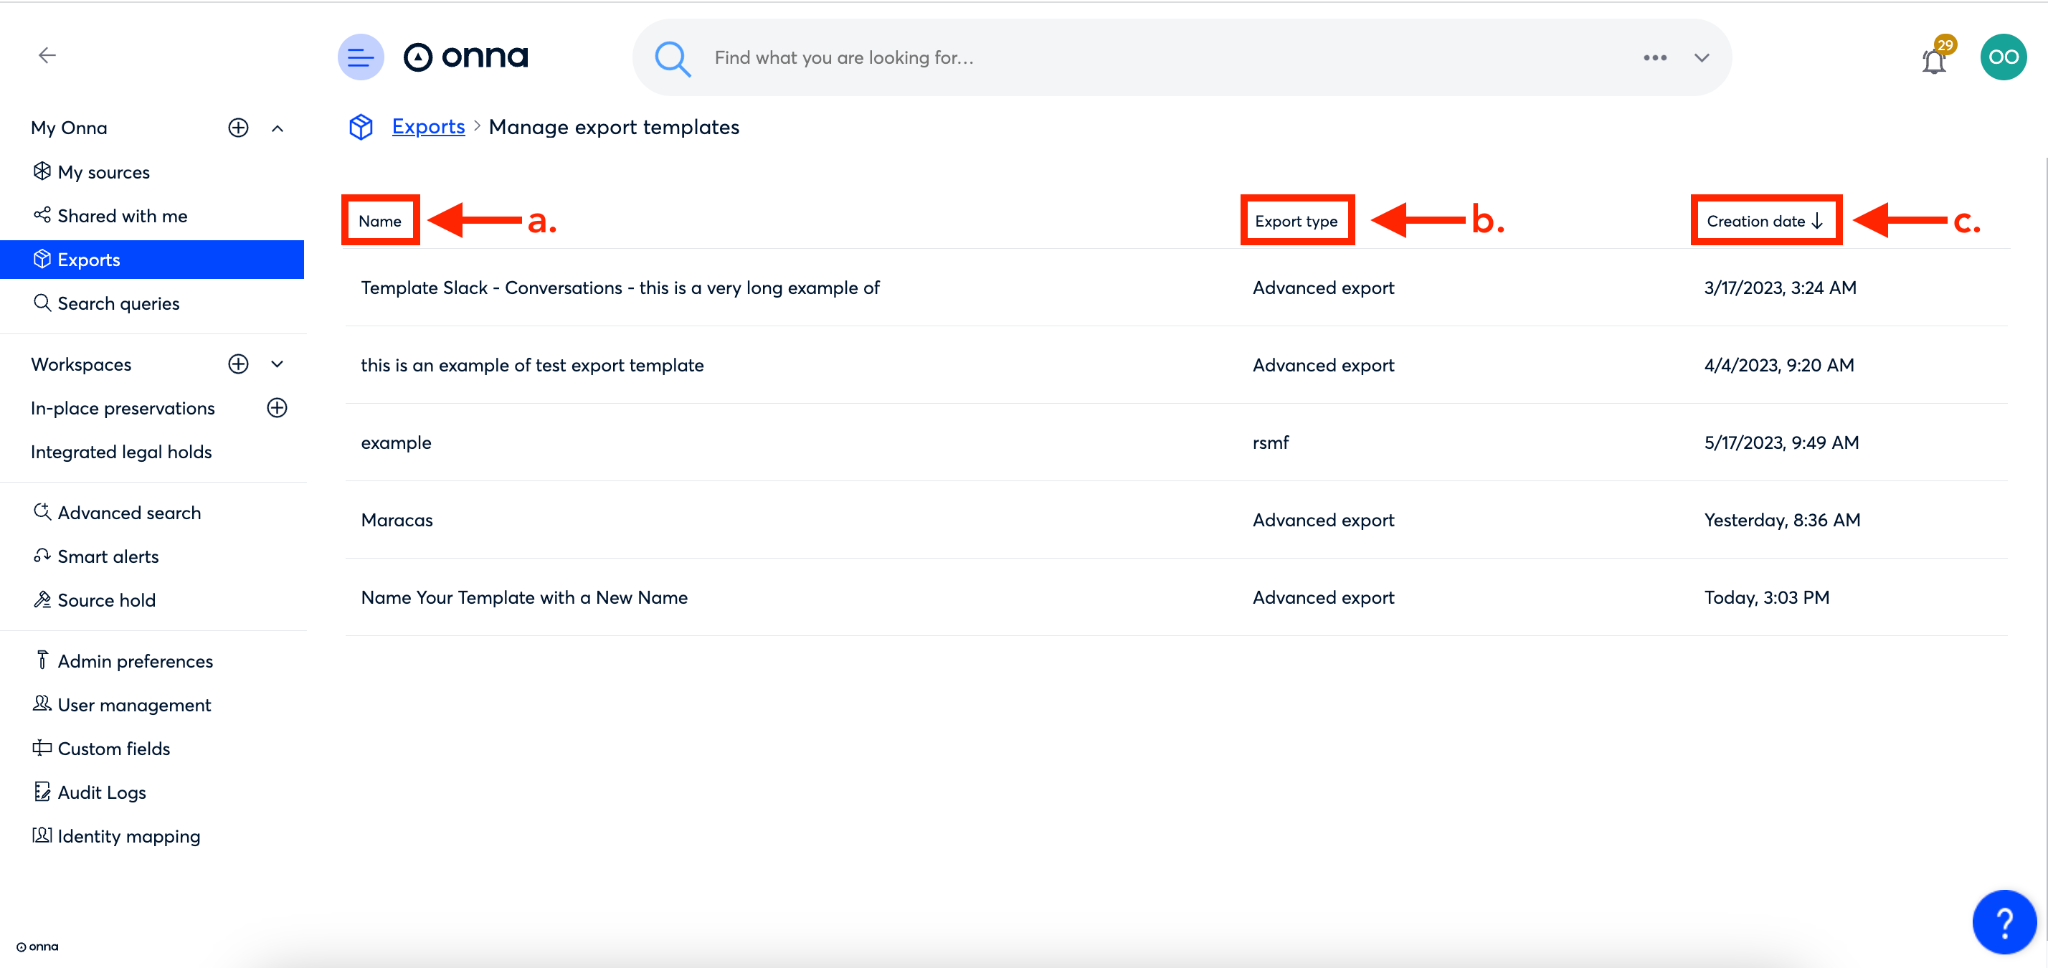
Once you’re on the ‘Manage export templates’ page, you will be able to view a list of all templates you’ve created.
This list will contain three columns. The first column contains the name of your export template (a). The second column ‘Export type’ (b) contains the type of export the template is (csv, advanced, rsmf). The final column ‘Creation date’ (c) lists the date the export template was created.
How to View Export Template Configuration Details
To confirm how an export template has been configured, it is possible to view the configuration details of any export template from your list. To view export template configuration details, follow the steps below:
Step 1
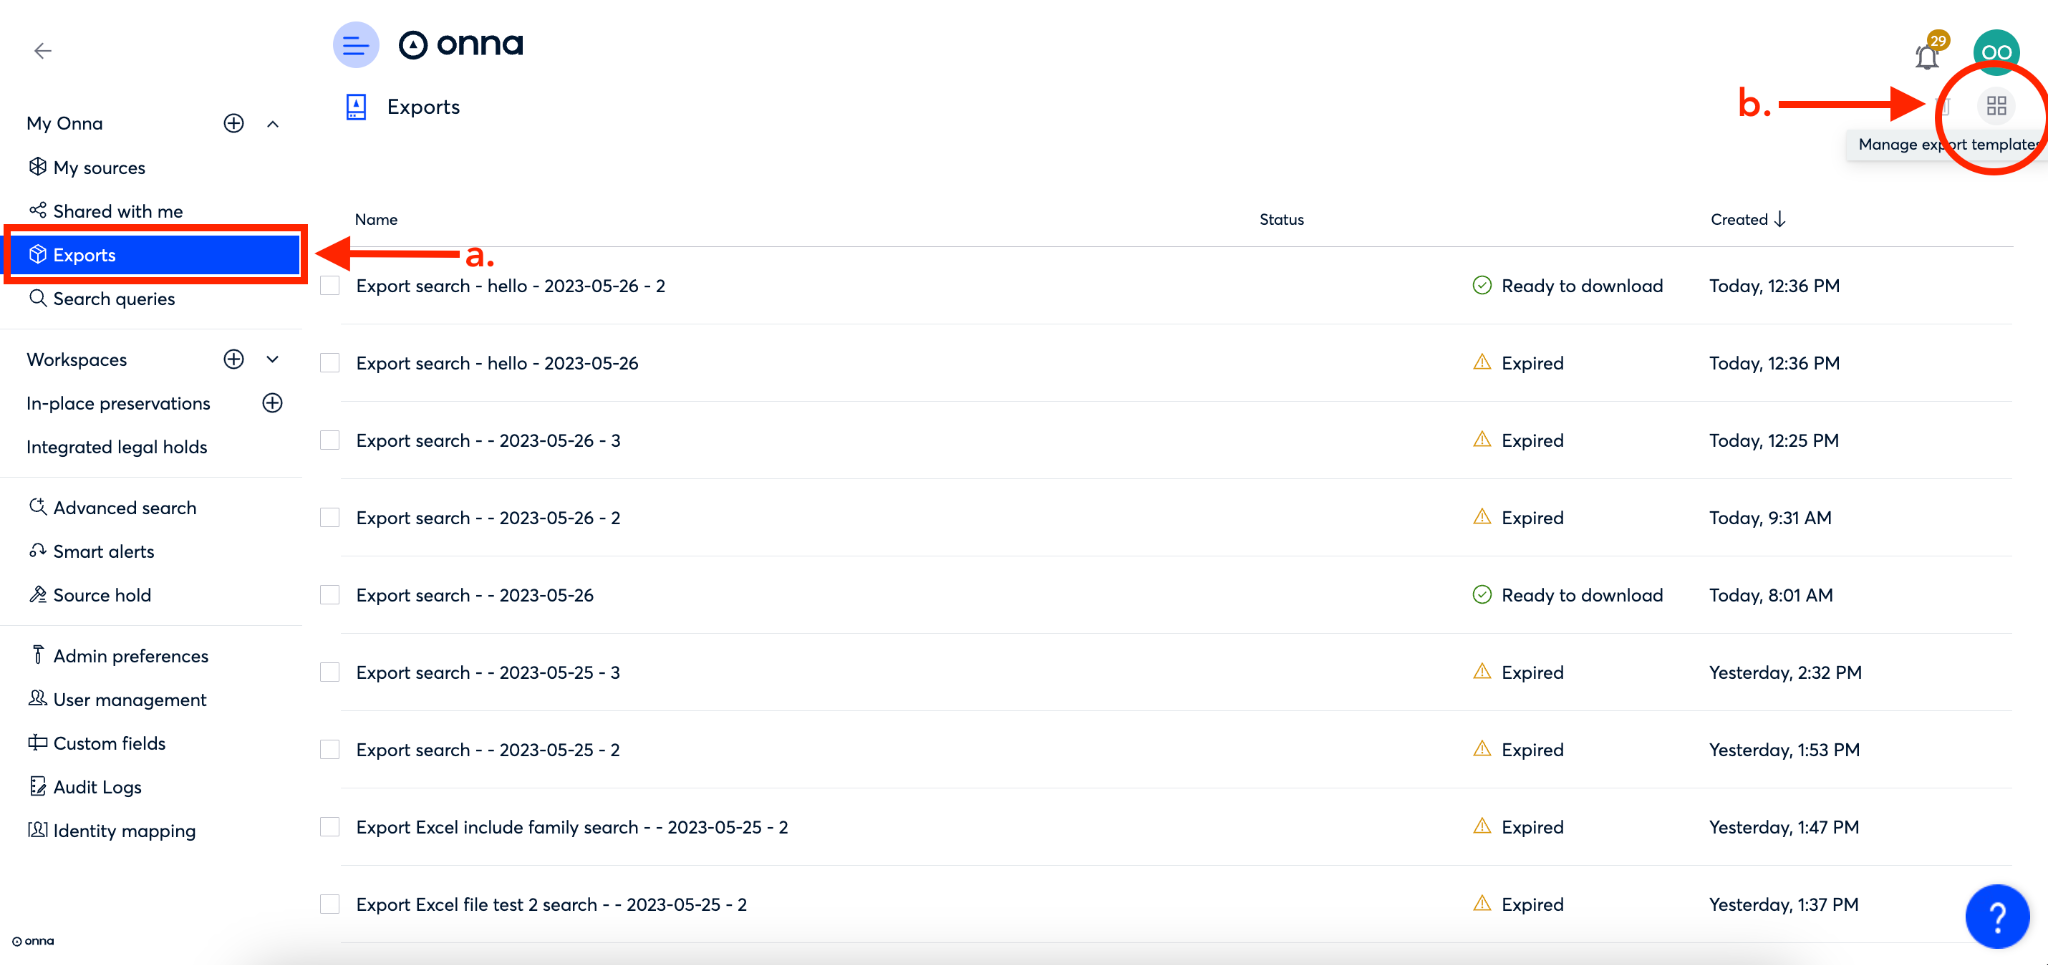
To begin viewing your export template configuration details, click on ‘Exports’ from the main menu (a).
Then, from the ‘Exports’ main page, click on the ‘Manage export templates’ icon in the upper right corner of the screen (b).
Step 2
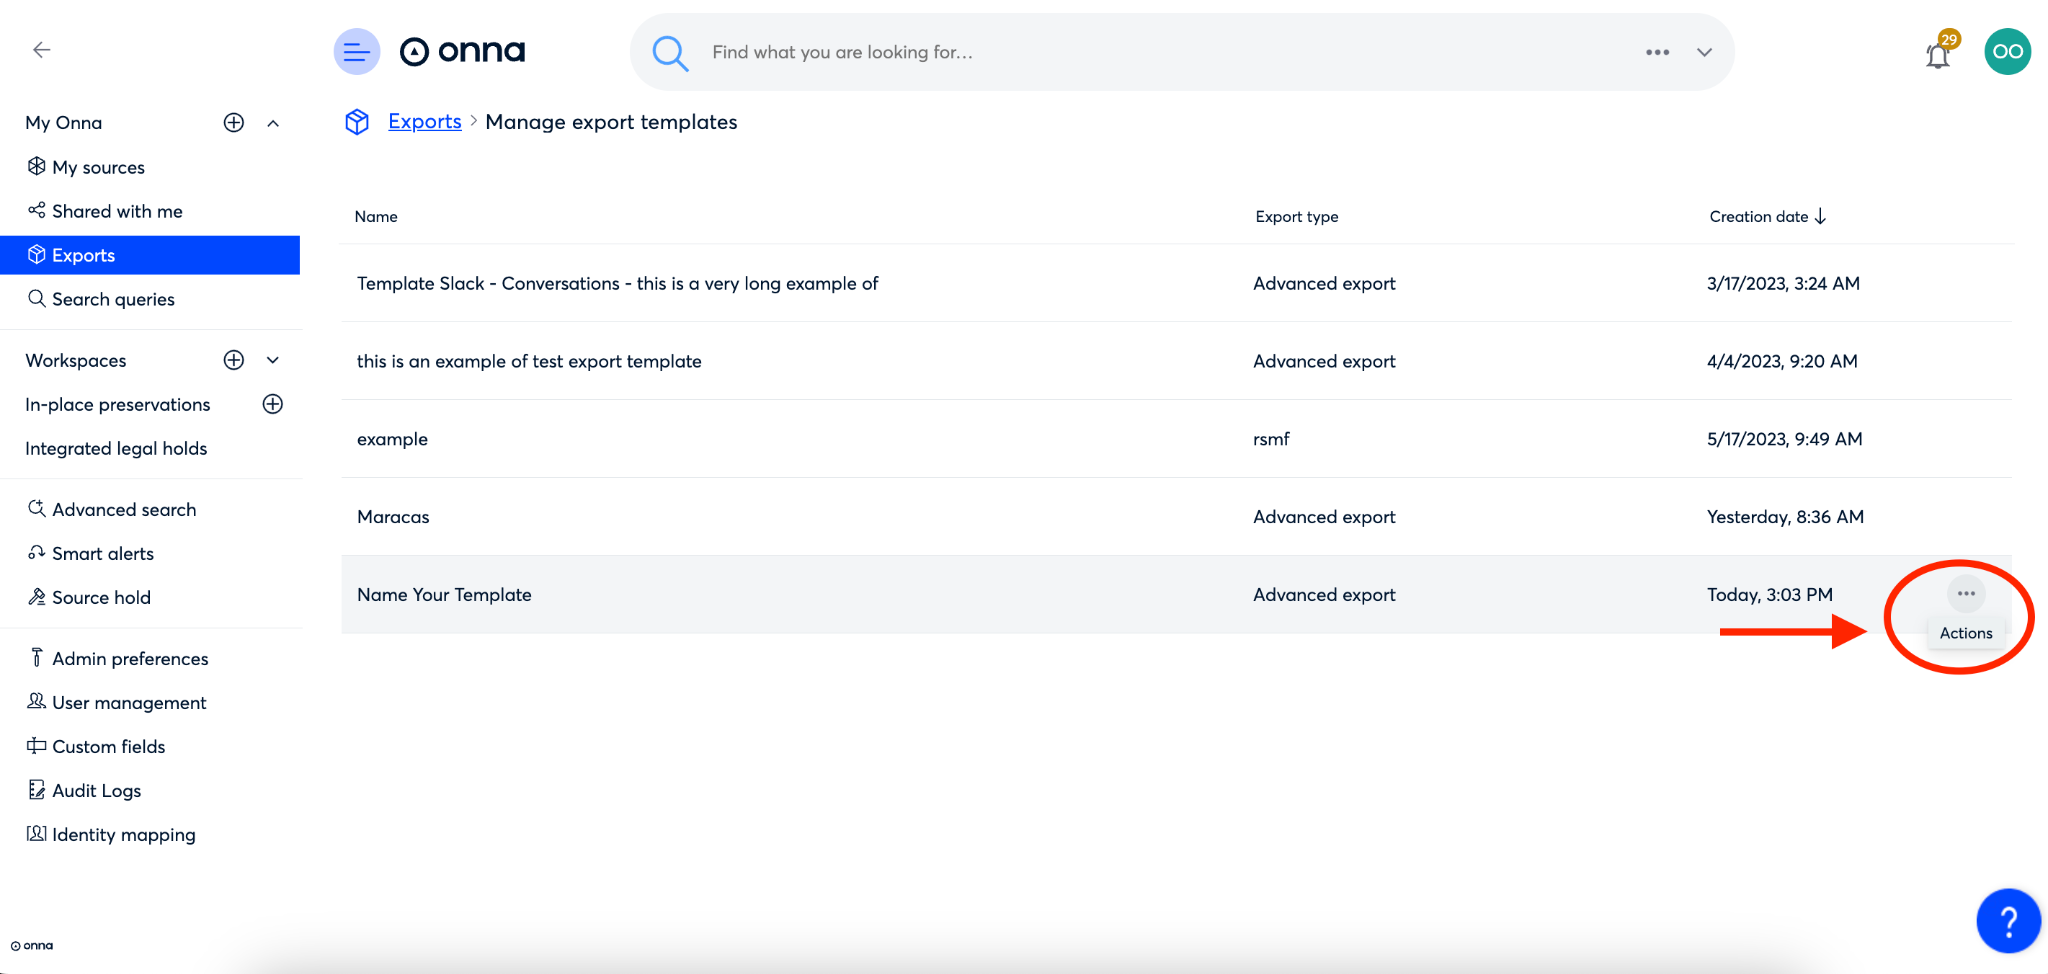
Next, click on the ellipsis to the right of the export template you want to view configuration details for.
Step 3
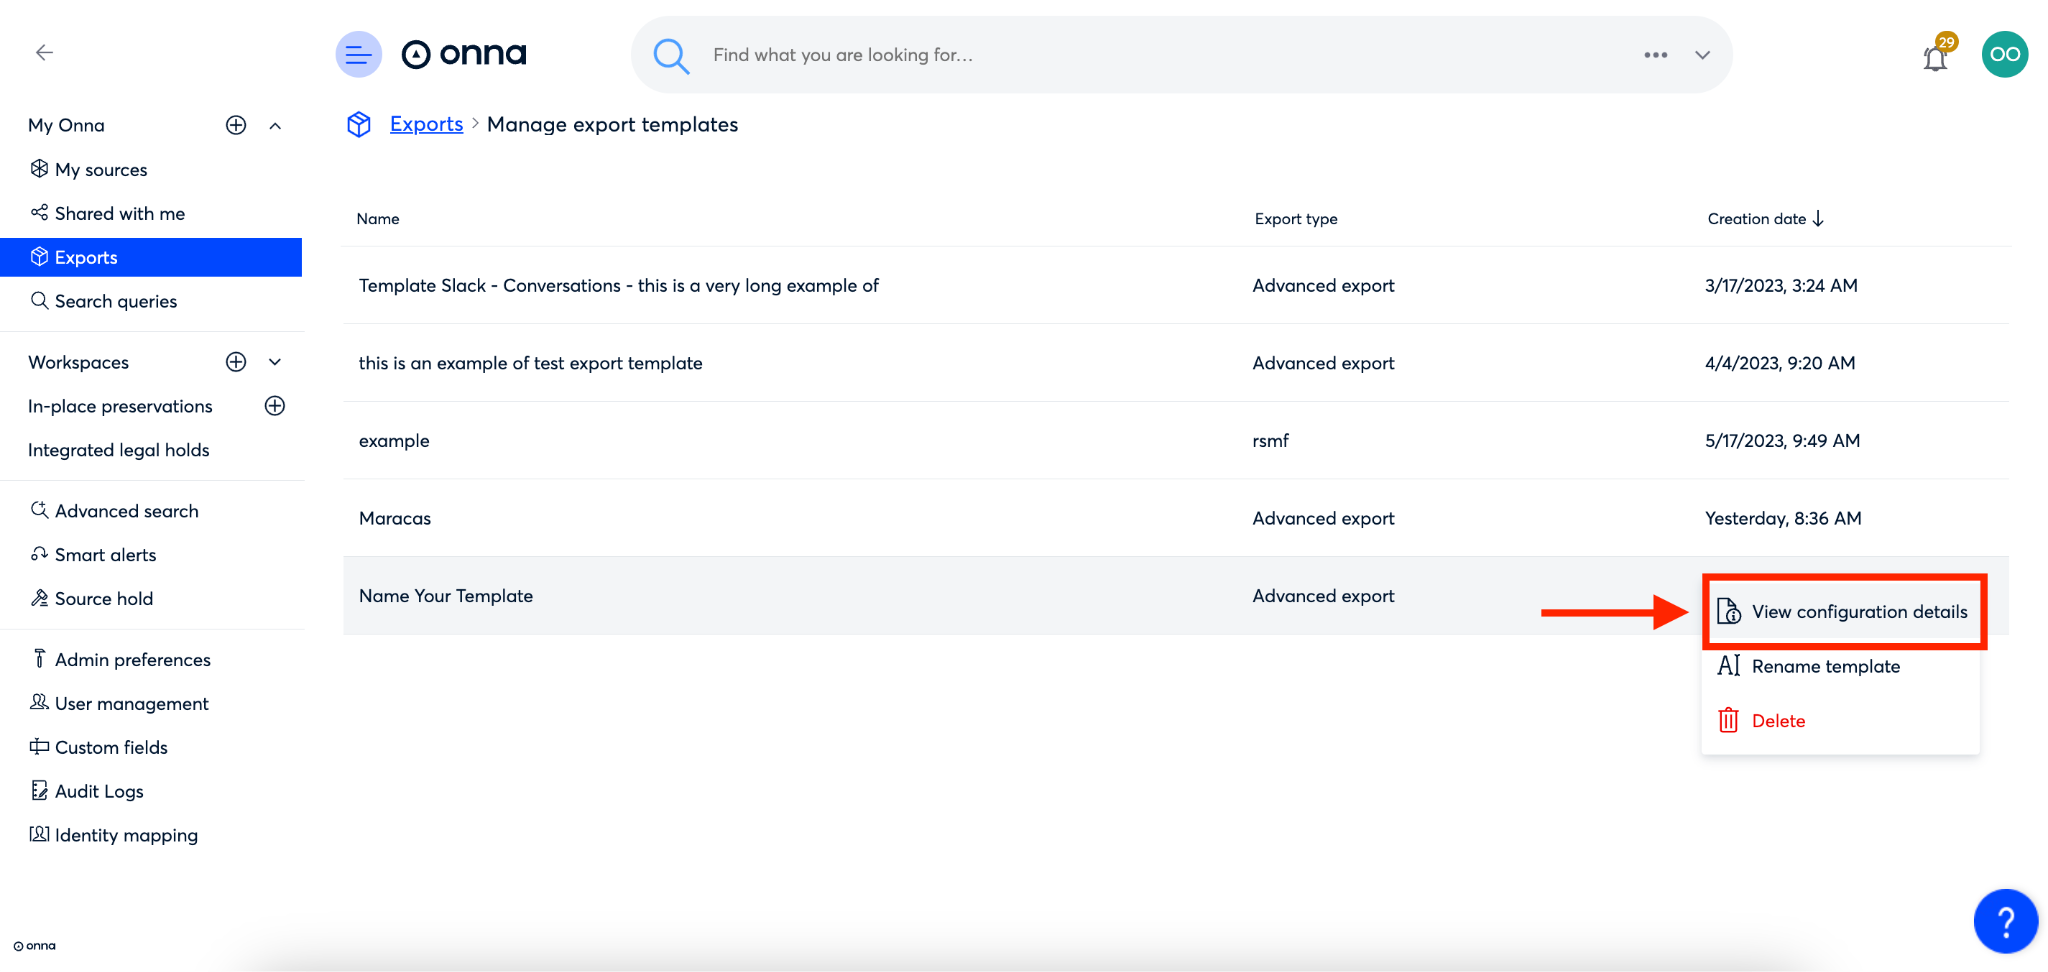
From the drop down menu that appears, select ‘View configuration details’.
Step 4
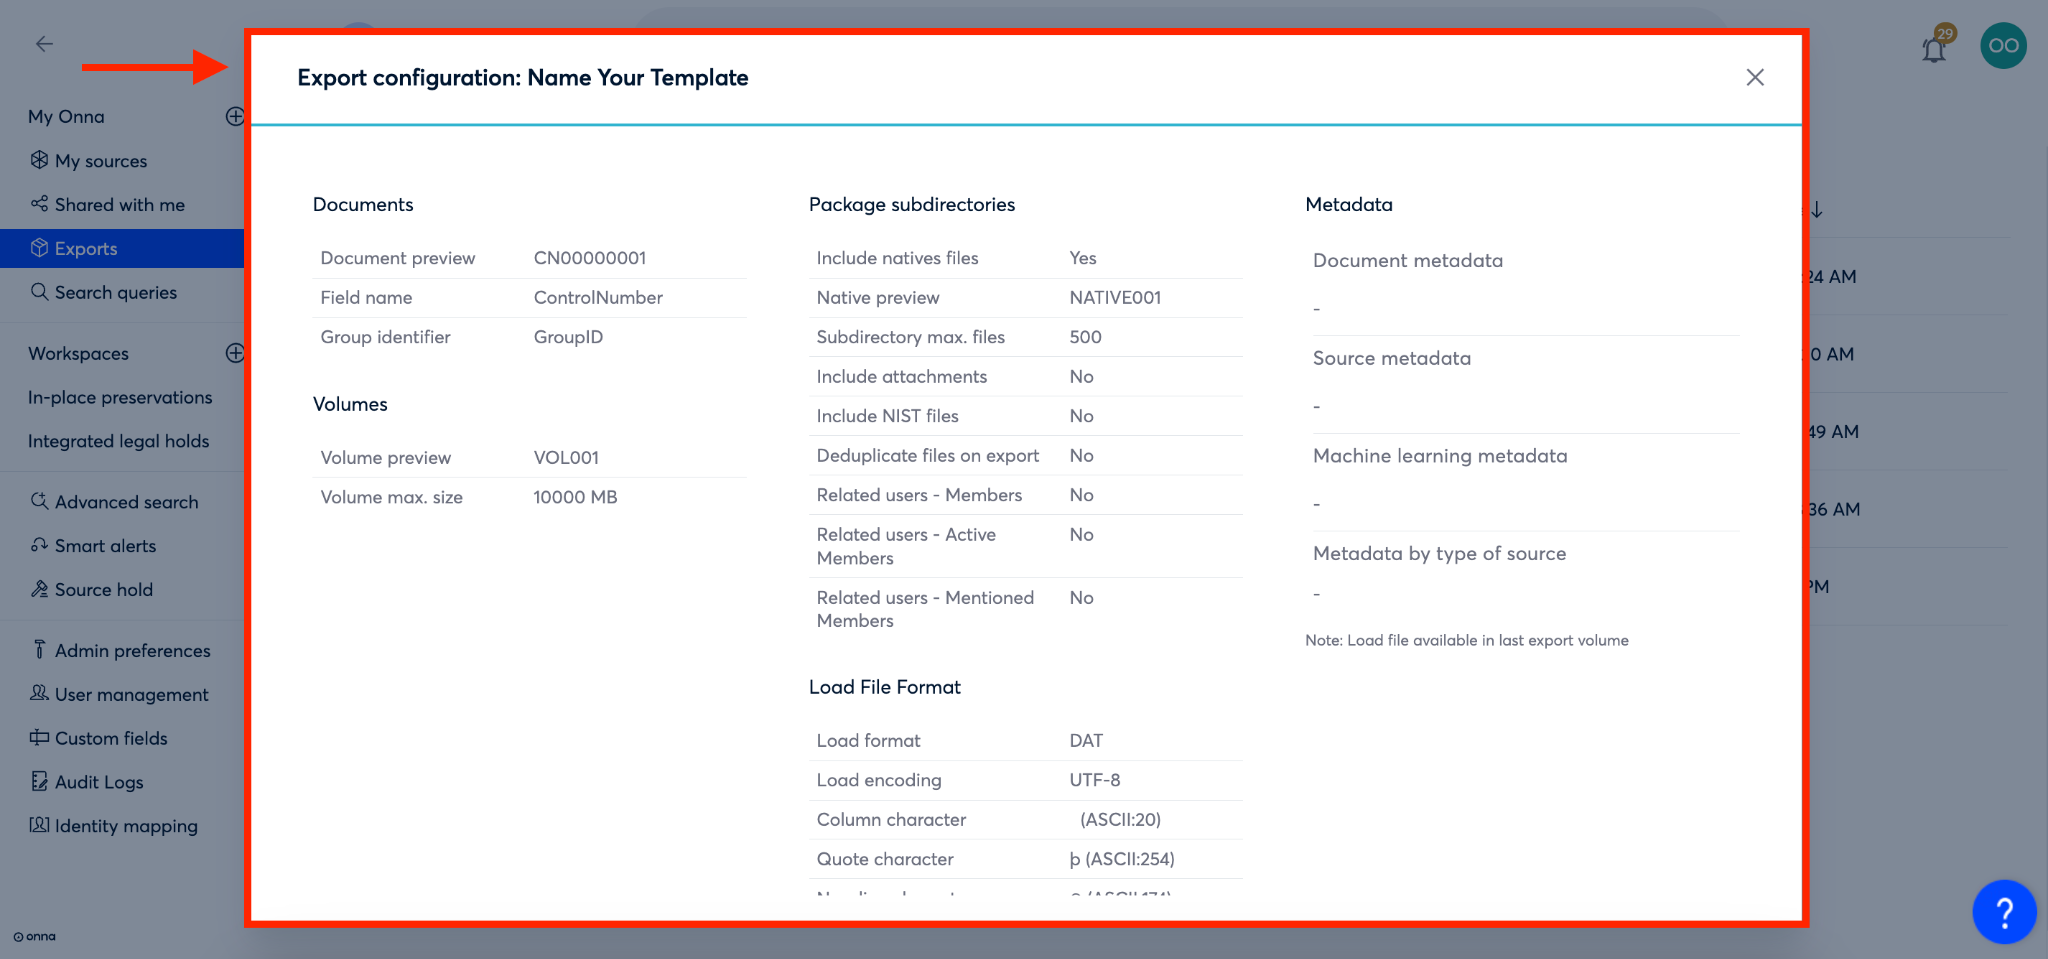
You’ll now see the configuration details for that export template appear in a new window on your screen.
How to Rename an Export Template
In order to manage your export templates better, you may need to rename a template after it has been created. To learn how to rename an export template, follow the steps below:
Step 1
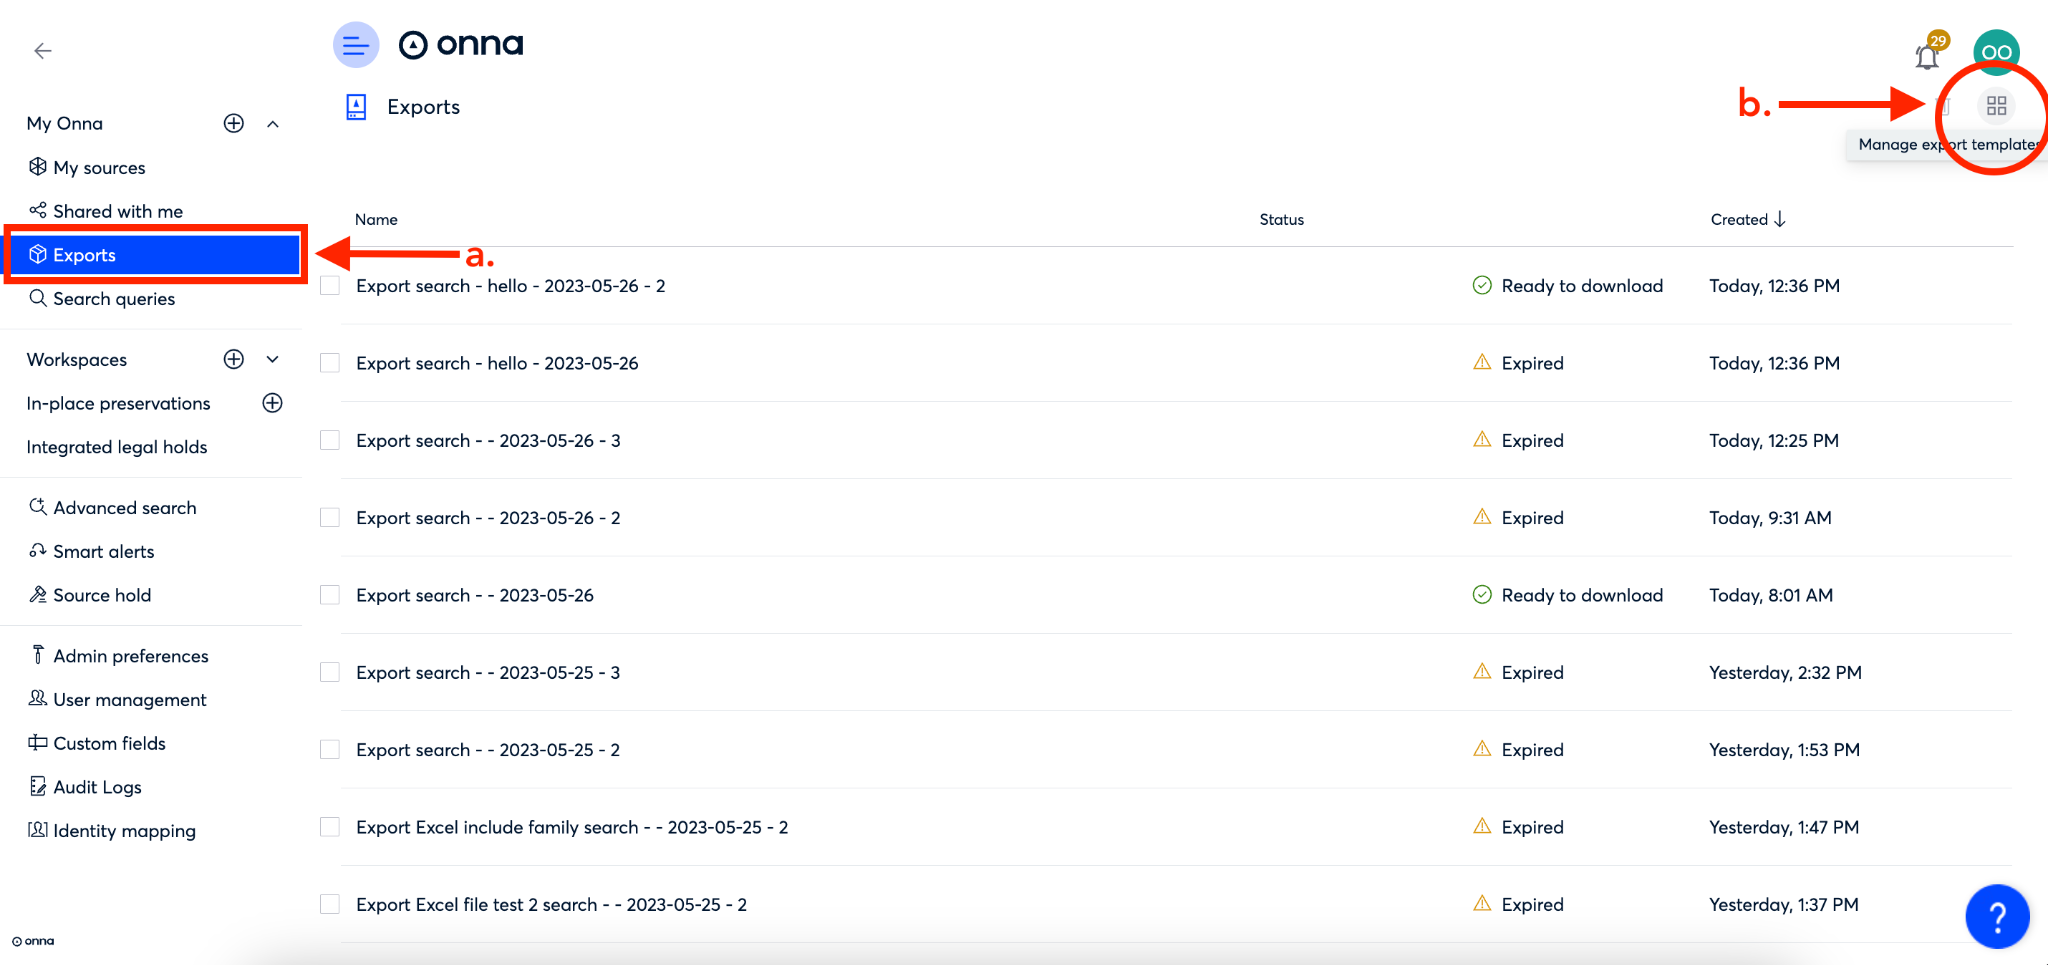
To begin renaming your export template, click on ‘Exports’ from the main menu (a).
Then, from the ‘Exports’ main page, click on the ‘Manage export templates’ icon in the upper right corner of the screen (b).
Step 2
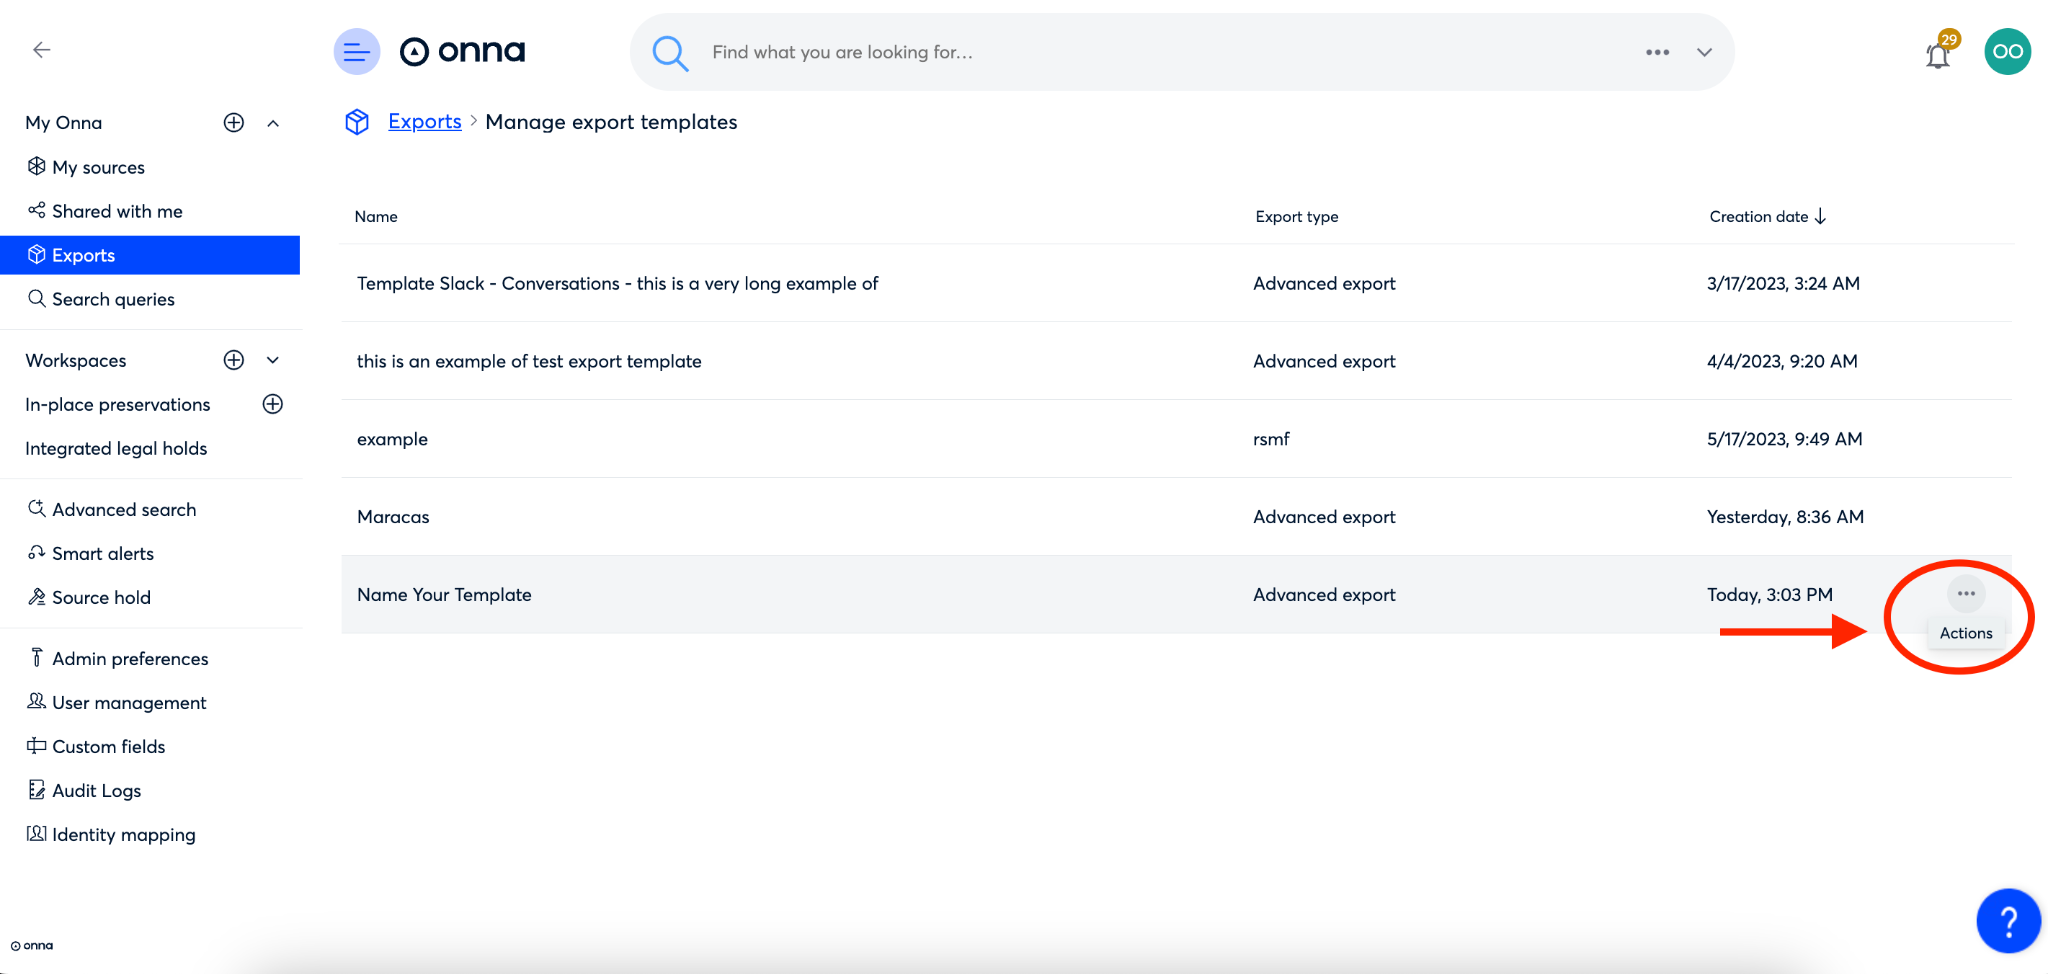
Next, click on the ellipsis to the right of the export template you want to rename.
Step 3
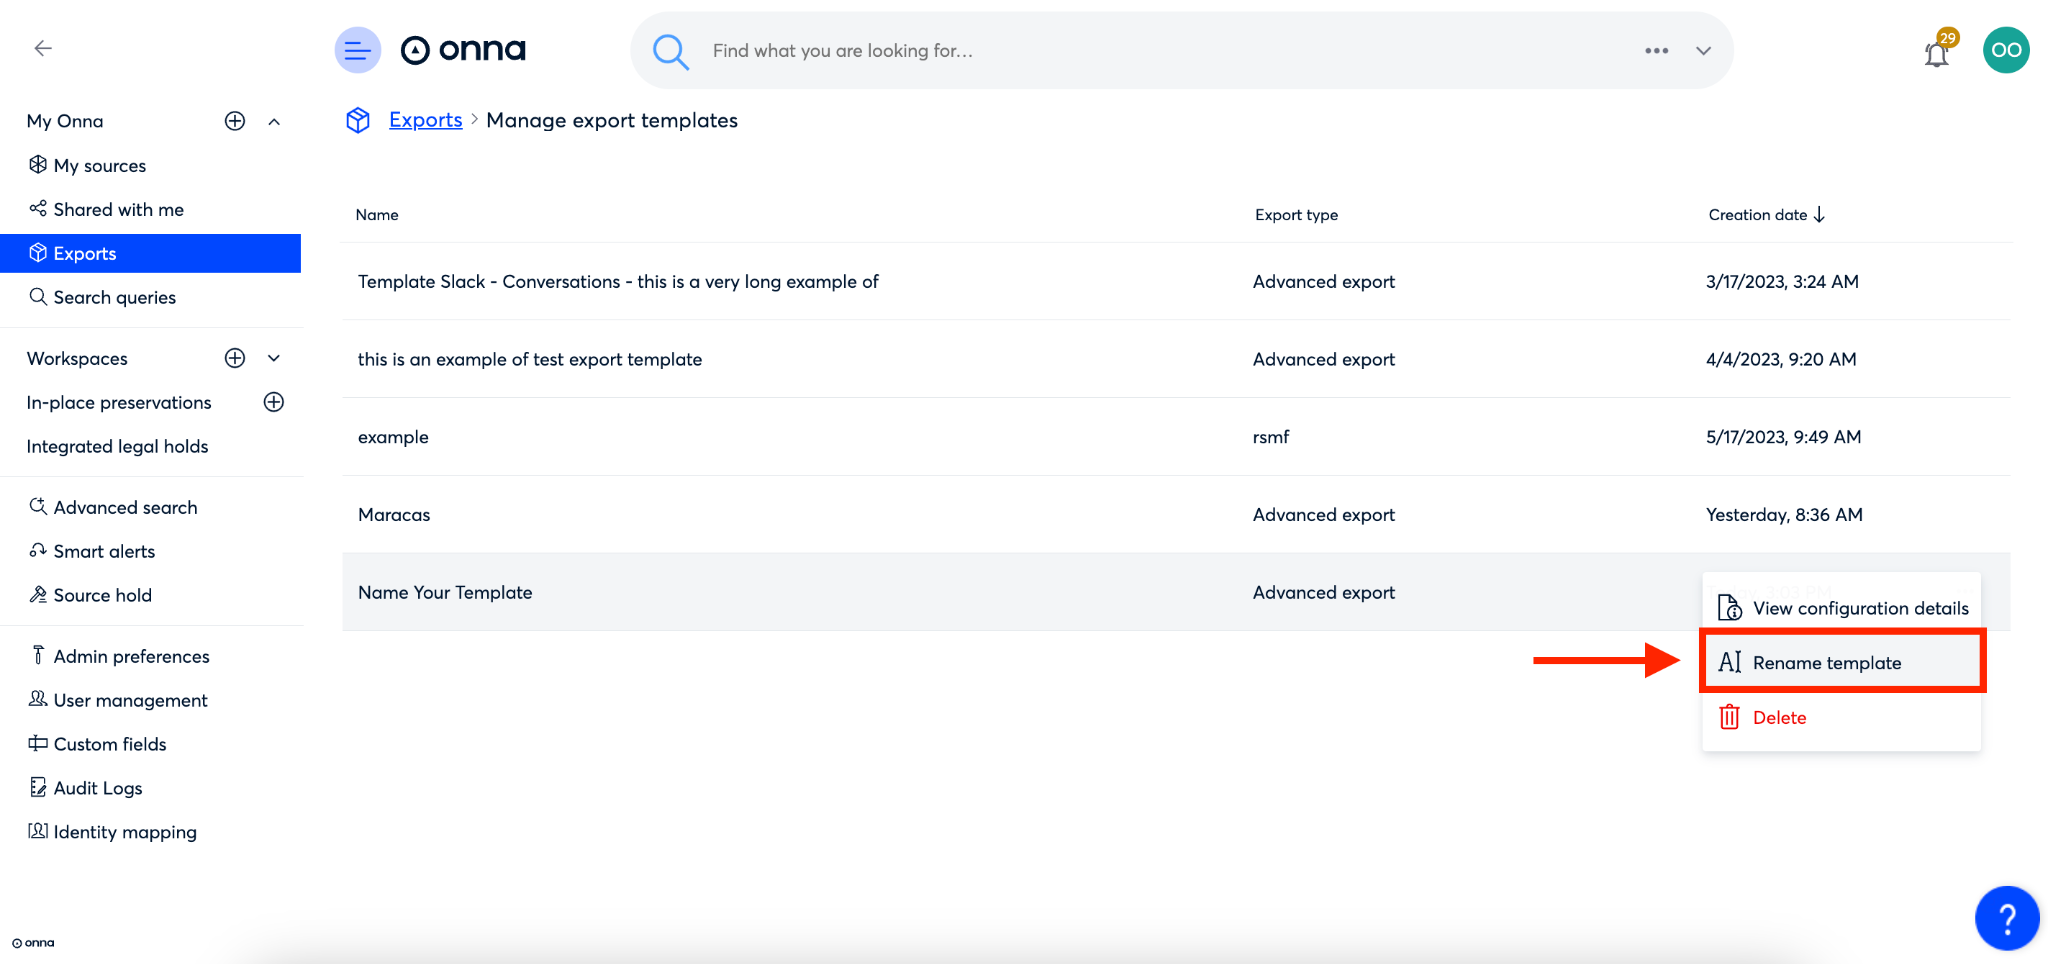
From the drop down menu that appears, select ‘Rename template’.
Step 4
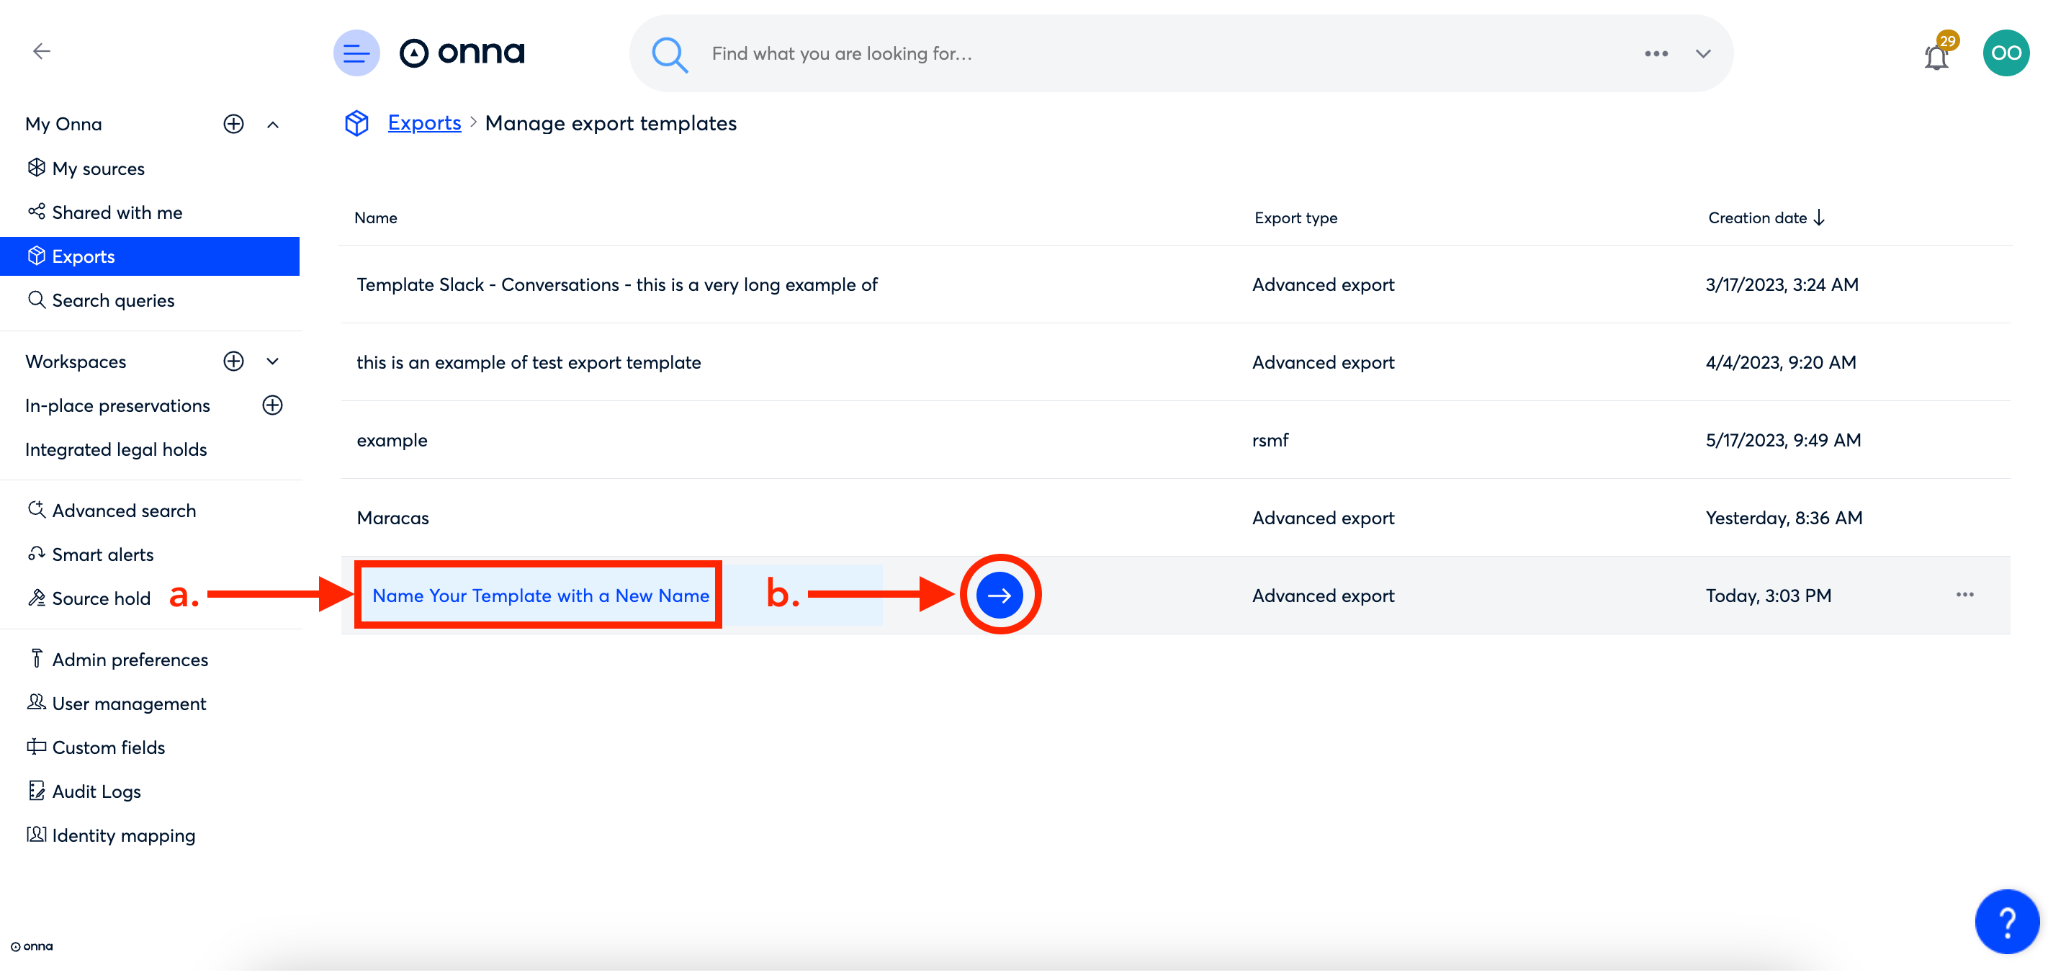
You’ll now see an editable text field pop up in blue over the current title of your export template. Simply click into the field and change the name (a). Then, click on the blue arrow to the right of the name (b).
The name of your export template is now changed.
How to Share an Export Template
Once you’ve configured your export and created a template, it is possible to share your export template to enhance to efficiency of your eDiscovery workflow. To share an export template, follow the steps below:
Step 1
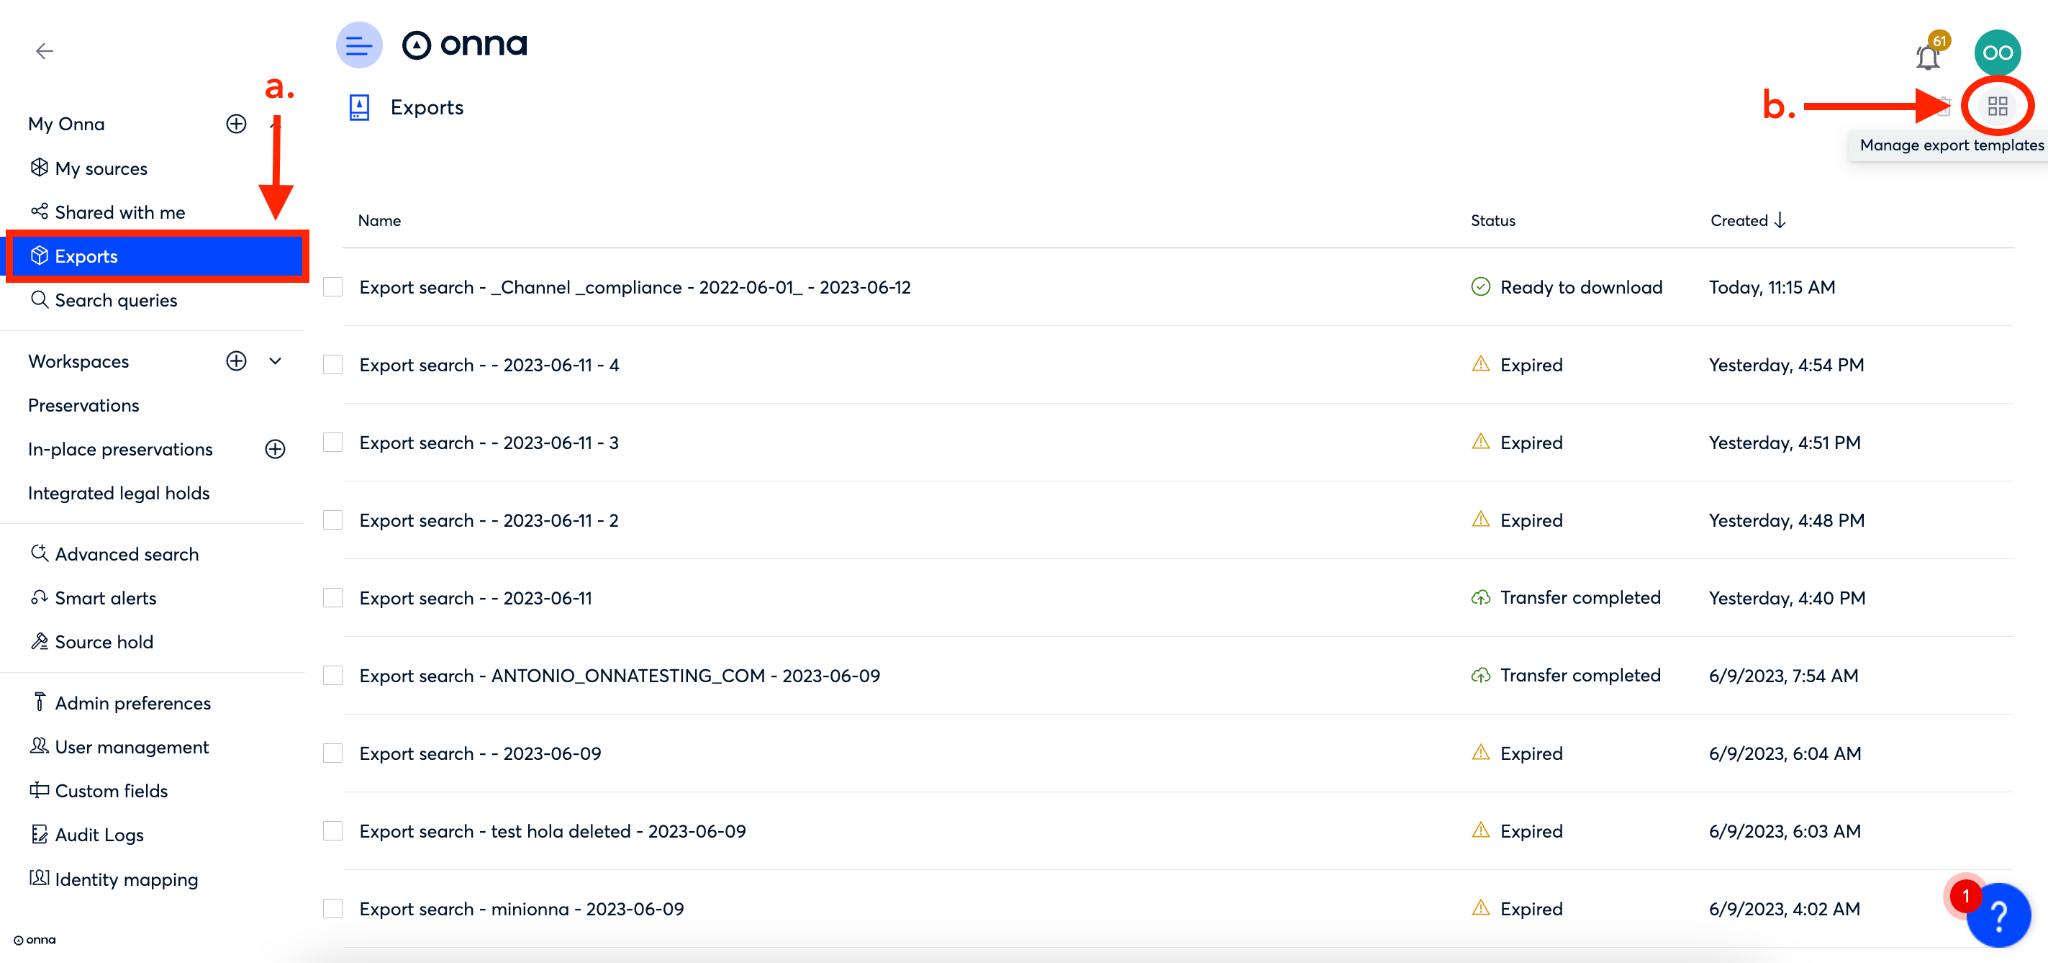
To begin, click on ‘Exports’ from the main menu (a). Then, click on the ‘Manage export templates’ icon in the upper right corner of the screen (b).
Step 2
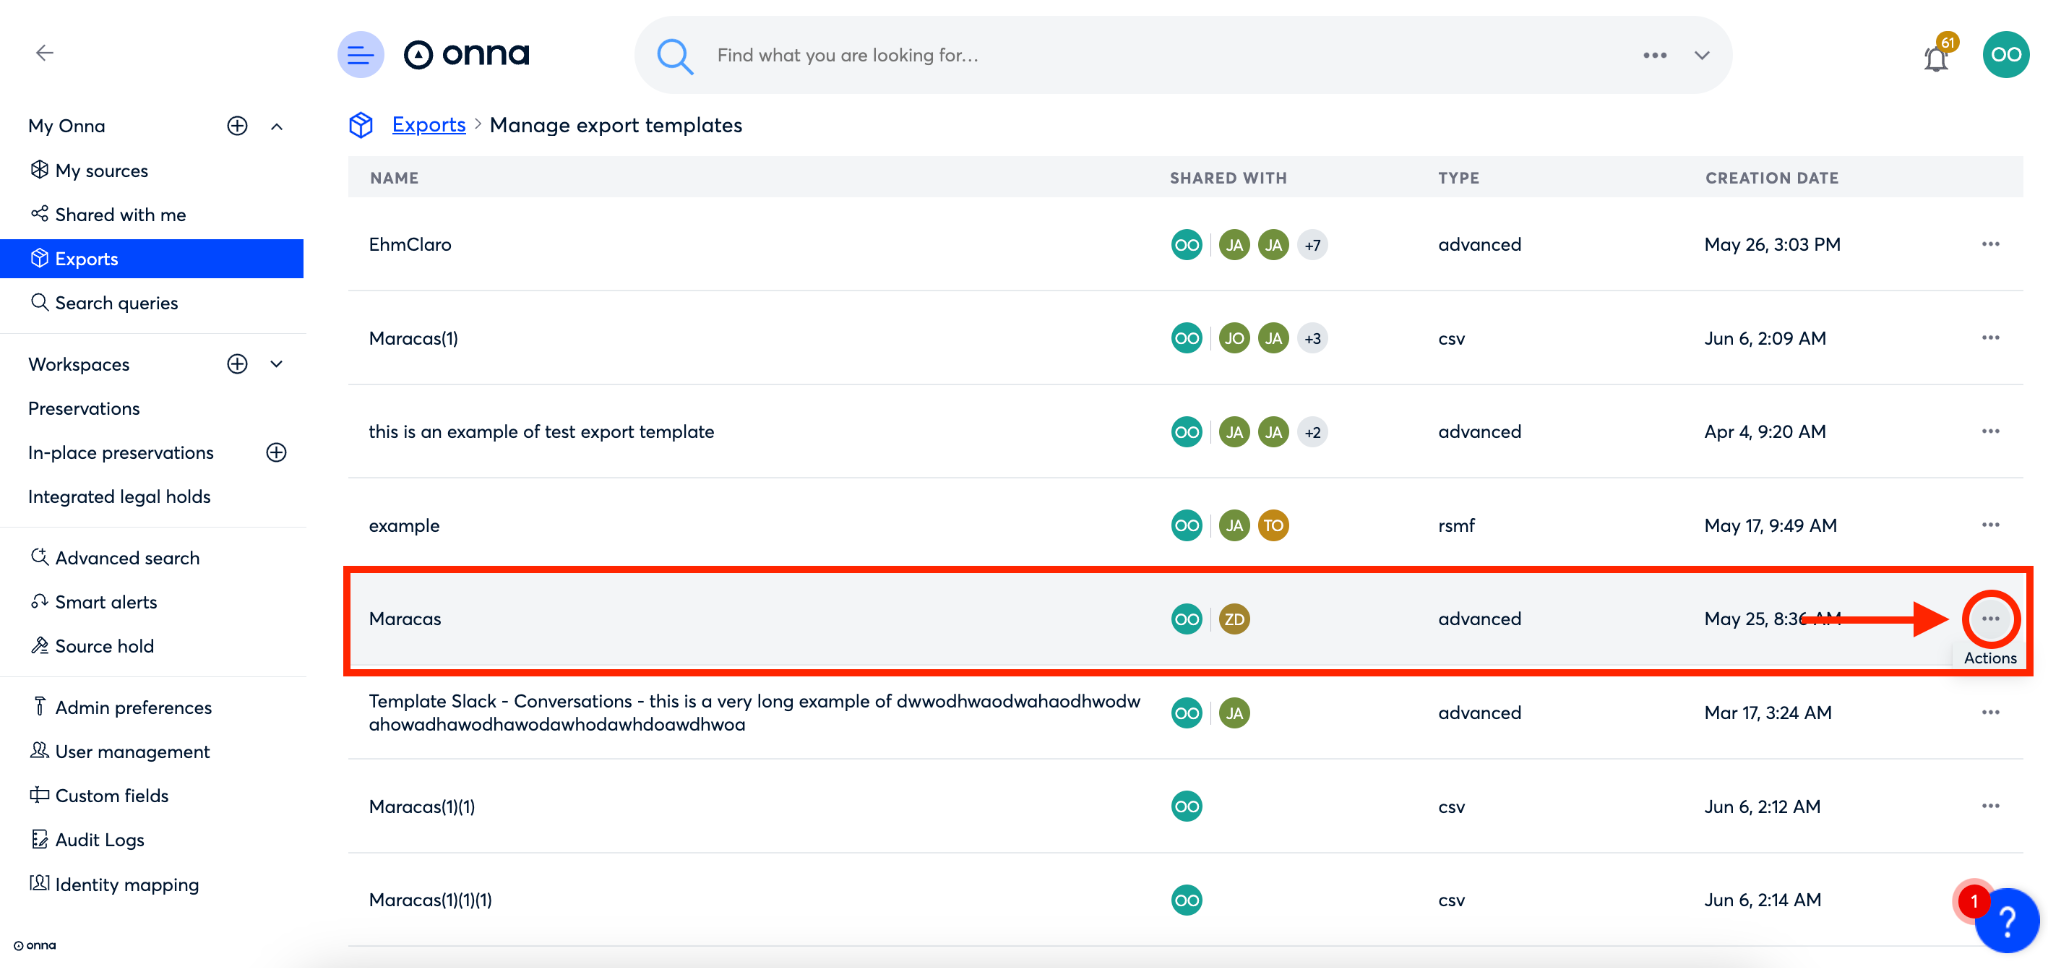
Next, find the export template you want to share, and click on the ellipsis on the right side of the export template row.
Step 3
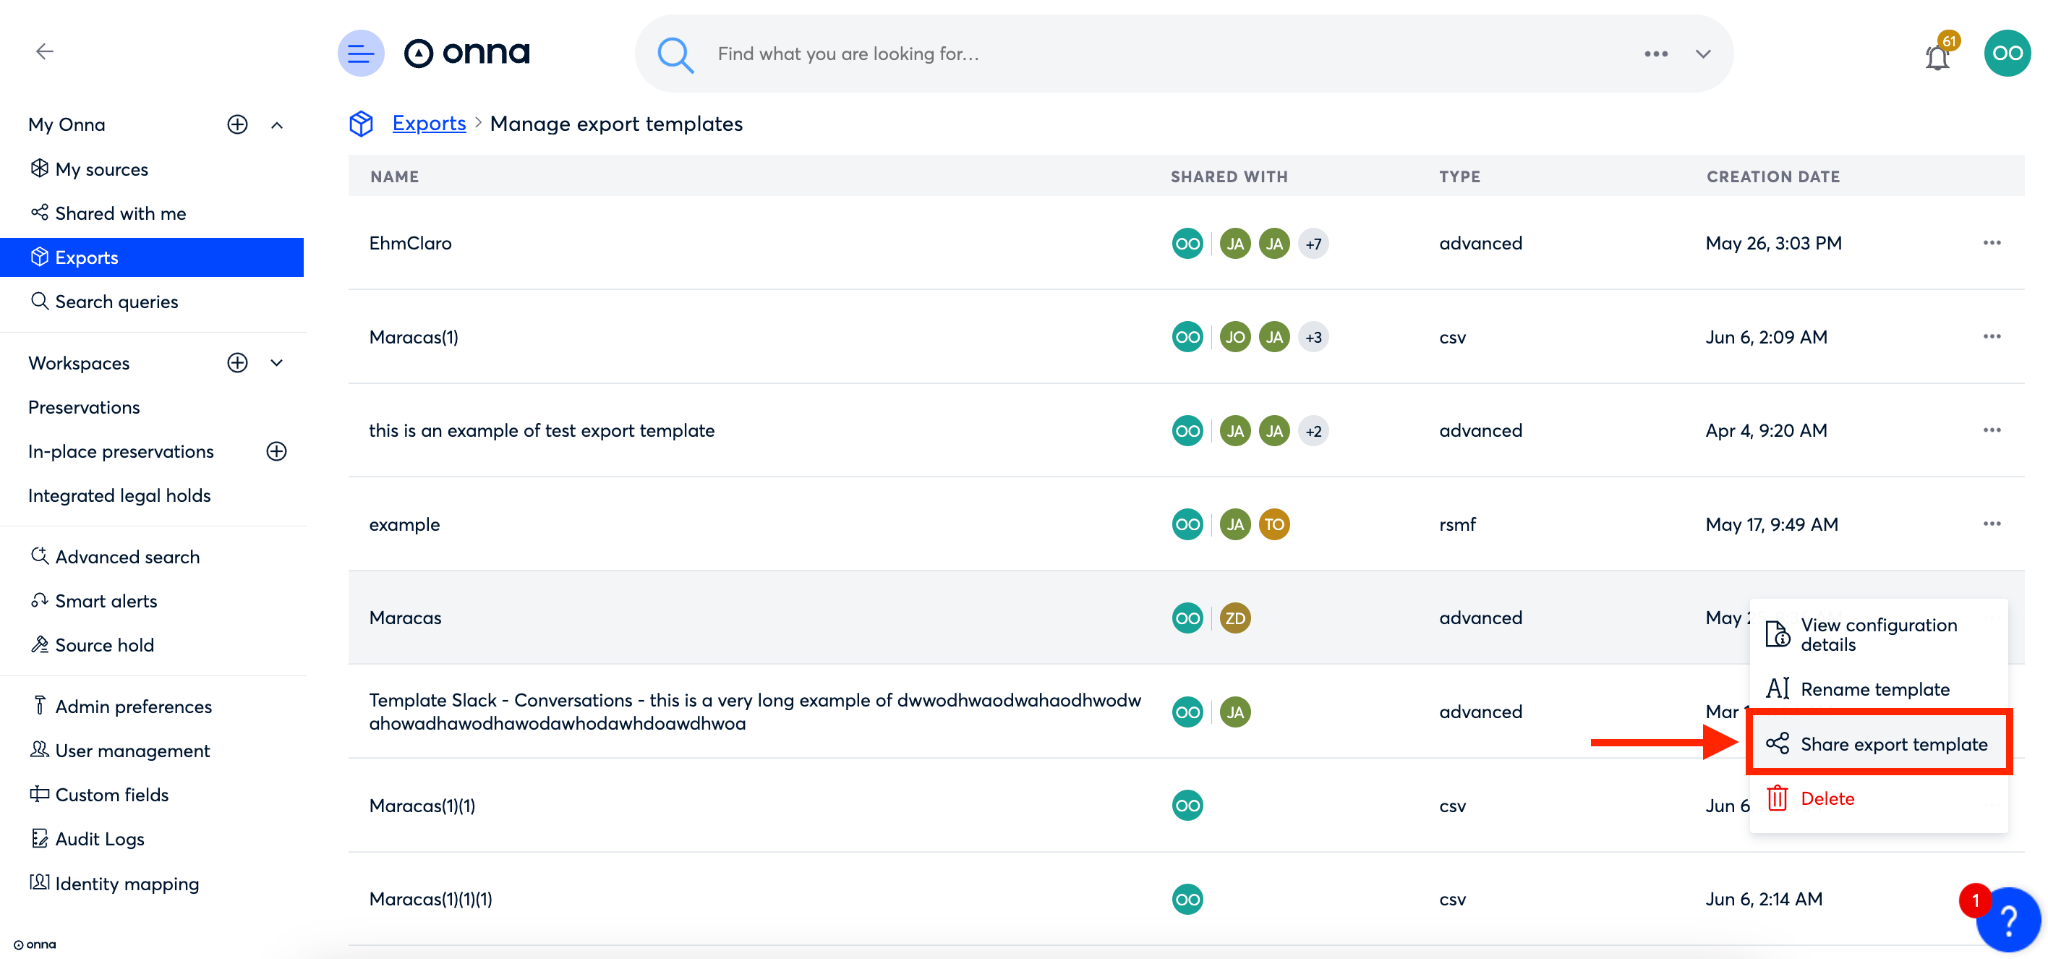
From the dropdown menu that appears, click on ‘Share export template’.
Step 4
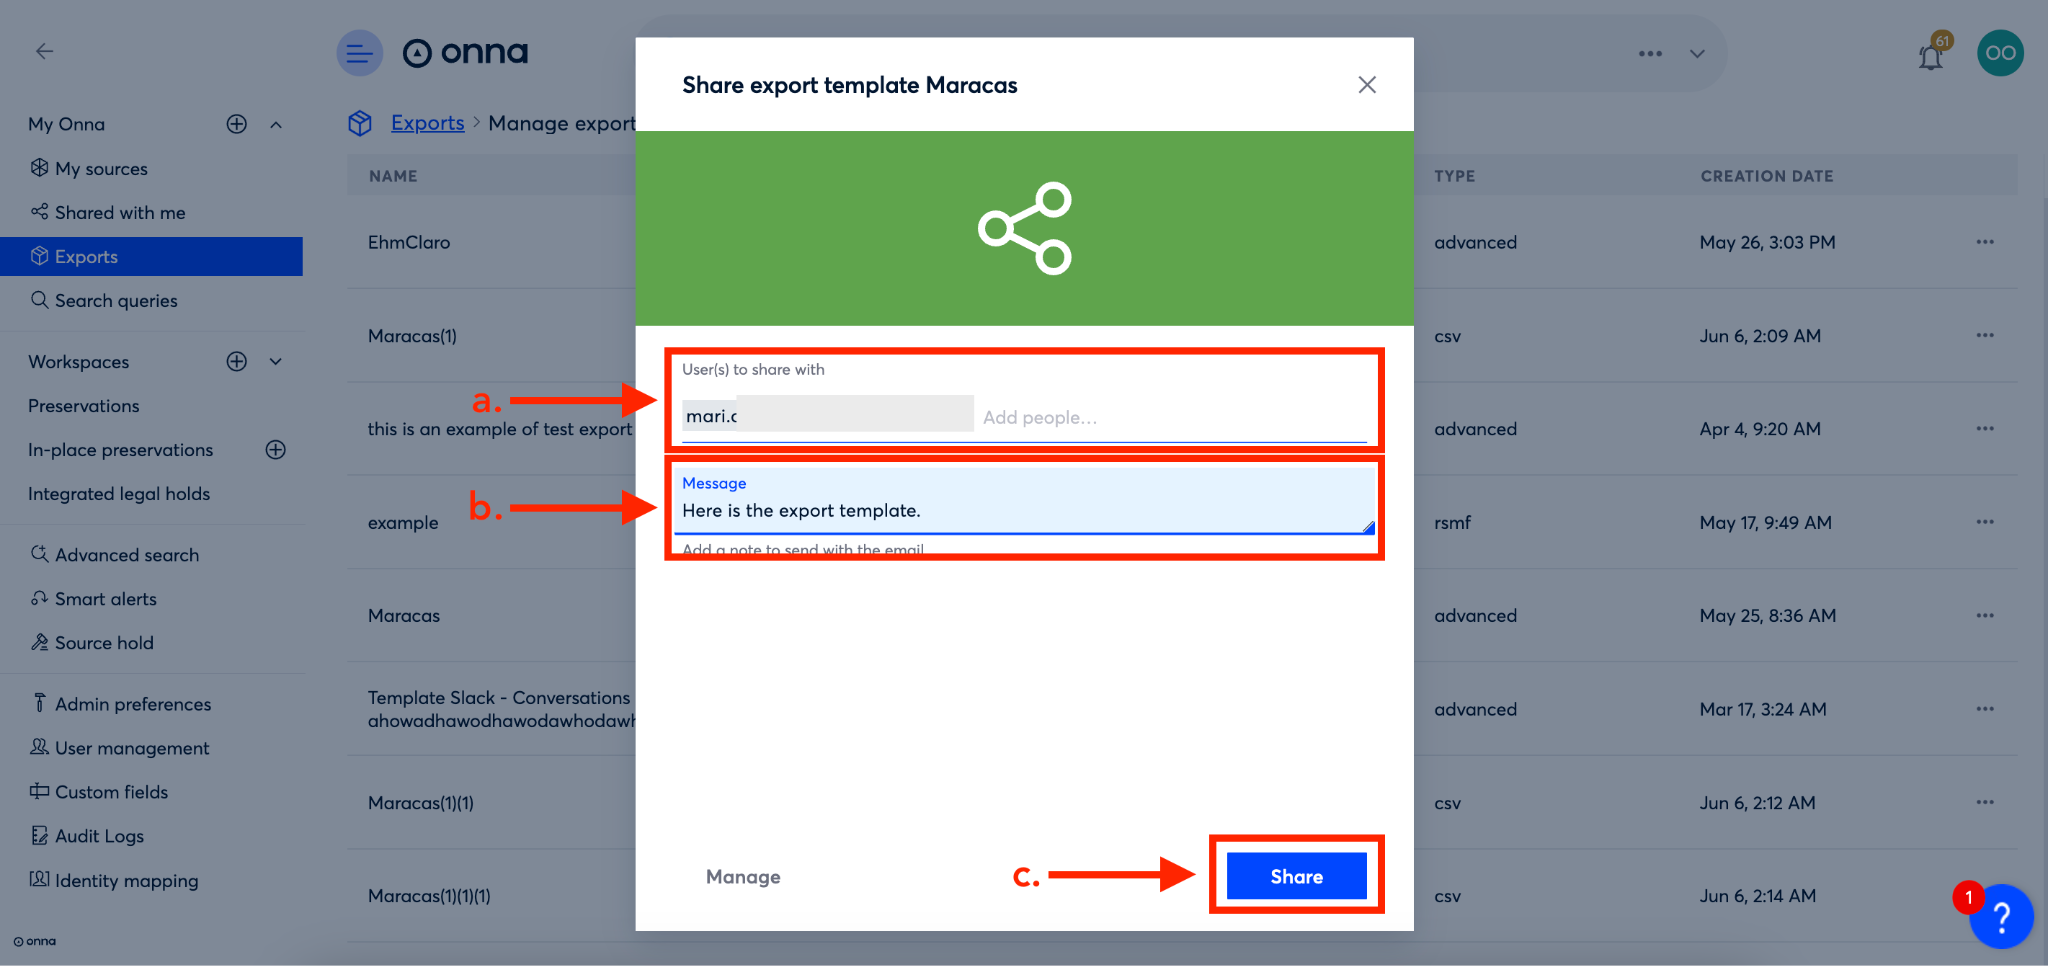
Once on the ‘Share export template…’ window you will select the user you want to share your export with (a), include an optional message (b), and then click on the blue ‘Share’ button at the bottom right corner of the screen (c).
Please note: Export templates can only be shared with individual users, not user groups.
How to Remove Export Template Members
After sharing your template with other members of your team there may be times when you need to remove export template members. To remove a member of your export template, follow the steps below:
Step 1
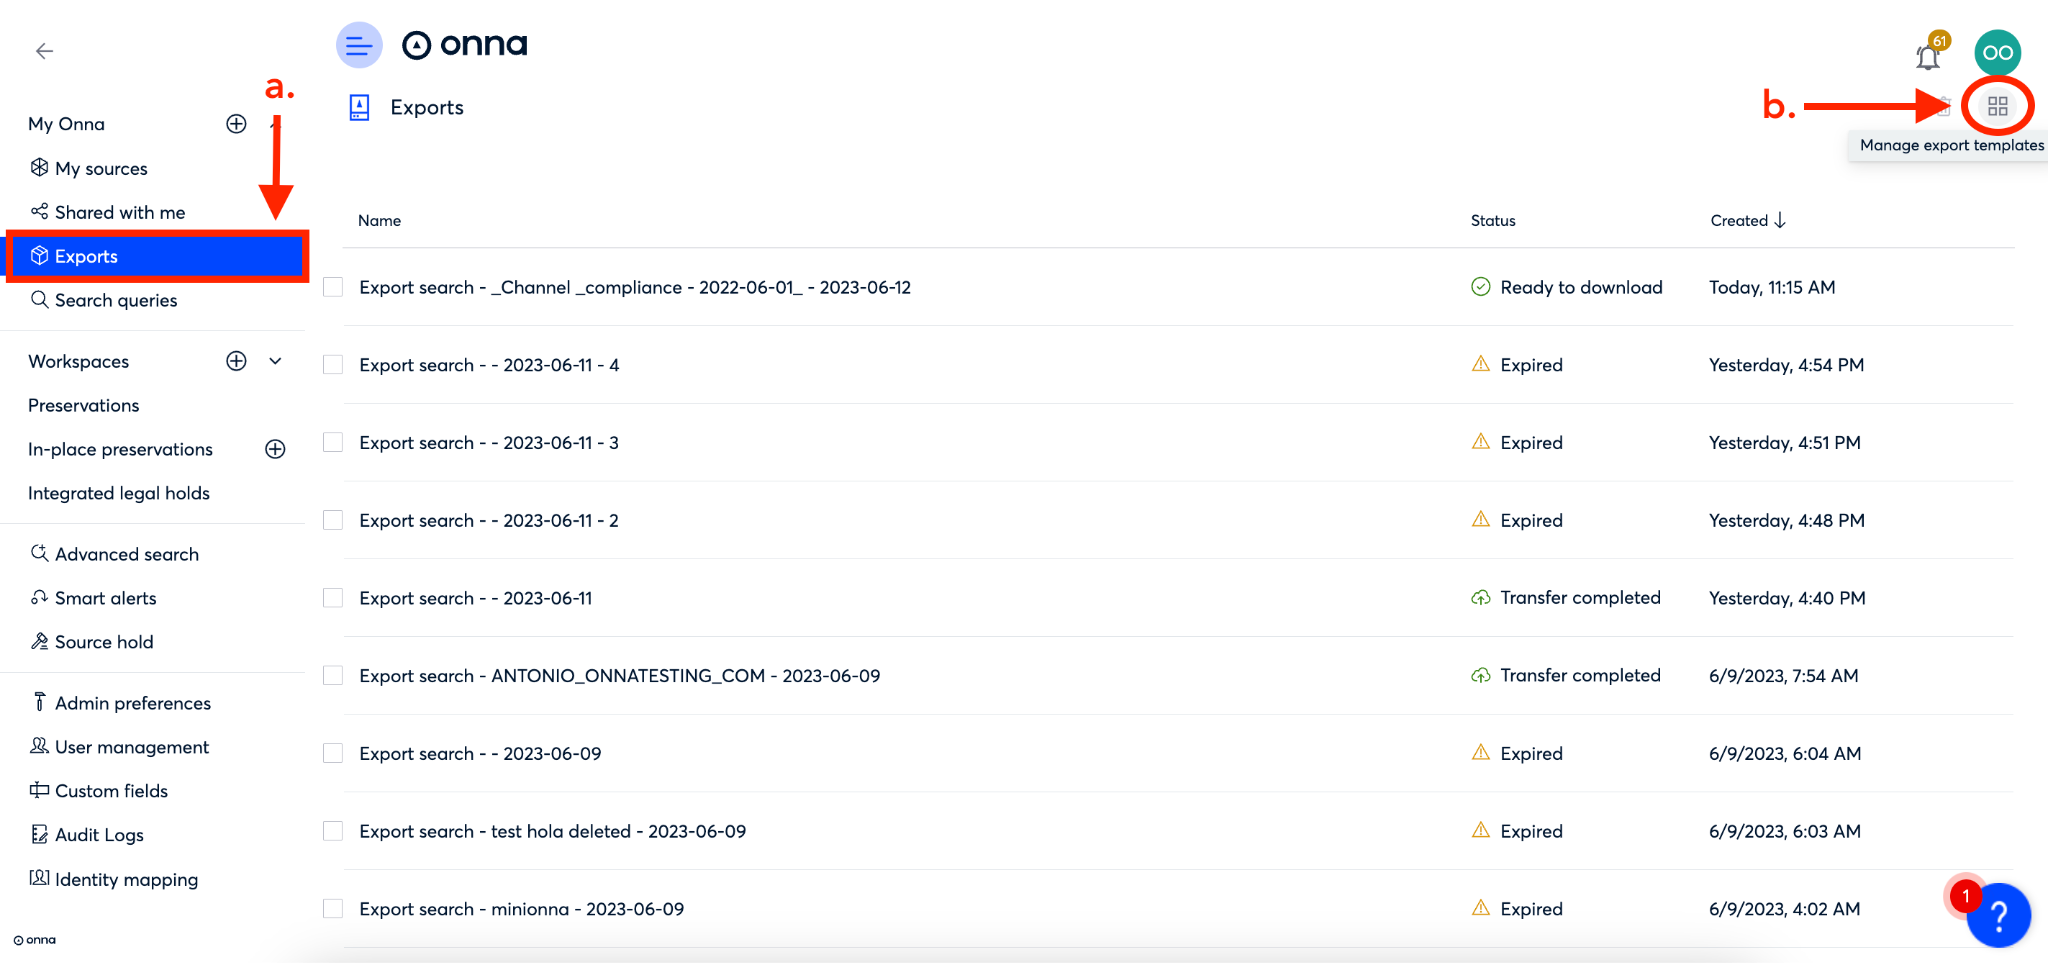
To begin, click on ‘Exports’ from the main menu (a). Then, click on the ‘Manage export templates’ icon in the upper right corner of the screen (b).
Step 2
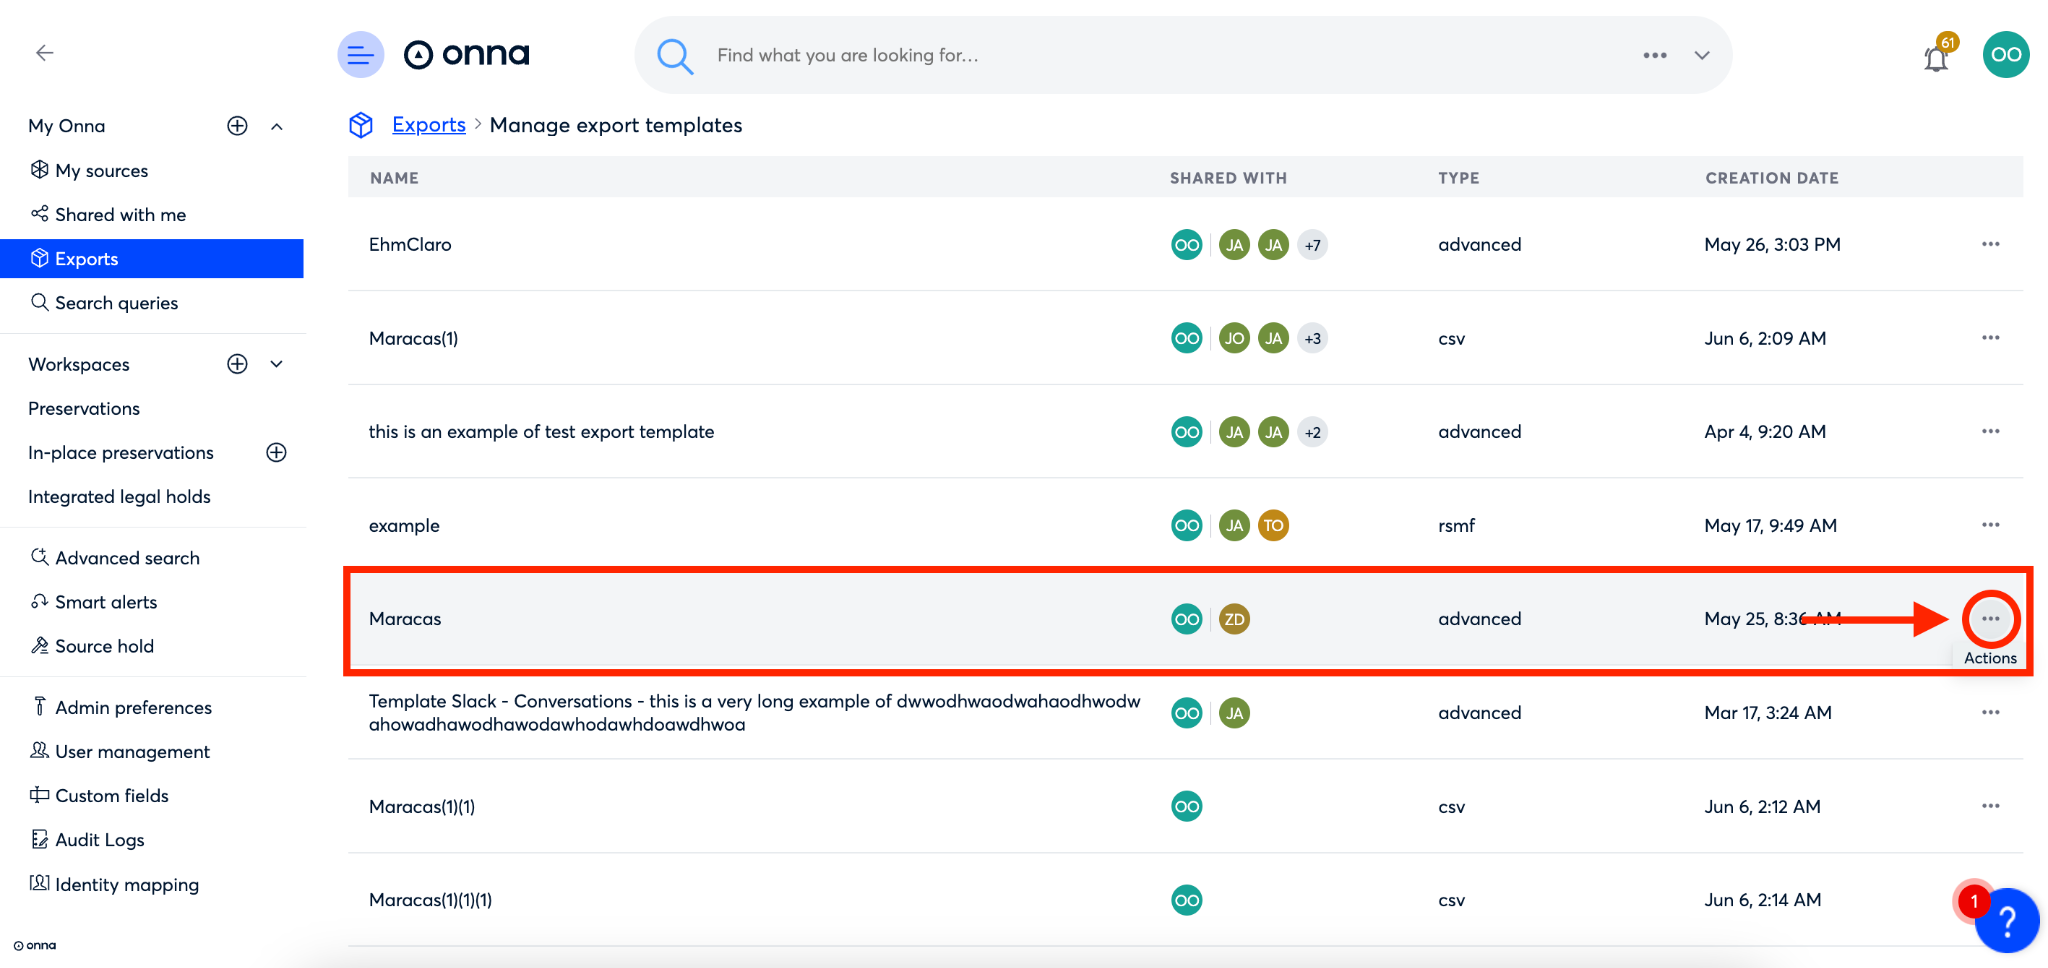
Next, find the export template you want to remove a member from, and click on the ellipsis on the right side of the export template row.
Step 3
From the dropdown menu that appears, click on ‘Share export template’.
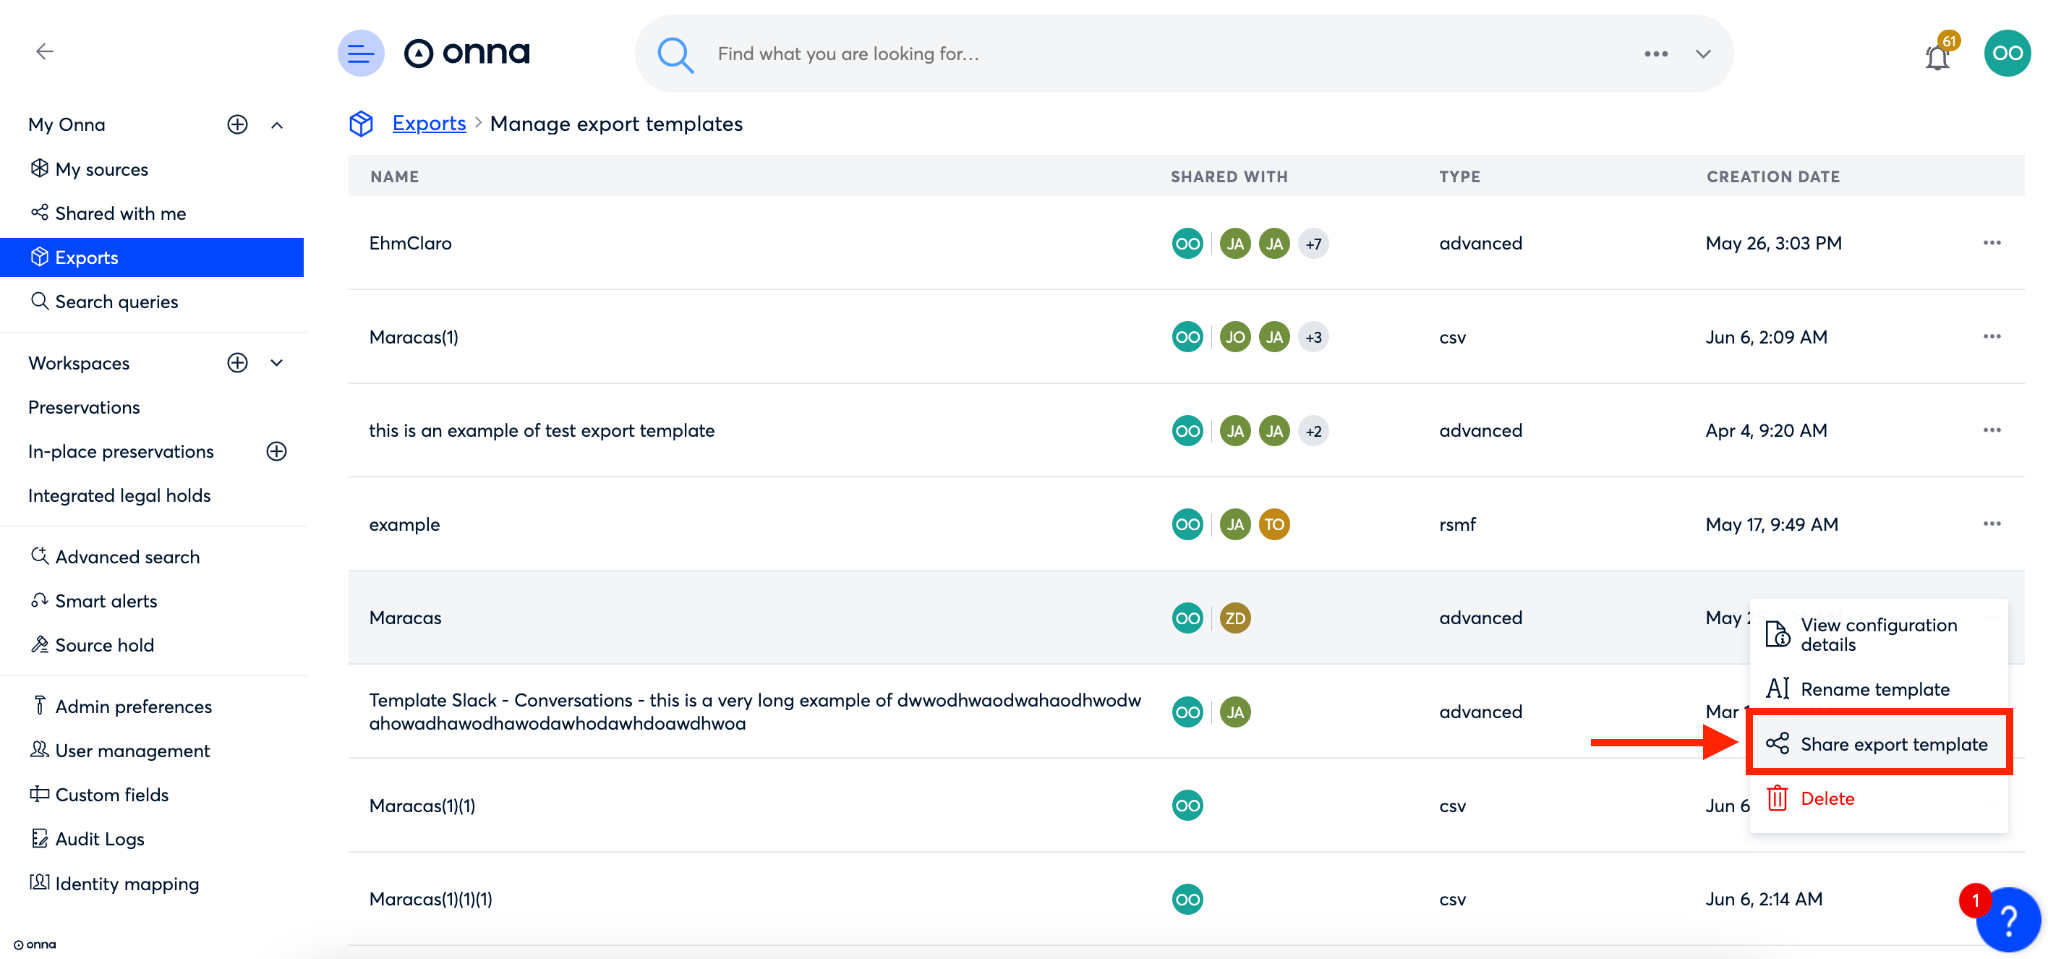
Step 4
Once on the ‘Share export template…’ window, click on ‘Manage’ in the lower left corner of the window.
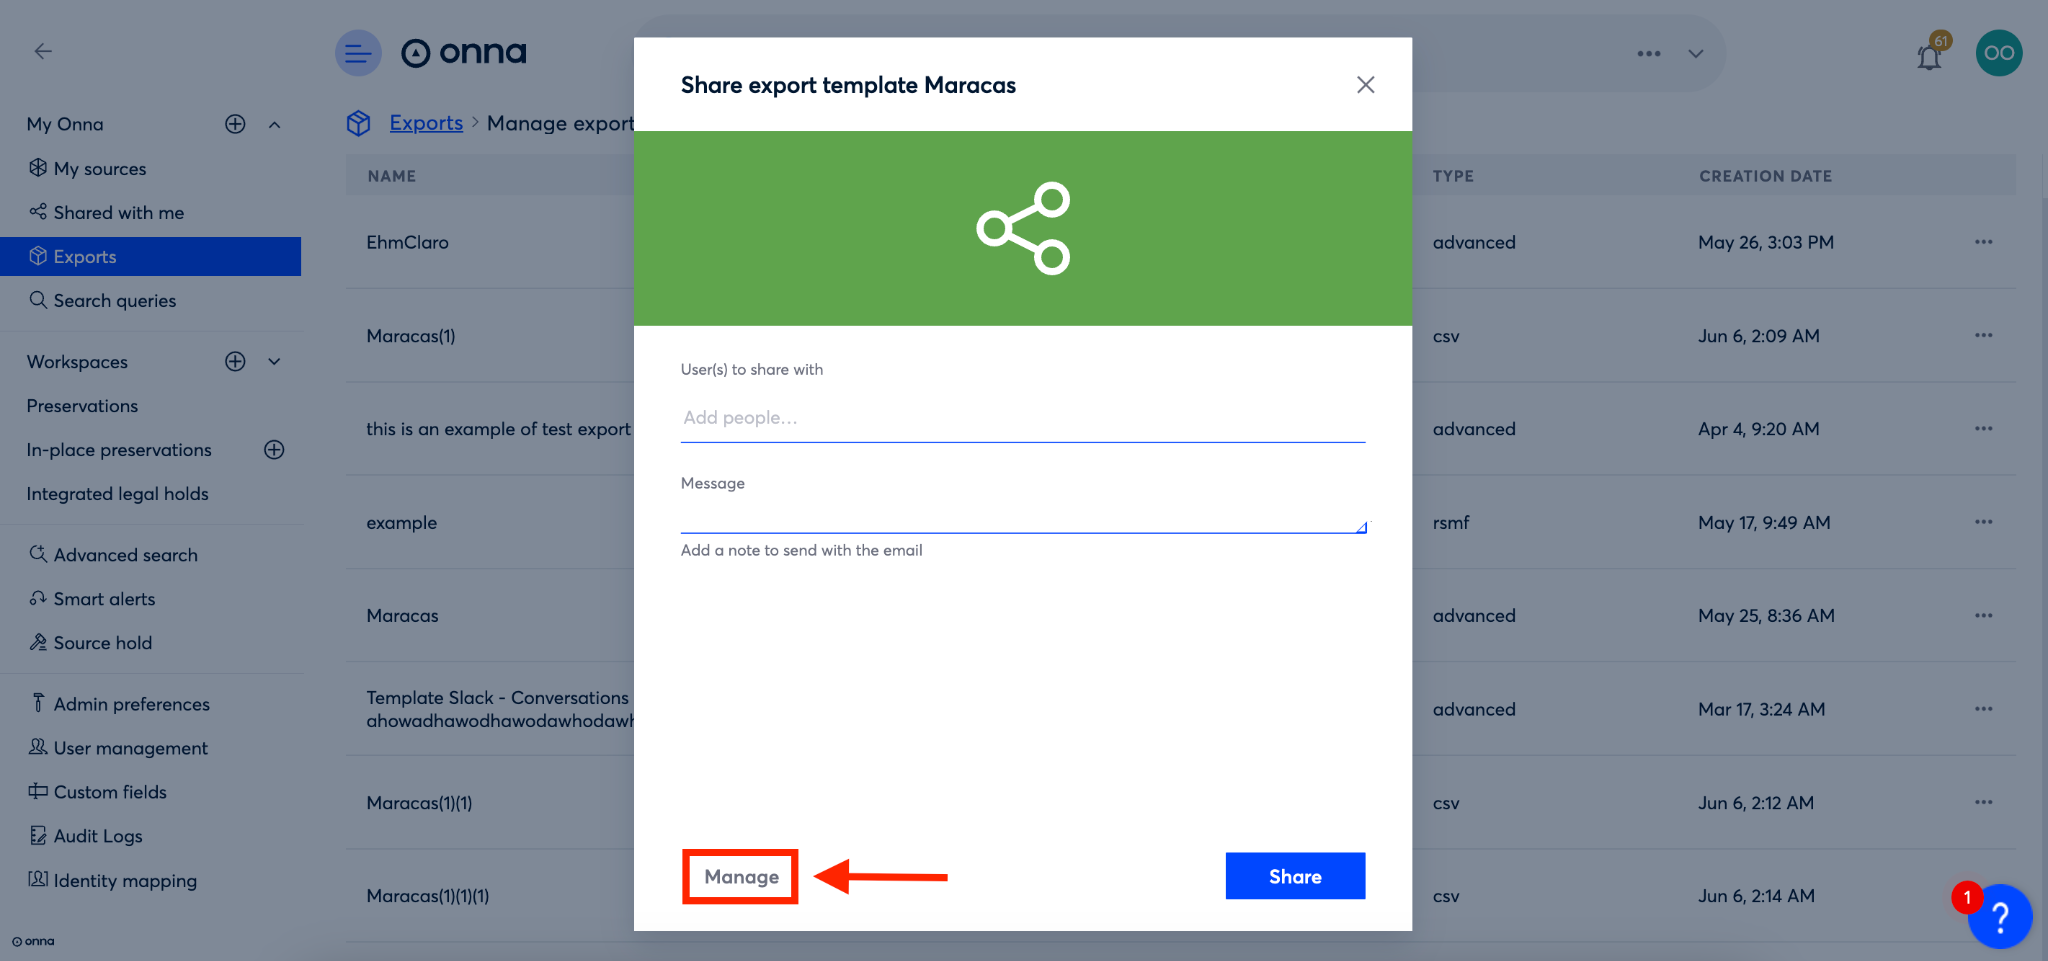
Step 5
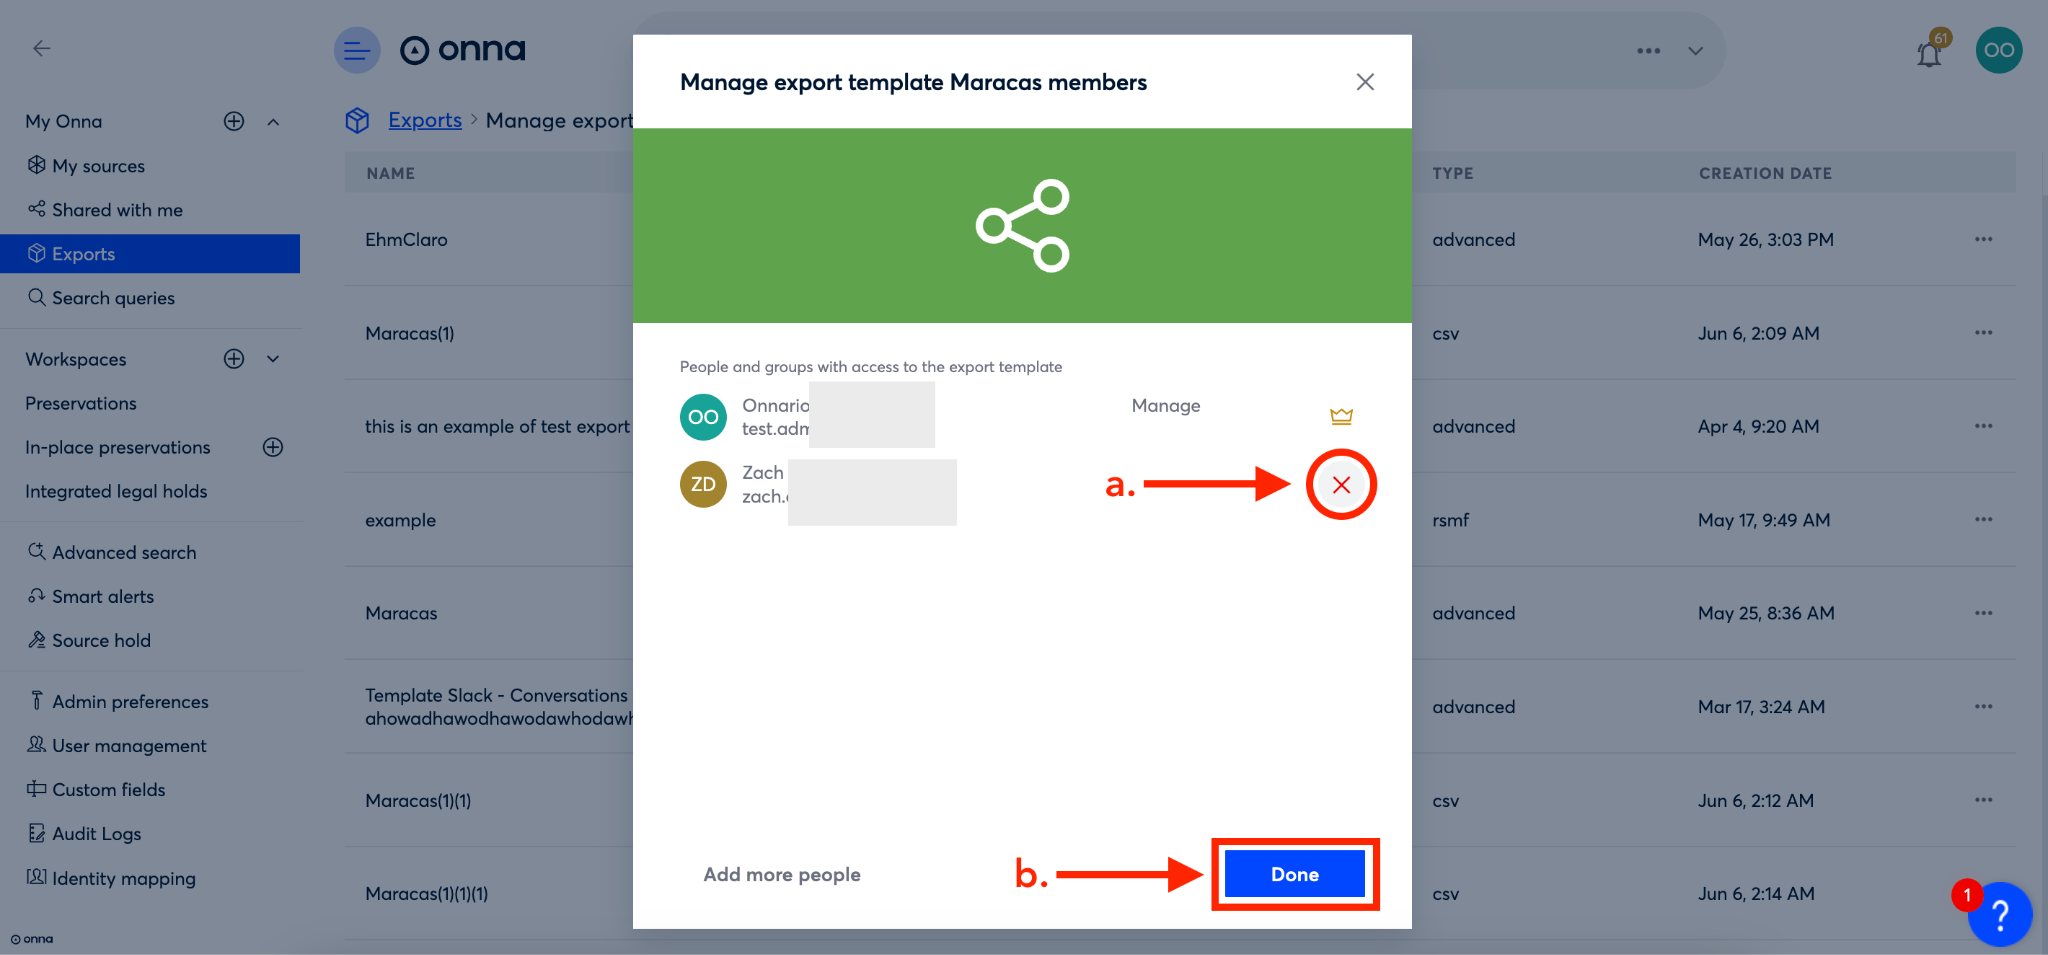
You will now see a list of members who have access to your export template. To remove a user from the export template, click on the red ‘X’ next to their name (a).
Once they have been removed, click on the blue ‘Done’ button (b) in the bottom right corner of the screen.
How to Delete an Export Template
In order to manage your export templates, you may need to delete them from time to time.To delete an export template, follow the steps below:
Step 1
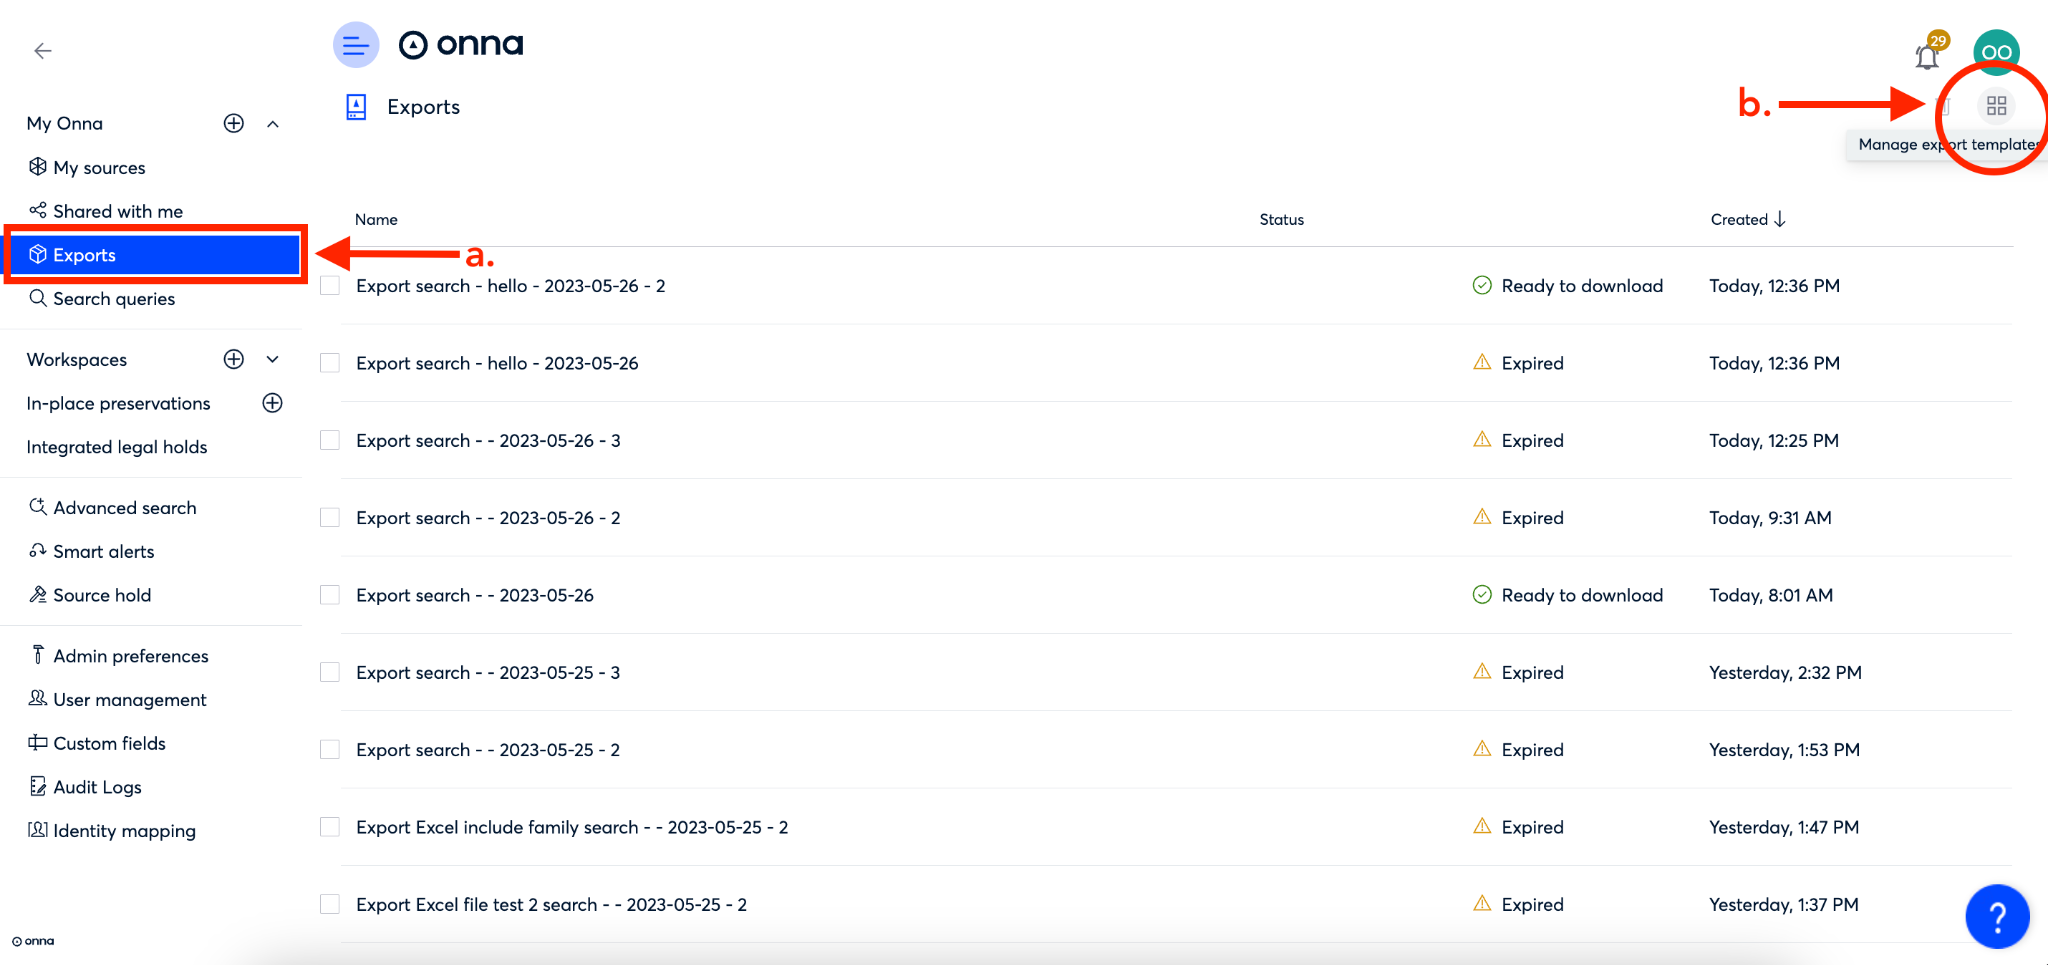
To begin deleting your export template, click on ‘Exports’ from the main menu (a).
Then, from the ‘Exports’ main page, click on the ‘Manage export templates’ icon in the upper right corner of the screen (b).
Step 2
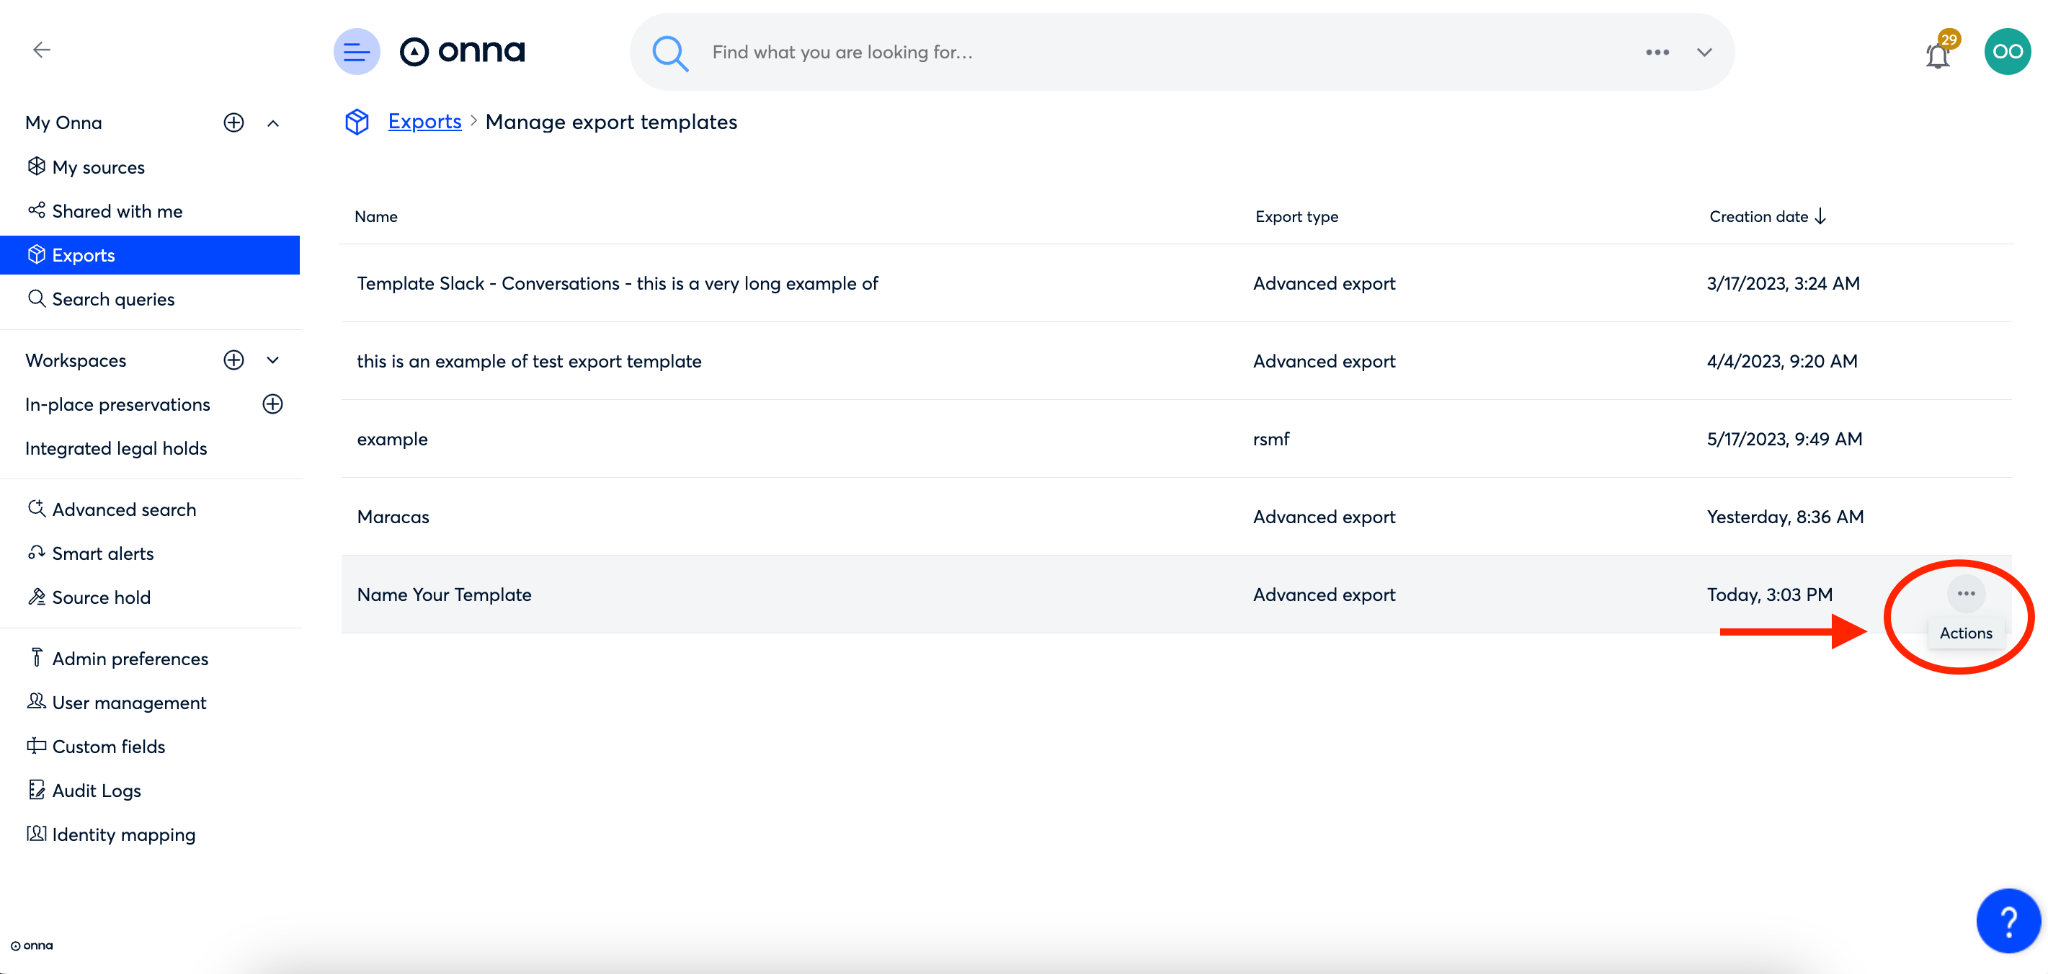
Next, click on the ellipsis to the right of the export template you want to delete.
Step 3
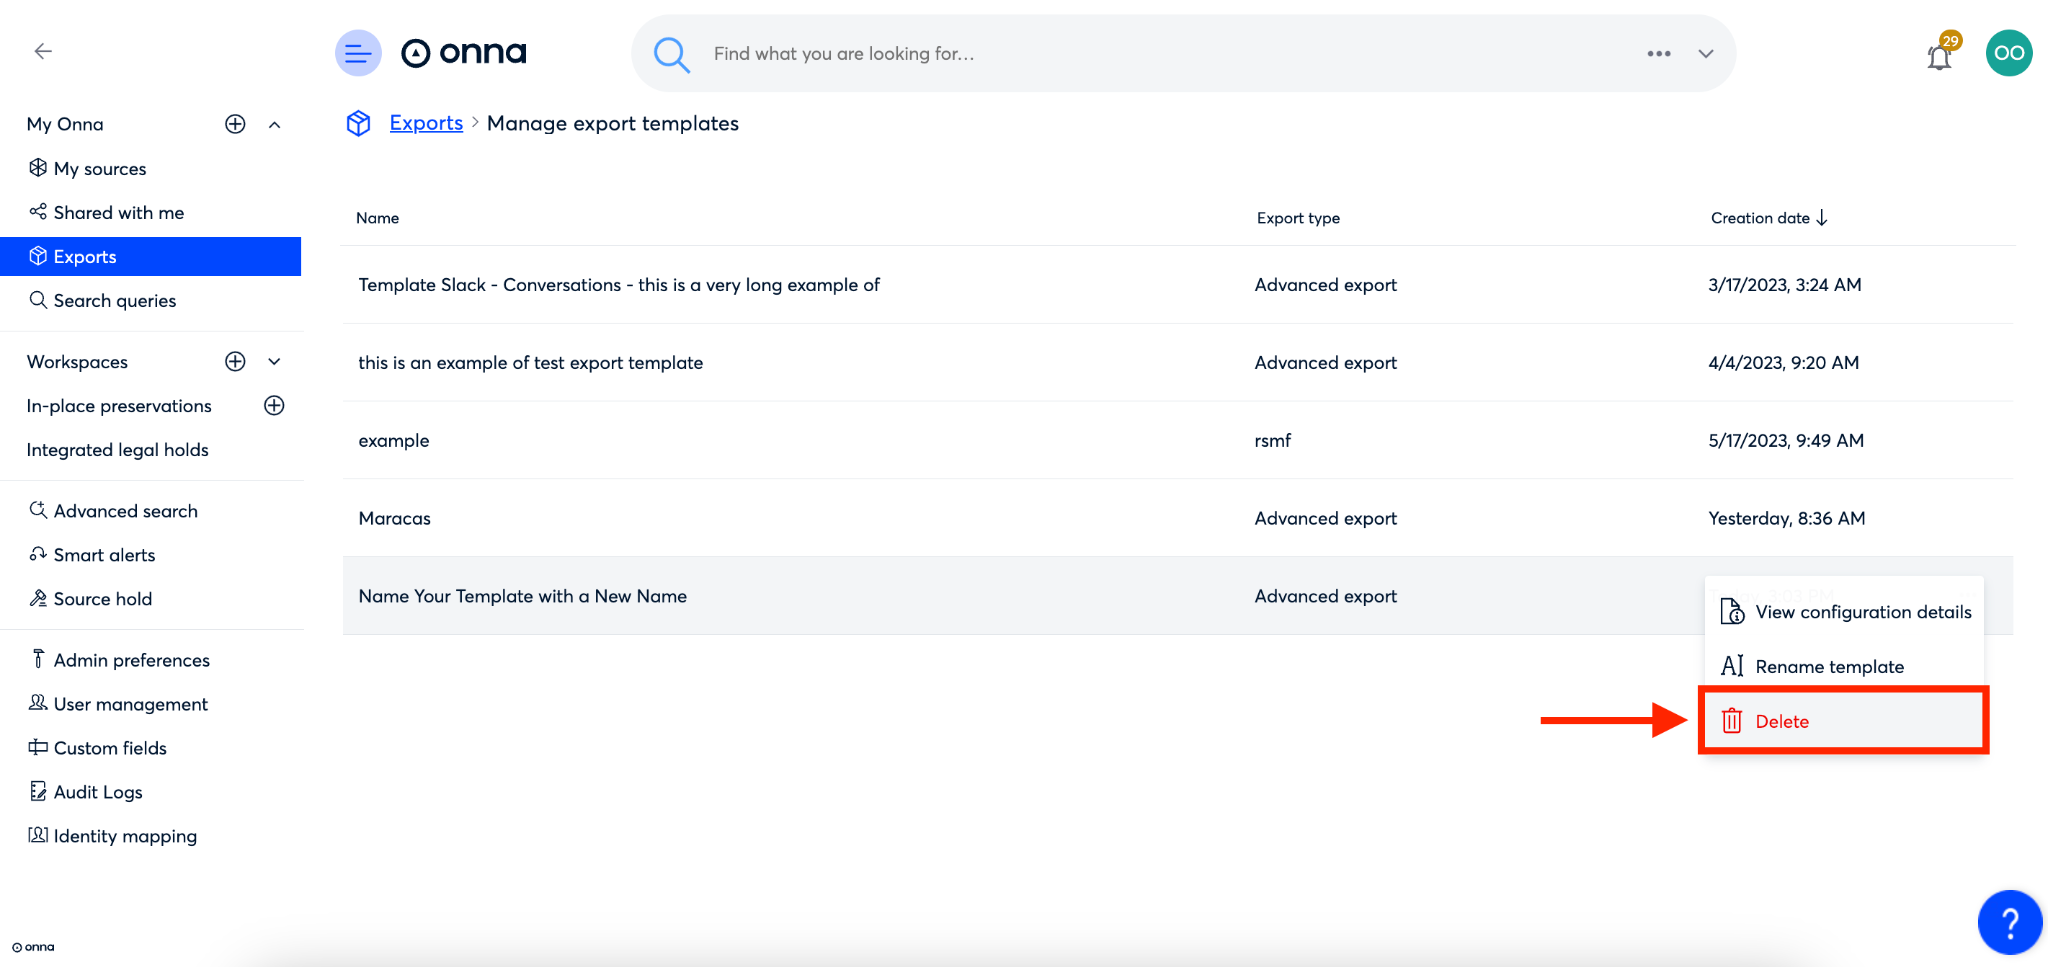
From the drop down menu that appears, select ‘Delete’.
Step 4
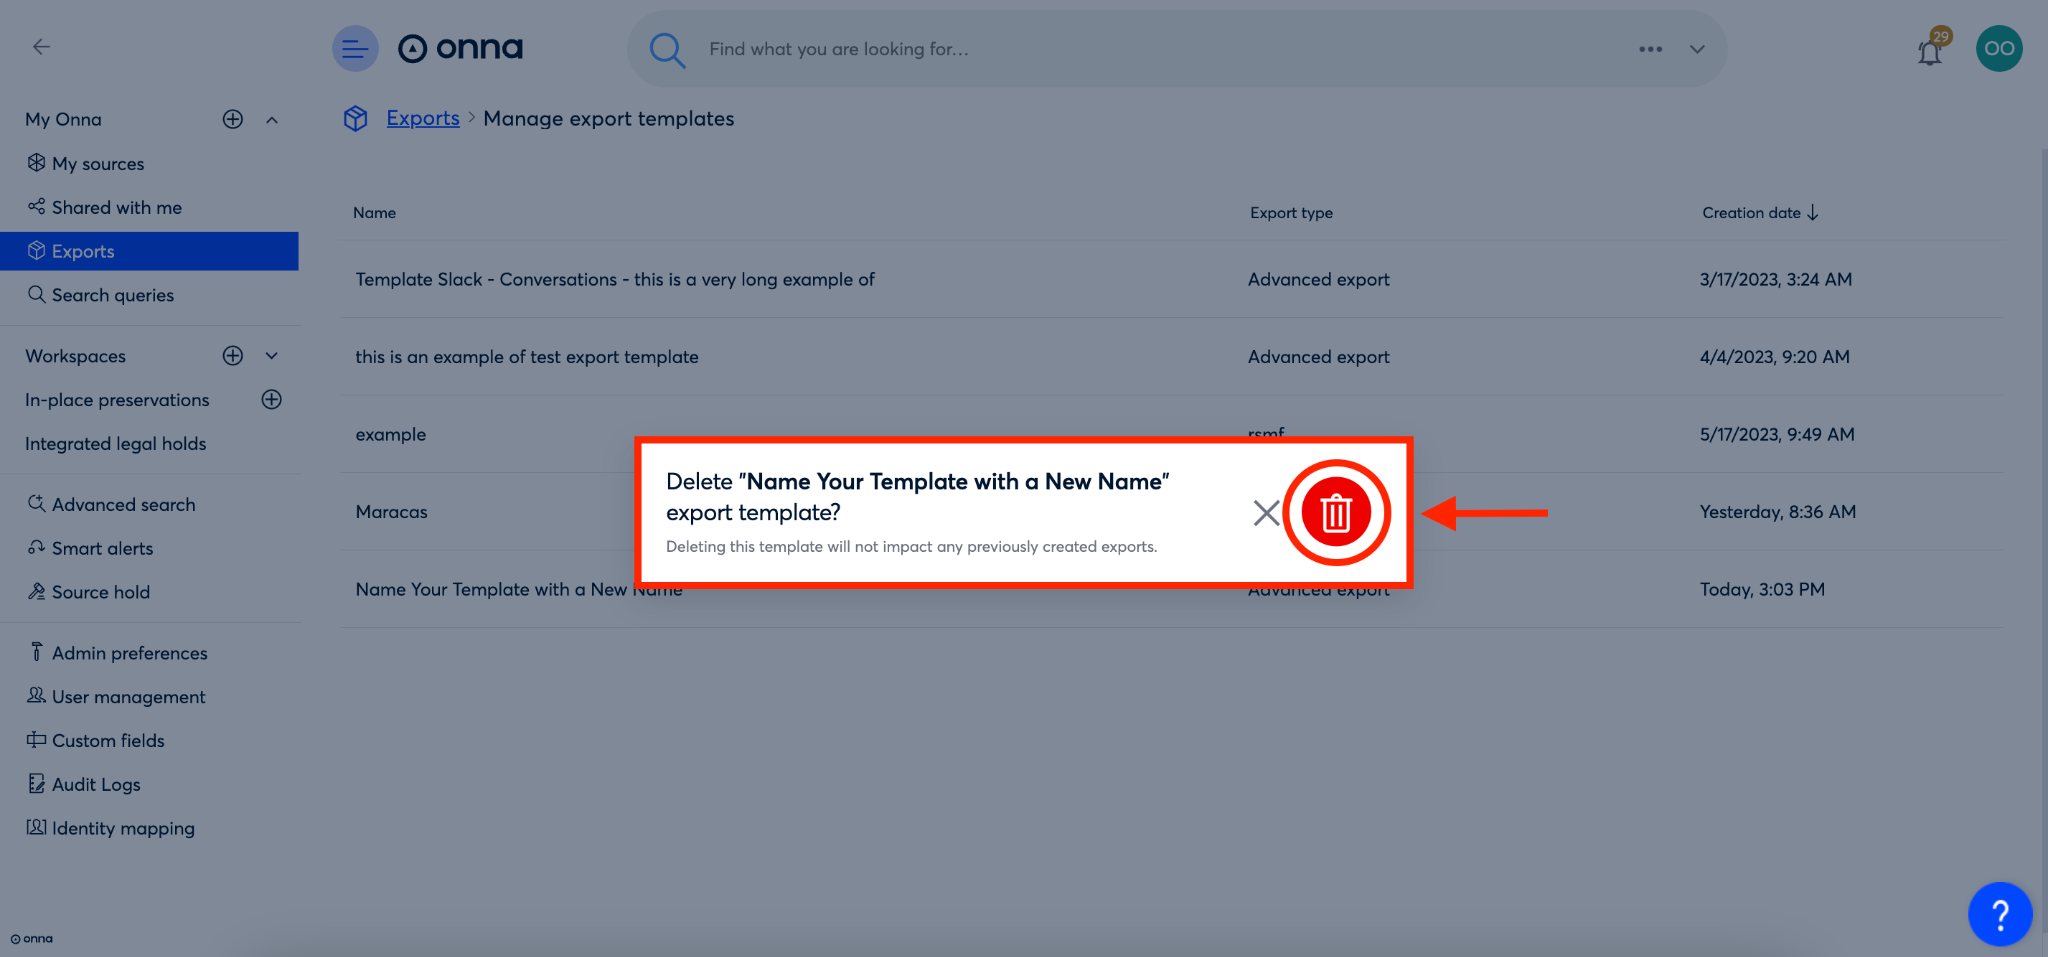
You’ll now see a pop-up appear asking you to confirm that you want to delete this export template. To confirm and delete, click on the red trash can icon on the right side of the pop-up. To cancel the deletion click the gray ‘X’.
Your export template is now deleted and removed from your list of export templates.
Please Note: Once your template is deleted it cannot be recovered.
.png)