Slack Enterprise_ How to Connect and Collect
- 29 Oct 2024
- 12 Minutes to read
- Print
- DarkLight
- PDF
Slack Enterprise_ How to Connect and Collect
- Updated on 29 Oct 2024
- 12 Minutes to read
- Print
- DarkLight
- PDF
Article summary
Did you find this summary helpful?
Thank you for your feedback

In this article:
Slack Enterprise Overview
Slack Enterprise Considerations
Slack Enterprise Requirements
Creating a Non Custodian-Based Collection in Slack Enterprise
Creating a Custodian-Based Collection in Slack Enterprise
Slack Enterprise Overview
Slack is a team communication and collaboration tool. Onna integrates with Slack's Discovery API to extract all related data and metadata from entire Slack workspaces, specific user accounts, specific channels, and/or private/multiparty chats. The Discovery API does need to be enabled on your Slack Enterprise Grid Account if it hasn't been already.
Connector Features | |
Authorized Connection Required? Yes | Is identity mapping supported? Yes |
Audit logs available? Yes | Admin Access? Yes |
Supports a full archive? Yes | Custodian based collections? Yes |
In-place preservations supported? Yes | Resumable sync supported? Yes |
Preserve in place with ILH? Yes | Syncs future users added later automatically? Yes |
Sync modes supported:
| Is file versioning supported? Yes |
Types of Data Collected | Metadata Collected |
| In addition to standard metadata (file name, file size, etc) Onna also collects the following Slack specific metadata:
|
If you created a Slack Enterprise authorized connection prior to August 22, 2023 and want to collect custom Emojis you will need to set up a new authorized connection. Your existing authorized connections can remain as they are. With the new authorized connection, your existing connections will also be updated.
Slack Enterprise Considerations
Canvas
When collecting a Canvas from Slack Enterprise, the Canvas rendering in Onna does not include emojis or embedded Canvases. Additionally we do not currently support the collection of inline comments or revisions.
Upload a Channel List
Prior to creating a collection in Slack you may want to consider having the Slack Administer export a CSV of the channels. If the channel list is very large this will allow you to select individual or smaller groups to expedite the load time. See Export Your Workspace Data.
Slack Enterprise Requirements
Before setting up a new sync using the Slack Enterprise connector you will need to have access to authorized connection credentials in Onna. To learn more about how to set up and share an authorized connection visit the article, Creating and Managing Authorized Connections in Onna.
In order to set up an authorized connection for Slack Enterprise you will need the following information:
Slack Org Owner Account
The credentials for the account are needed to establish an authorized connection. It is recommended to use a service account to establish the connection.Slack Discovery API
The Slack Discovery API must be enabled on the account. To enable the Slack Discovery API an Org Owner needs to email [email protected] to say they'd like to enable the Discovery APIs for their organization.
Slack will promptly enable the org after verifying the email address matches an Org Owner. If Slack fails to respond, you can use the below URL to verify the status of the Discovery API: https://my.slack.com/services/export.
To access certain features in Onna, such as Integrated Legal Holds, you need to have access to Slack Enterprises’s Legal Holds API.
How to Connect and Collect Using Slack Enterprise
Once you have the authorized connection credentials necessary you can set up a new sync by following the steps below:
Creating a Non Custodian-Based Collection in Slack Enterprise
Step 1
Navigate to the workspace where you want to set up your sync.
Inside that workspace click on the ‘+’ icon in the upper right corner of the screen to ‘Add source’.
.png "image(165).png")
.png "image(165).png")
Step 2
You will now see a list of all sources enabled for your organization. Find and select the ‘Slack Enterprise’ source.


Step 3
You’ll now define the basic information for your new sync, including:
The name of your sync (We will autofill this field with the name of your source, but you can change it)
The sync mode you’d like to use
The start date for your sync (Note: If you’re choosing a one-time sync you’ll enter an start and end date for your sync)
Optional: If you need to, you can switch the authorized connection credentials you want to use to set up the sync by clicking switch account
Once you’ve selected the right account select the blue ‘Continue as...’ button

Step 4
Next, you will select the content you want to include in the sync. To do so you will:
Select the type of direct messages you’d like to include in your sync.
Select the type of channels you’d like to include in your sync.

Select Canvas to include canvases in your collection.
Note:
Canvases that are part of a conversation will always be collected. Canvas is captured at the root level. If the Canvas has been shared, the attachment will also be included.

Select Lists to include Slack Lists in your collection.
Note:
Lists that are part of a conversation will always be collected. Lists are captured at the root level. Comments and mentions are not captured in the list. If a list is shared, it is captured at the root level as well as the attachment that was shared.

Select Modern attachments to collect attachments from Google Workspace accounts with an authorized connection in Onna. Then, select the GWS authorized connection you'd like to use for the collection from the 'Account credentials' dropdown.
Note:
If the account you want to use is not in the 'Account credentials' dropdown, you can click 'Use another account'. You will then be redirected to Authorized Connections to add new credentials. This will cancel your source creation and you will need to start the Slack collection workflow again once you've added new credentials.

Click the blue Next button.


Step 4a - Option to Select from a Channel List
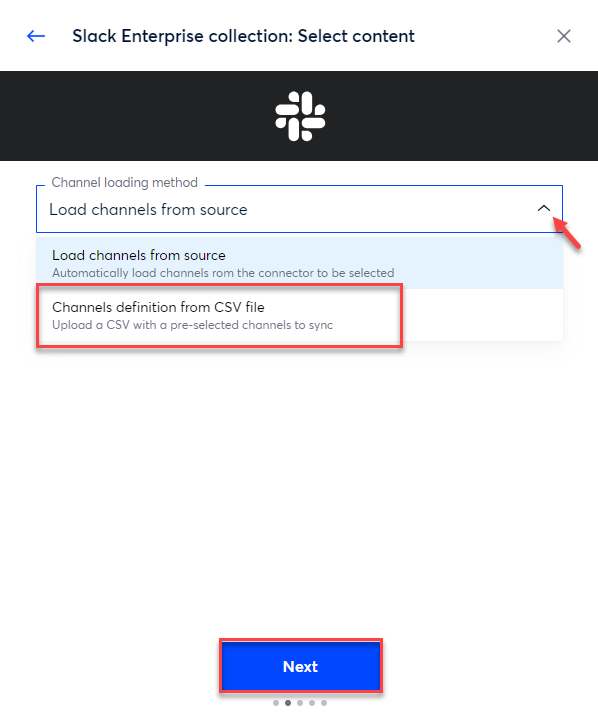
When selecting content for your collection, you have an option to select a list of channels instead of loading from source.
Toggle the Custodian collection to Off and click Next.

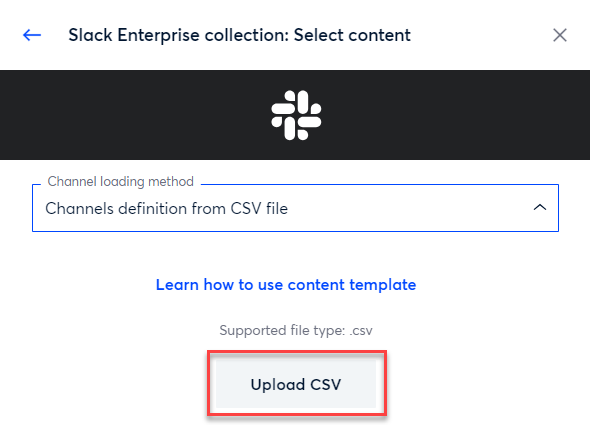
Open the Channel Loading Method, select Channels definition from CSV file and click Next.
Click Upload CSV.
Note:
The Slack Administrator must have exported a channel list and placed the CSV file in an accessible location for selection.
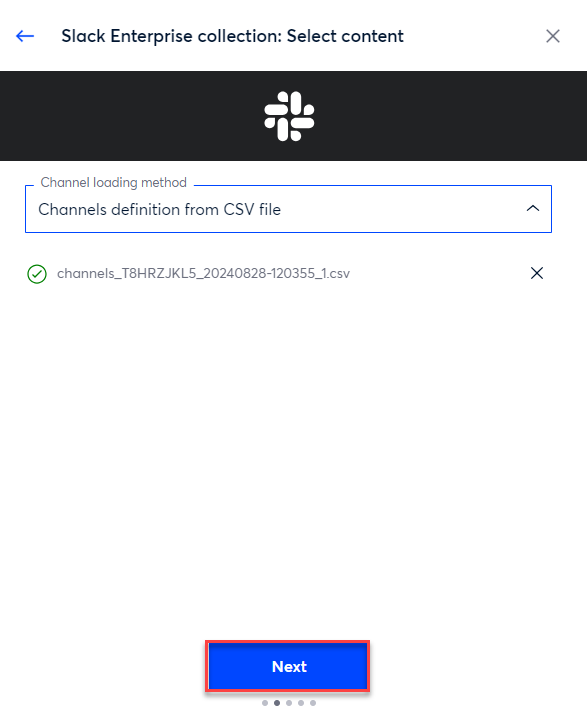
After selecting your file, click Next.
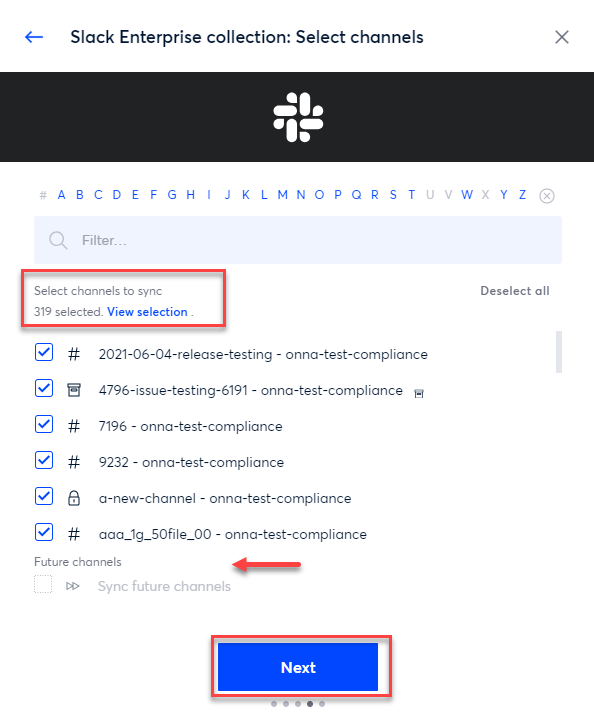
Select the channels to sync for collection. You can select individual channels or all channels. Click Next when finished.
Note:
When selecting from a channel list the option to sync future channels is not available.
To load channels from Source, see Step 6.


Step 5a
Your next step is to define the workspaces you want to include in your sync.
Please note that this screen will NOT appear if you are not performing a custodian-based collection and are only collecting only direct messages and multiparty messages.
Select the workspaces you want to include in your sync
Loading large numbers of Multi-workspace channels can take a significant amount of time across large enterprise accounts. For Multi-workspace channels you have the option to not load, load all, or load only those channels for selected workspaces:
Do Not Load - This option will not load any organization or multi-workspace channels
Load All - This will load all organization and multi-workspace channels independent of the workspaces selected
Load only those for selected workspaces- This option will load all organization-wide channels, but filter the multi-workspace channels to include only those from the selected workspaces. In order to filter these channels, a number of requests need to be made, which causes this option to take the longest.

Step 5b
You’ll now scroll down to the bottom of the ‘Workspaces’ screen. At the bottom you will:
Check the box next to ‘Collect channels shared with external partners’ to add external channels to your sync or leave unchecked to exclude them.
Check the box next to ‘Sync future workspaces’ to sync workspaces added to your Slack account in the future or leave unchecked to to exclude future channels from your sync.
Click the blue ‘Next’ button.

Step 6
If you did not load your channels from a list, your next step is to select the channels you want to include in your sync.
Select the channels from the list or click ‘Select all’ to include all channels.
To sync future channels that are added, make sure the option to ‘Sync future channels’ is checked.
Click the blue ‘Done’ button

Step 7
On the next screen, you will see
All users’ and their email domains selected
At the bottom of this screen you will have the option to sync future users. To do so, check the box next to ‘Sync future users from selected domains’ When this option is selected any user created in the future from the selected domain will sync into Onna.
However if you would like to add additional domains to sync future users please reach out to the Onna Support team for additional assistance
Then, click the blue ‘Done’ button (c).

Step 8
Your sync is now in progress and visible inside the workspace you added it to. For more information see the “How to Monitor Your Source Sync Status” article.

Creating a Custodian-Based Collection in Slack Enterprise
Step 1
Navigate to the workspace where you want to set up your sync.
Inside that workspace click on the ‘+’ icon in the upper right corner of the screen to ‘Add source’.

Step 2
You will now see a list of all sources enabled for your organization. Find and select the ‘Slack Enterprise’ source.

Step 3
You’ll now define the basic information for your new sync, including:
The name of your sync (We will autofill this field with the name of your source, but you can change it)
They sync mode you’d like to use
The start date for your sync (Note: If you’re choosing a one-time sync you’ll enter an start and end date for your sync)
Optional: If you need to, you can switch the authorized connection credentials you want to use to set up the sync by clicking switch account
Once you’ve selected the right account select the blue ‘Continue as...’ button

Step 4
Next, you will select the content you want to include in the sync. To do so you will:
When performing a custodian-based collection, toggle to ‘On’.
Select the type of direct messages you’d like to include in your sync.
Select the type of channels you’d like to include in your sync.

Select Canvas to include canvases in your collection.
Note:
Canvases that are part of a conversation will always be collected. Canvas is captured at the root level. If the Canvas has been shared, the attachment will also be included.

Select Lists to add Slack Lists to your collection.
Note:
Lists that are part of a conversation will always be collected. Lists are captured at the root level. Comments and mentions are not captured in the list. If a list is shared, it is captured at the root level as well as the attachment that was shared.

Select Modern attachments to collect attachments from Google Workspace accounts with an authorized connection in Onna. Then, select the GWS authorized connection you'd like to use for the collection from the 'Account credentials' dropdown.
Note:
If the account you want to use is not in the 'Account credentials' dropdown, you can click 'Use another account'. You will then be redirected to Authorized Connections to add new credentials. This will cancel your source creation and you will need to start the Slack collection workflow again once you've added new credentials.

Click the blue Next button.


Step 5
You’ll now add the users you’d like to include in your sync. You can do this by either:
Manually adding users' email addresses. Or,
Loading users via a list or from a CSV by clicking ‘Load users’.

Step 6
If you select users from a list you will be directed to a screen where you can select the users you want to include (a) or click ‘Select all’ to include all users.
Then, click the blue ‘Next’ button (b).

Step 7a
Your next step is to define the workspaces you want to include in your sync.
Select the workspaces you want to include in your sync
Loading large numbers of Multi-workspace channels can take a significant amount of time across large enterprise accounts. For Multi-workspace channels you have the option to not load, load all, or load only those channels for selected workspaces:
Do Not Load - This option will not load any organization or multi-workspace channels
Load All - This will load all organization and multi-workspace channels independent of the workspaces selected
Load only those for selected workspaces- This option will load all organization-wide channels, but filter the multi-workspace channels to include only those from the selected workspaces. In order to filter these channels, a number of requests need to be made, which causes this option to take the longest.

Step 7b
You’ll now scroll down to the bottom of the ‘Workspaces’ screen. At the bottom you will:
Check the box next to ‘Collect channels shared with external partners’ to add external channels to your sync or leave unchecked to exclude them.
Check the box next to ‘Sync future workspaces’ to sync workspaces added to your Slack account in the future or leave unchecked to to exclude future channels from your sync.
Click the blue ‘Next’ button.

Step 8
Your next step is to select the channels you want to include in your sync.
Select the channels from the list or click ‘Select all’ to include all channels.
To sync future channels that are added, make sure the option to ‘Sync future channels’ is checked.
Click the blue ‘Done’ button

Step 9
Your sync is now in progress and visible inside the workspace you added it to. Learn more about How to Monitor Your Source Sync Status
