How to Manage Account Preferences
- 18 Jun 2024
- 5 Minutes to read
- Print
- DarkLight
- PDF
How to Manage Account Preferences
- Updated on 18 Jun 2024
- 5 Minutes to read
- Print
- DarkLight
- PDF
Article summary
Did you find this summary helpful?
Thank you for your feedback

In this article you will learn how to:
How to Configure Site Settings
How to Configure SAML Settings
How to Configure Processing Profile Settings
How to Configure Site Settings
On the ‘Account’ page in Admin Preferences you’re able to adjust your site settings, set up SAML, and create your processing profile. Changes made on the ‘Account’ page affect your entire Onna site, and thus how your users can operate within your site.
In the ‘Site settings’ section of the ‘Account’ page you’re able to configure your company name, logo, and custom support link. To configure your site settings, follow the steps below:
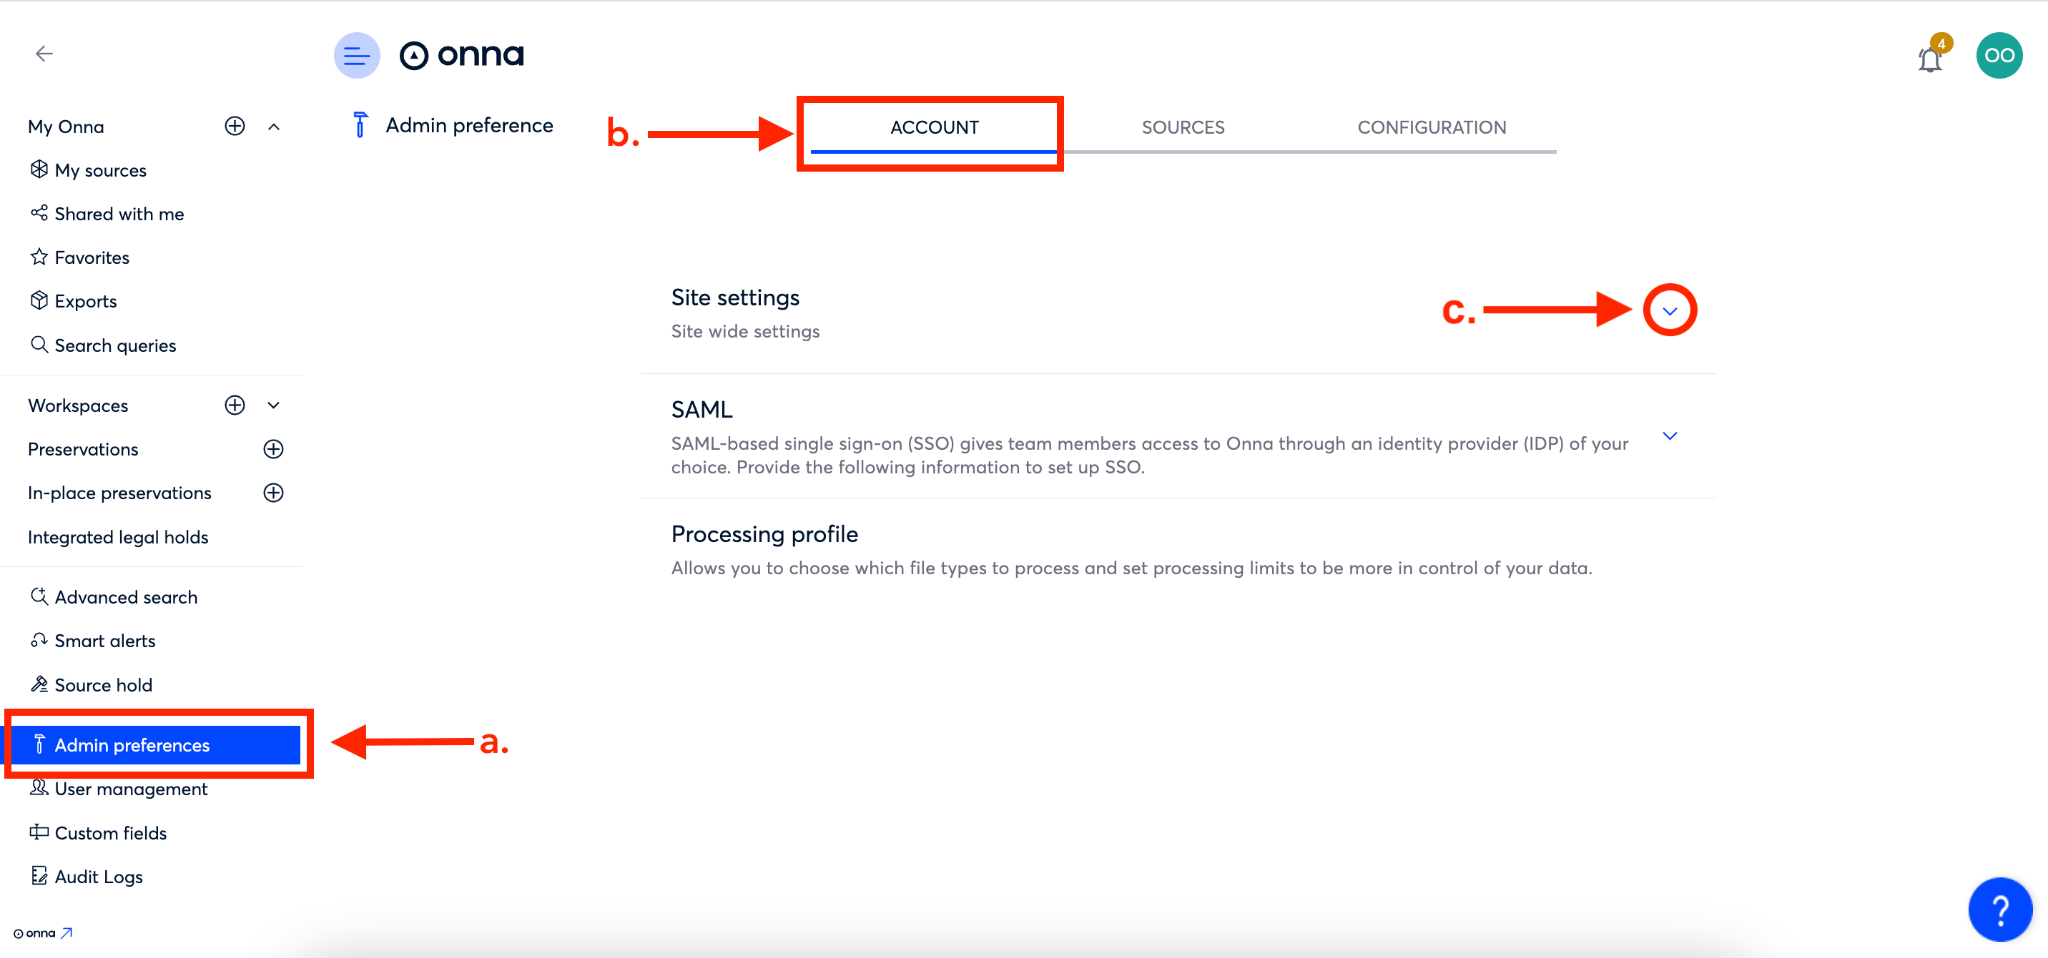
Step 1
Navigate to the Admin Preferences feature by clicking ‘Admin preferences’ from the main menu (a). From the ‘Account’ page (b), click on the arrow next to ‘Site Settings’ (c) to expand the section.
Step 2
In ‘Site settings’ you’ll first set your company name in the ‘Display site name’ field (a). Then, add a URL for your brand logo in the ‘Site brand URL’ field (b).
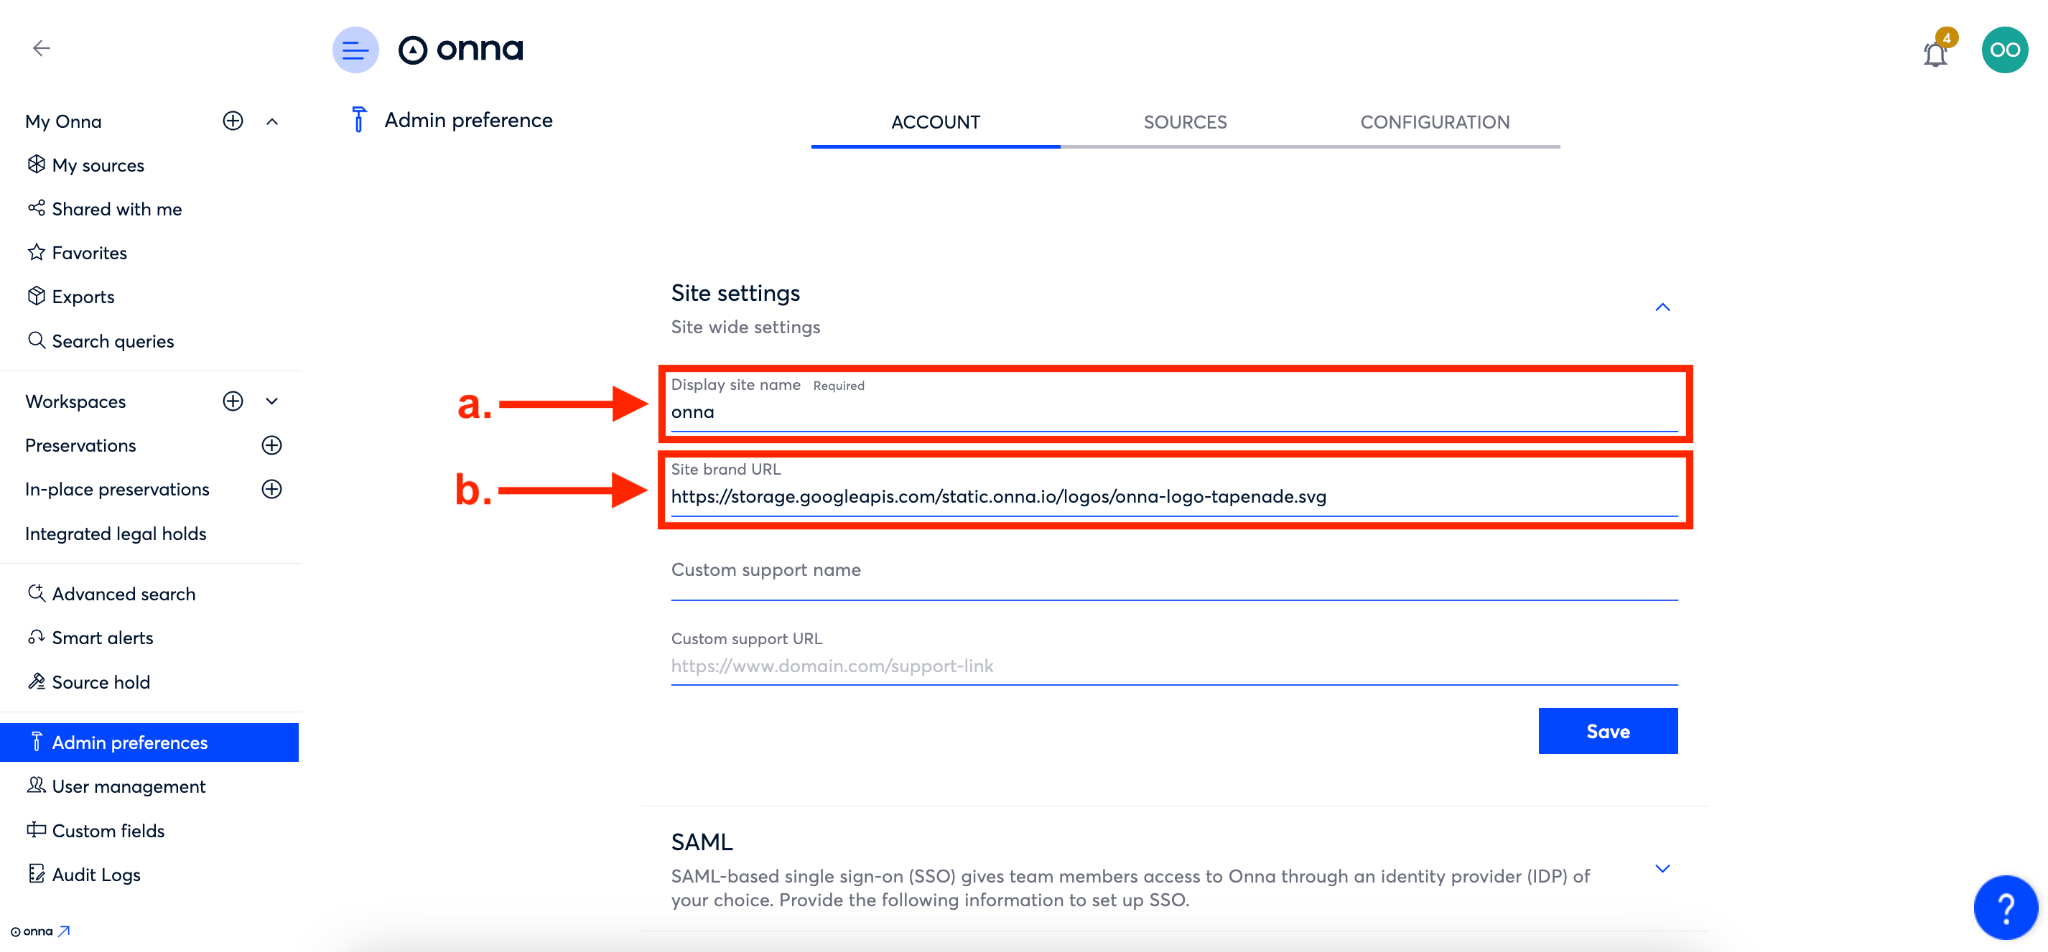
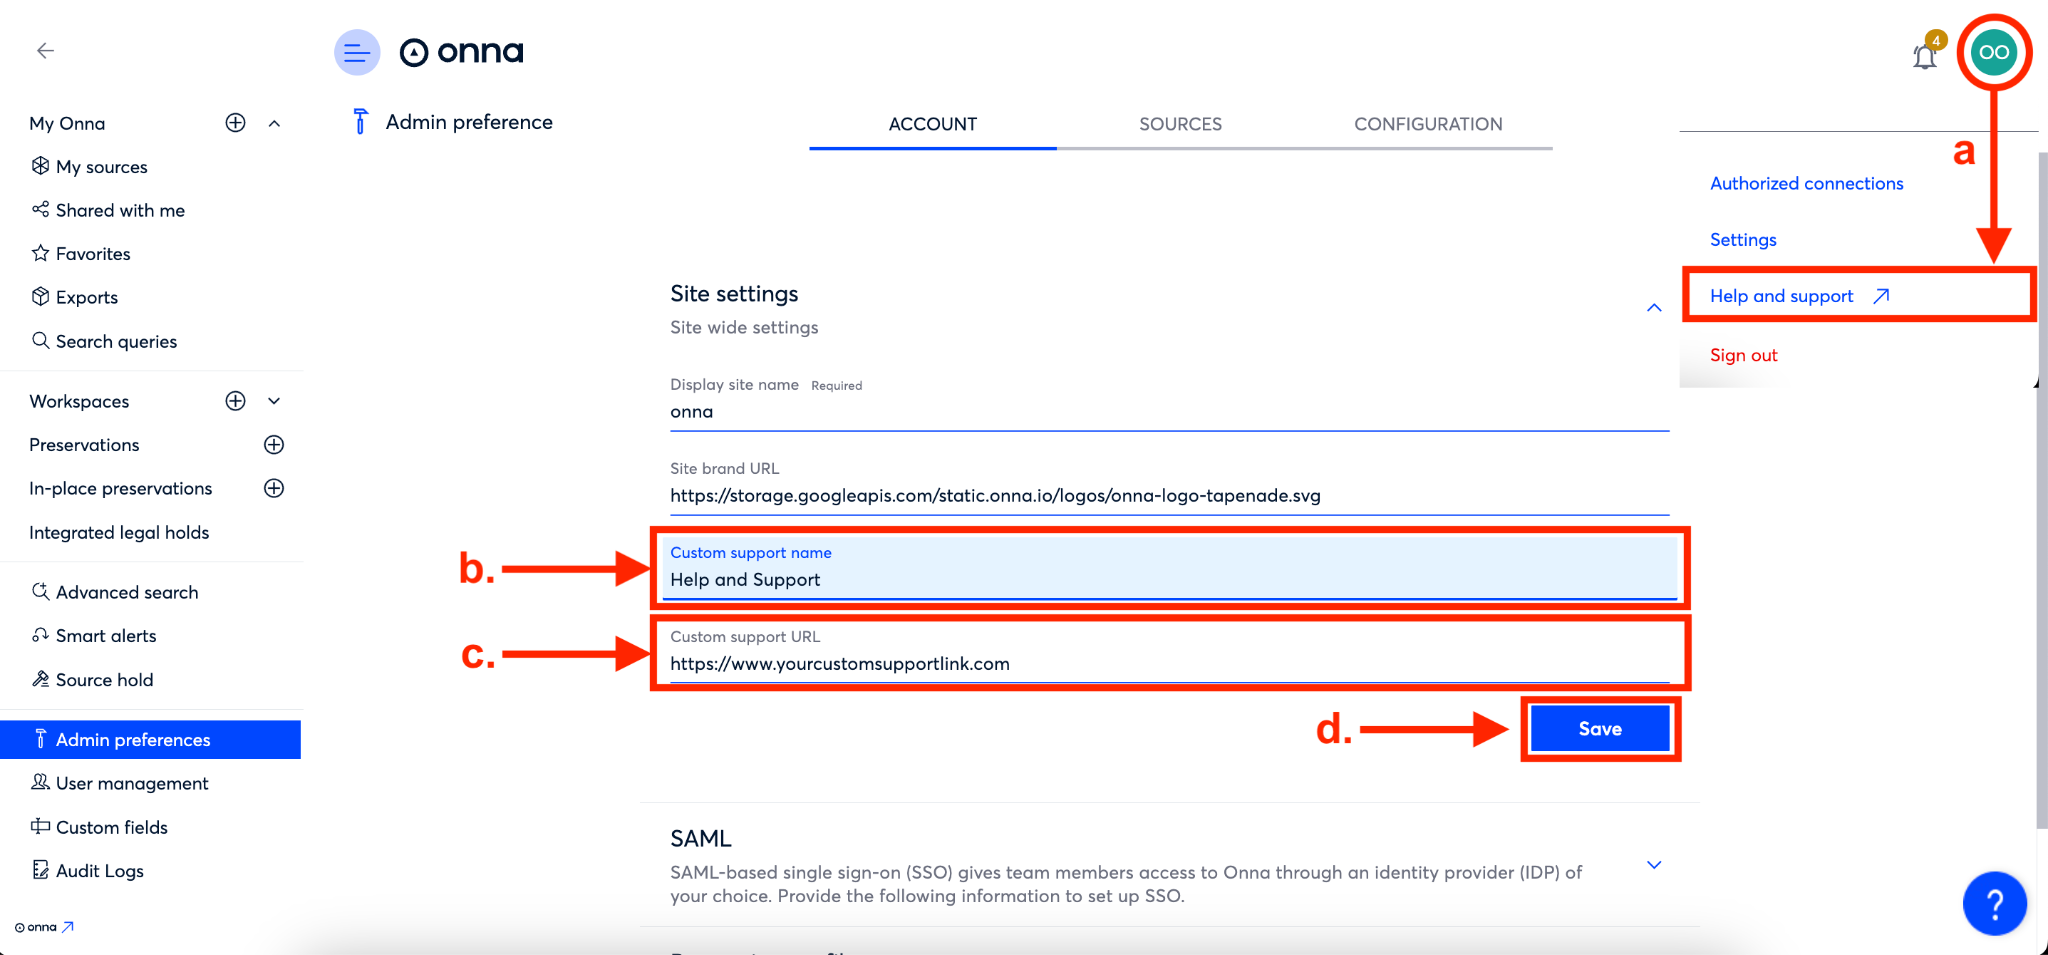
Step 3
You’re now able to configure your custom support link which is found in your user profile menu (a).
To do so, first provide a name for your menu link in the ‘Custom support name’ field (b). Then, add a URL where users will be directed when clicking on the link in the ‘Custom support URL’ field (c). Then, click the blue ‘Save’ button (d).
How to Configure SAML Settings
Configuring your SAML settings will allow you to use one set of login credentials (ie. Sign in with Google) to log into multiple applications; in this case, Onna. To configure your SAML settings, follow the steps below:
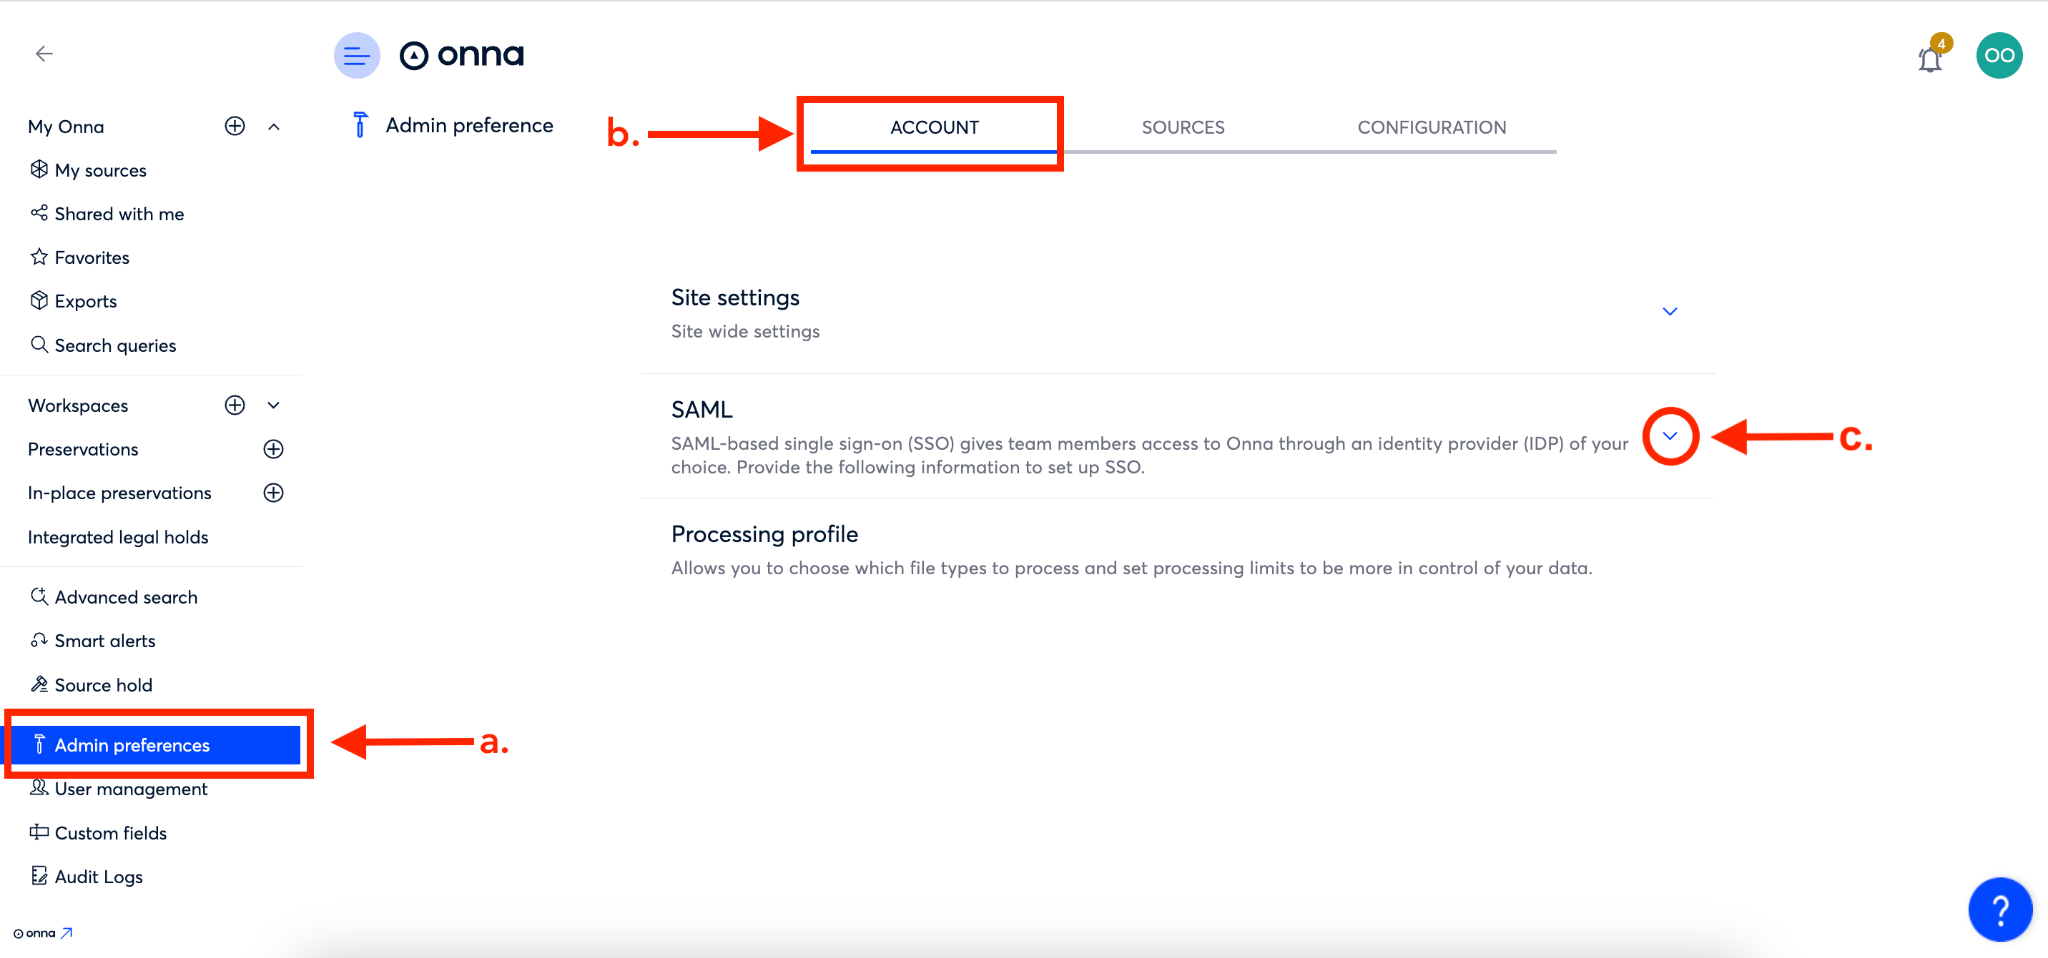
Step 1
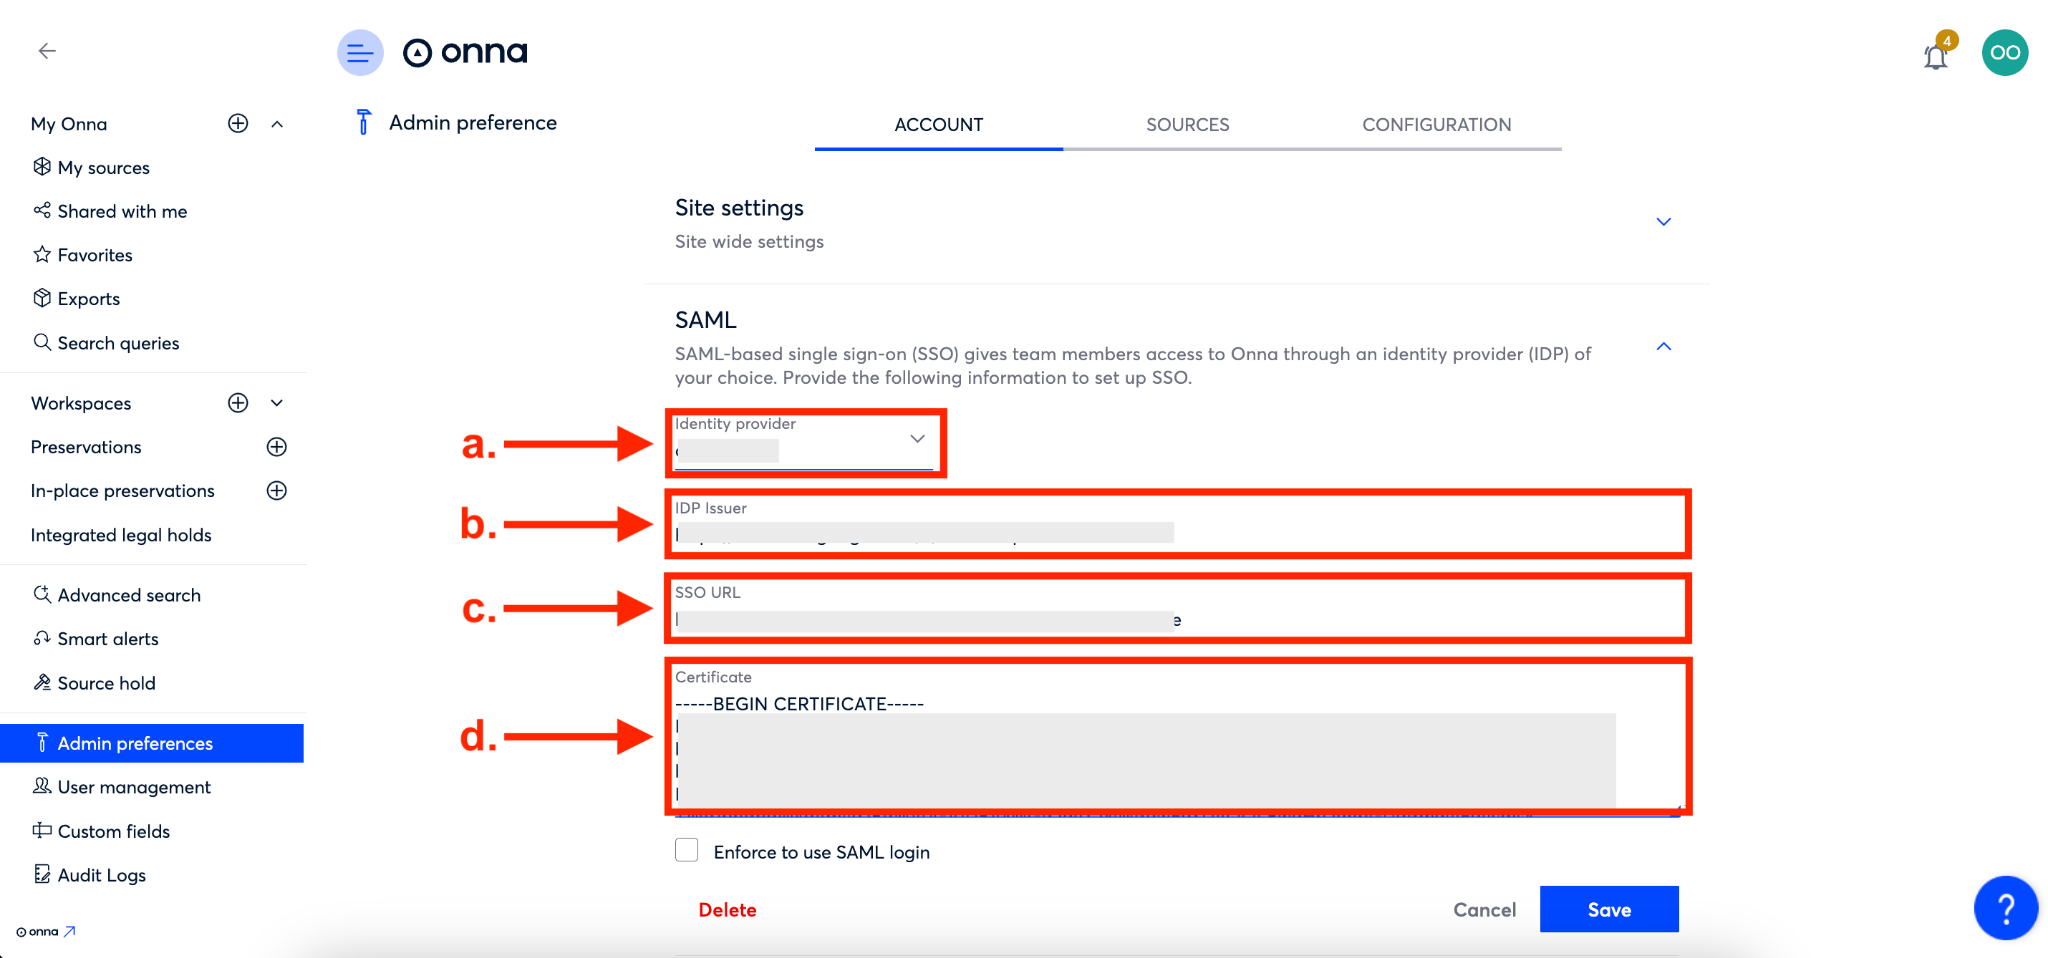
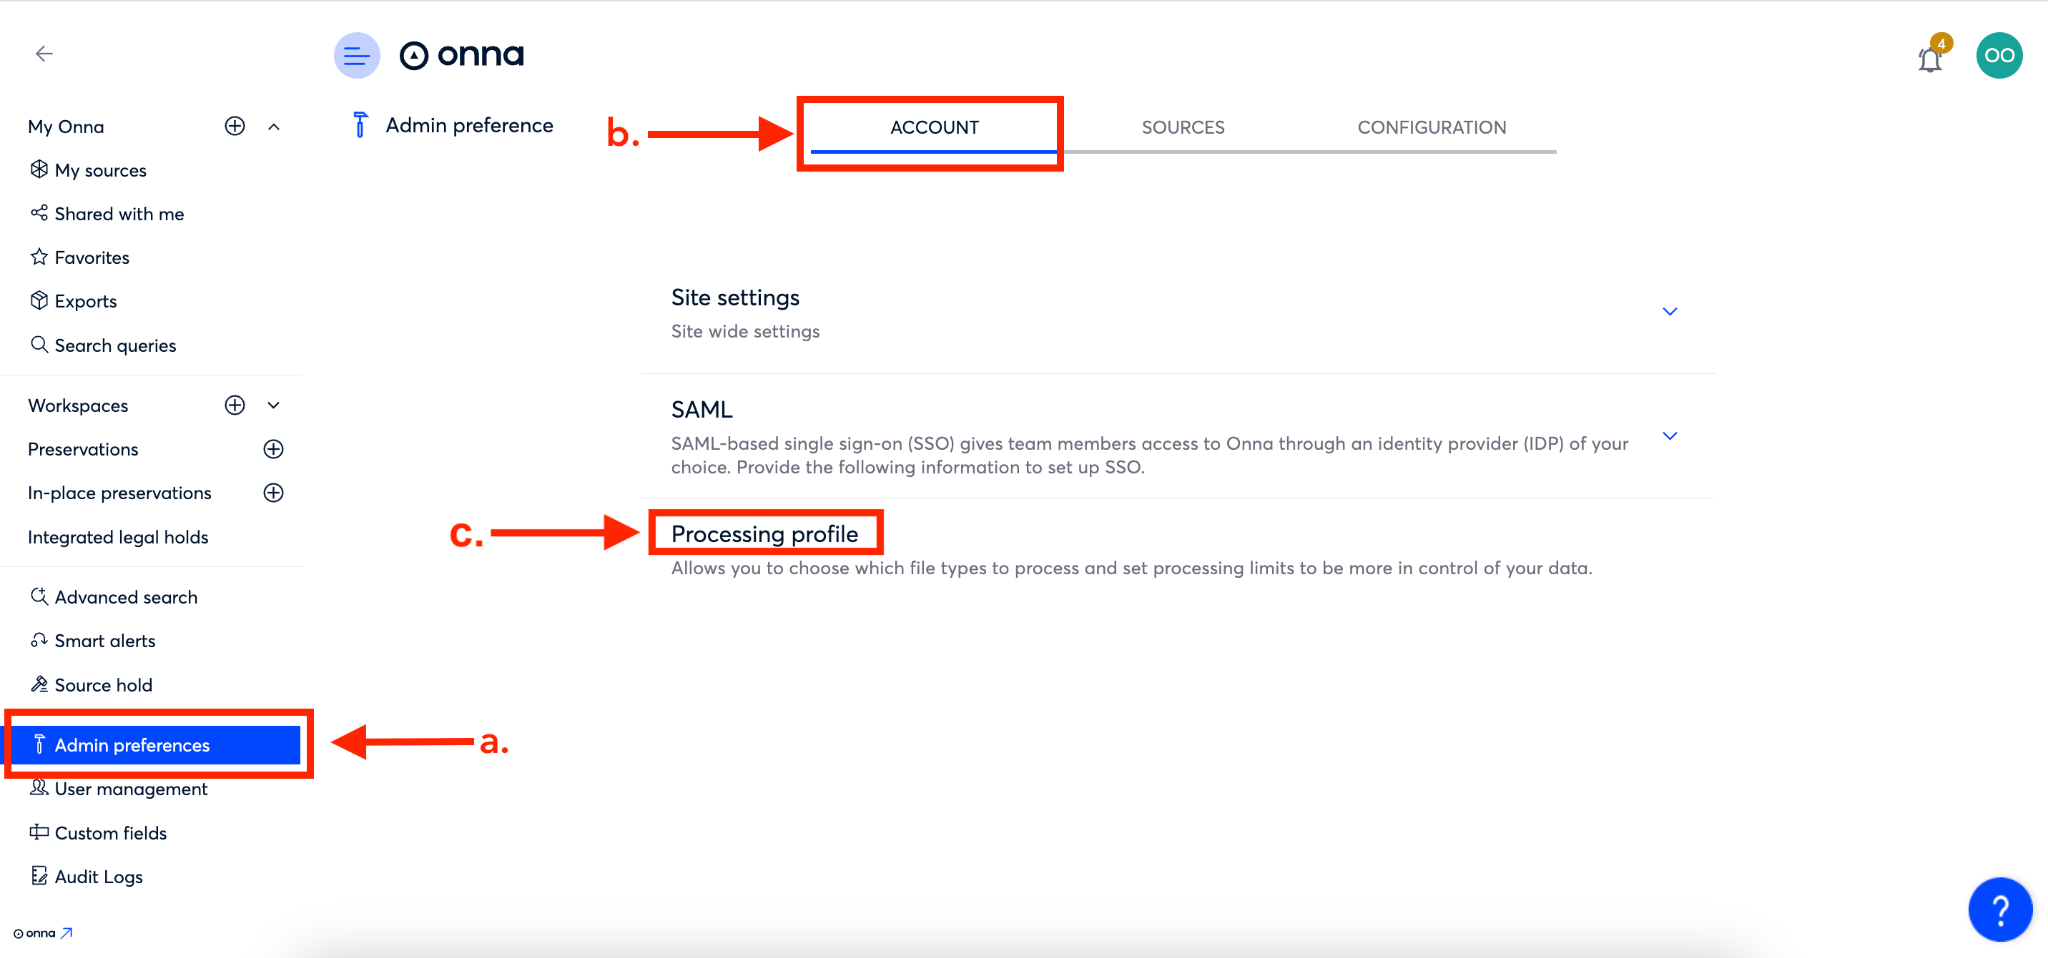
Navigate to the Admin Preferences feature by clicking ‘Admin preferences’ from the main menu (a). From the ‘Account’ page (b), click on the arrow next to ‘SAML’ (c) to expand the section.
Step 2
You’ll now be able to add your SAML-based single sign-on credentials. To begin, fill in the ‘Identity provider’ field based on SSO instructions for your identity provider (a). Then, you’ll enter your IDP issuer (b), SSO URL (c), and your certificate (d).
Step 3
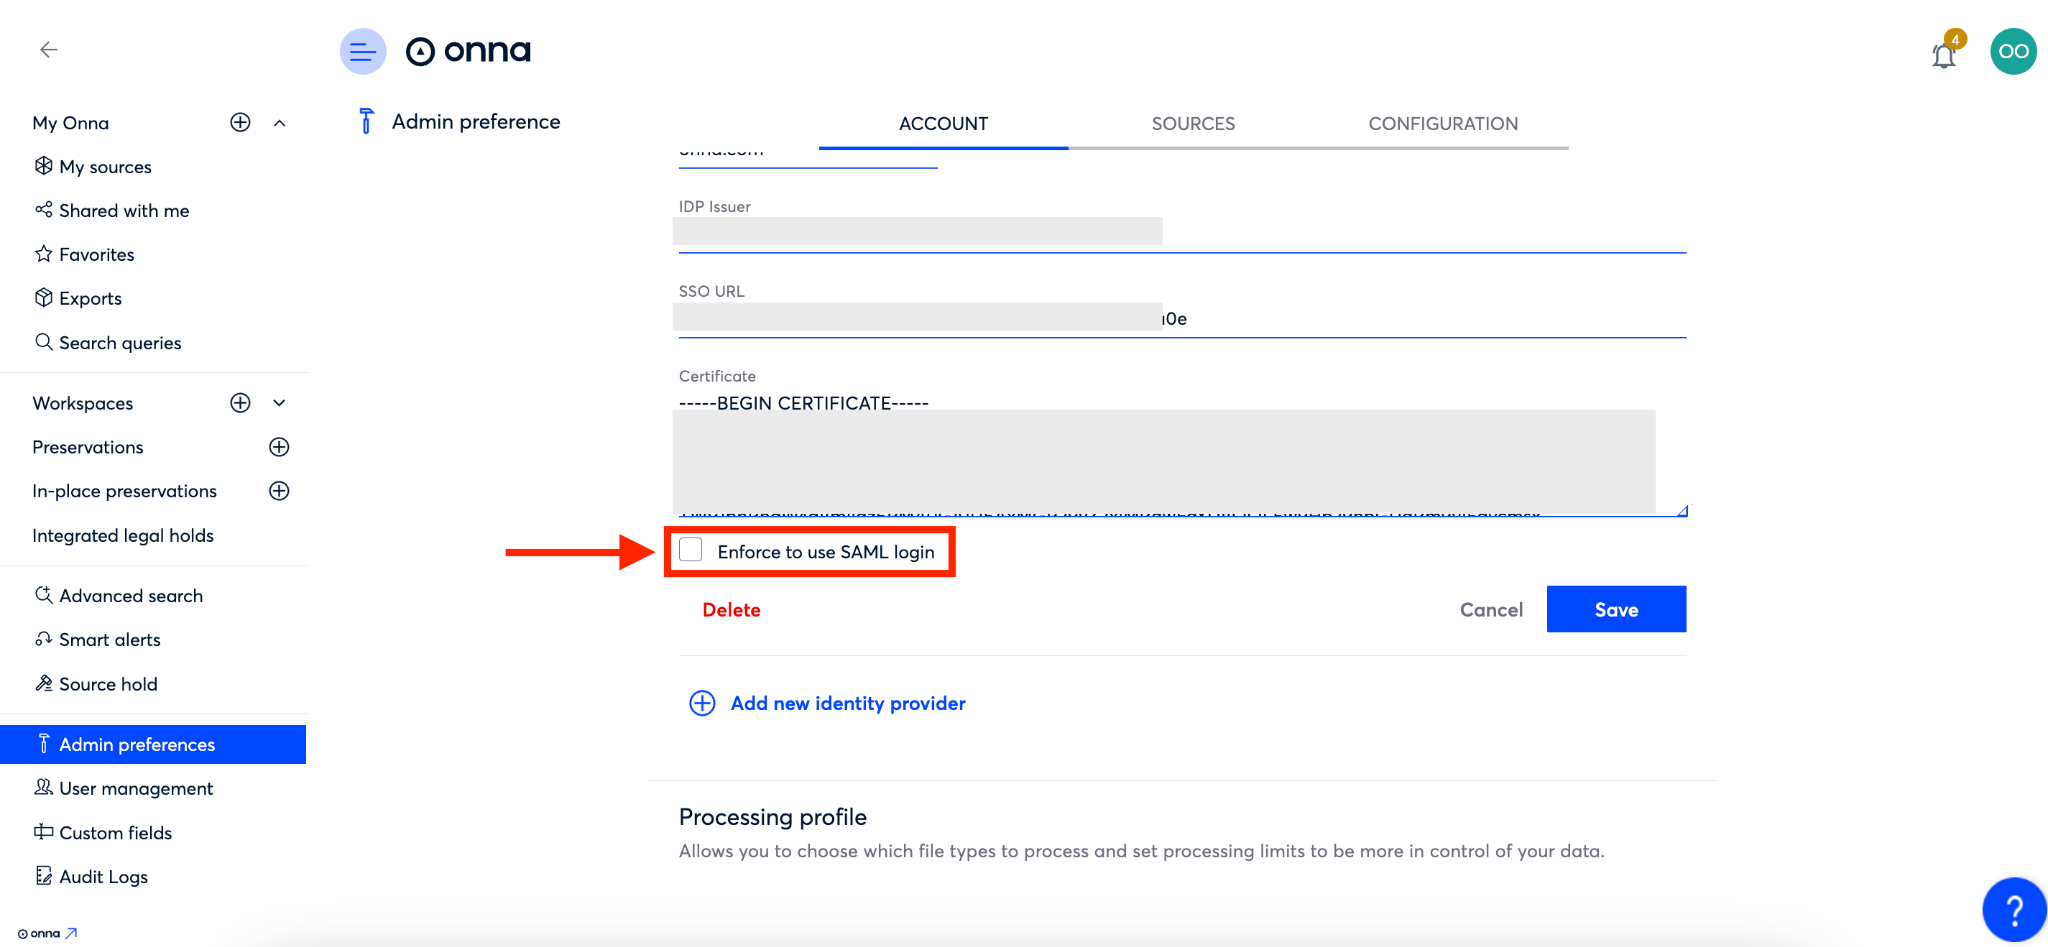
To enforce SAML login for all users so they cannot log-in with a unique username and password, put a check mark next to the ‘Enforce to use SAML login)
Step 4
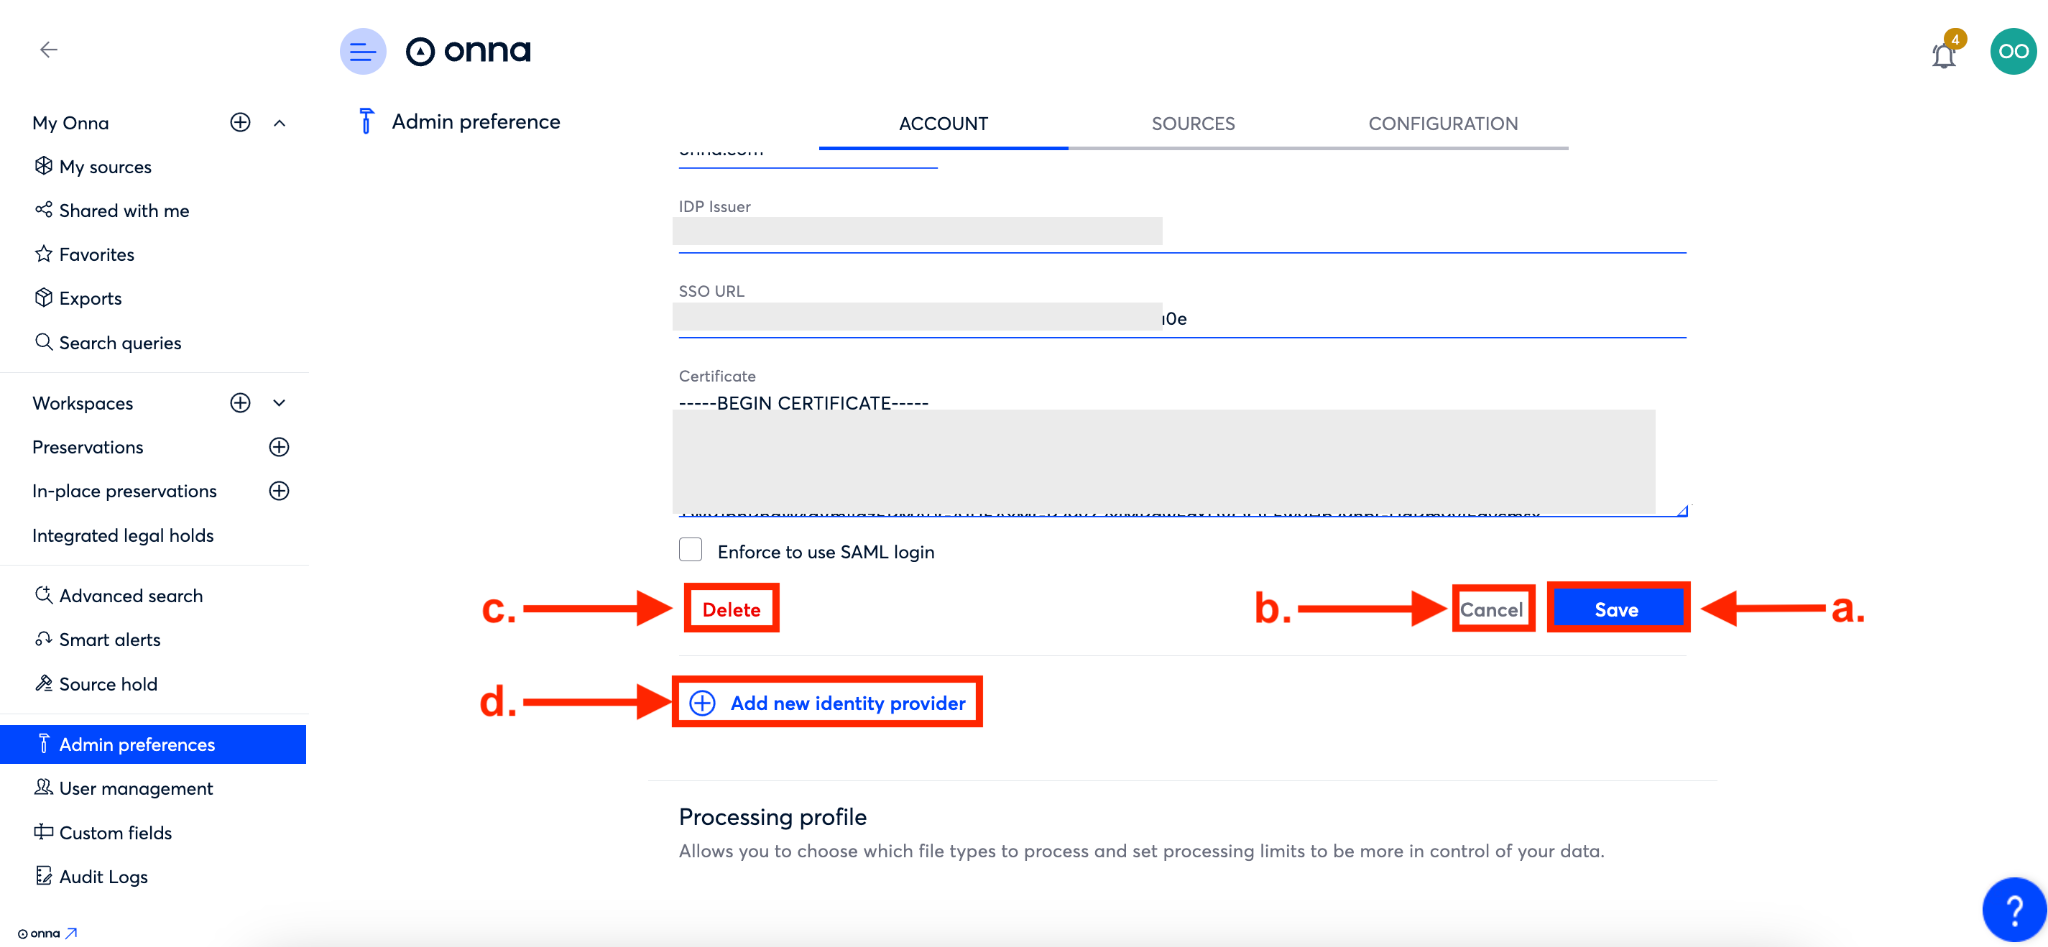
Finally you’ll either save your new SAML set-up by clicking the blue ‘Save’ button, cancel the set-up by clicking the gray ‘Cancel’ button, or deleting the SAML configuration information (c). If you’d like to add an additional identity provider click the ‘Add new identity provider’ link (d).
Learn more about SSO and find SAML 2.0 Configuration guides for multiple identity providers in Setting up SAML 2.0.
How to Configure Processing Profile Settings
Onna’s processing profile allows you to customize how your data is processed after it is collected, including the ability to exclude certain files from processing, as well as adjust OCR settings. After a file is collected into Onna, excluding the file from processing means that the filename is searchable and the file itself is available for download or on-demand processing, but the full text of the file is not indexed and not searchable. Any changes to Processing Profile settings will be applied to your entire site for all incoming data processed going forward from when the settings were applied.
Follow the steps below to configure your processing profile settings:
Step 1
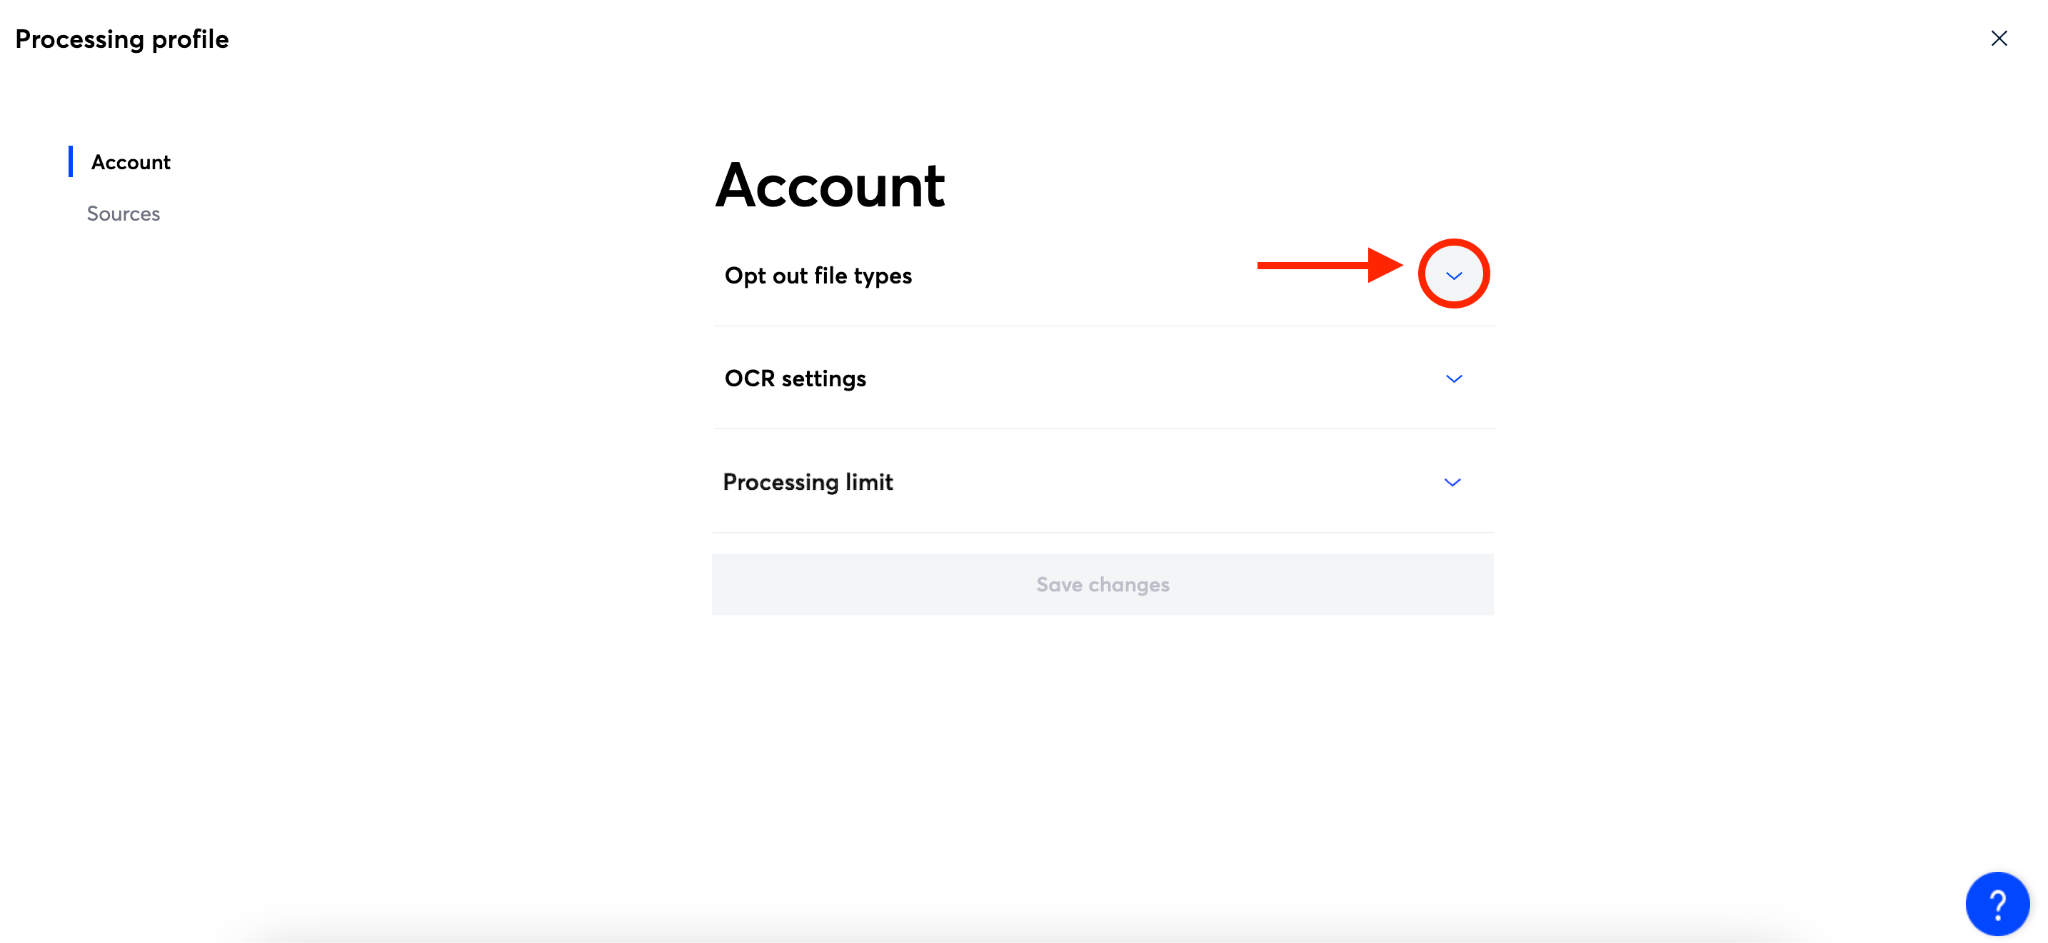
Navigate to the Admin Preferences feature by clicking ‘Admin preferences’ from the main menu (a). From the ‘Account’ page (b), click on ‘Processing profile’ (c) to be directed to the ‘Processing profile’ configuration page.
Step 2
Once on the ‘Processing profile’ configuration page, click on the arrow next to ‘Opt out file types’ to expand the section.
Step 3
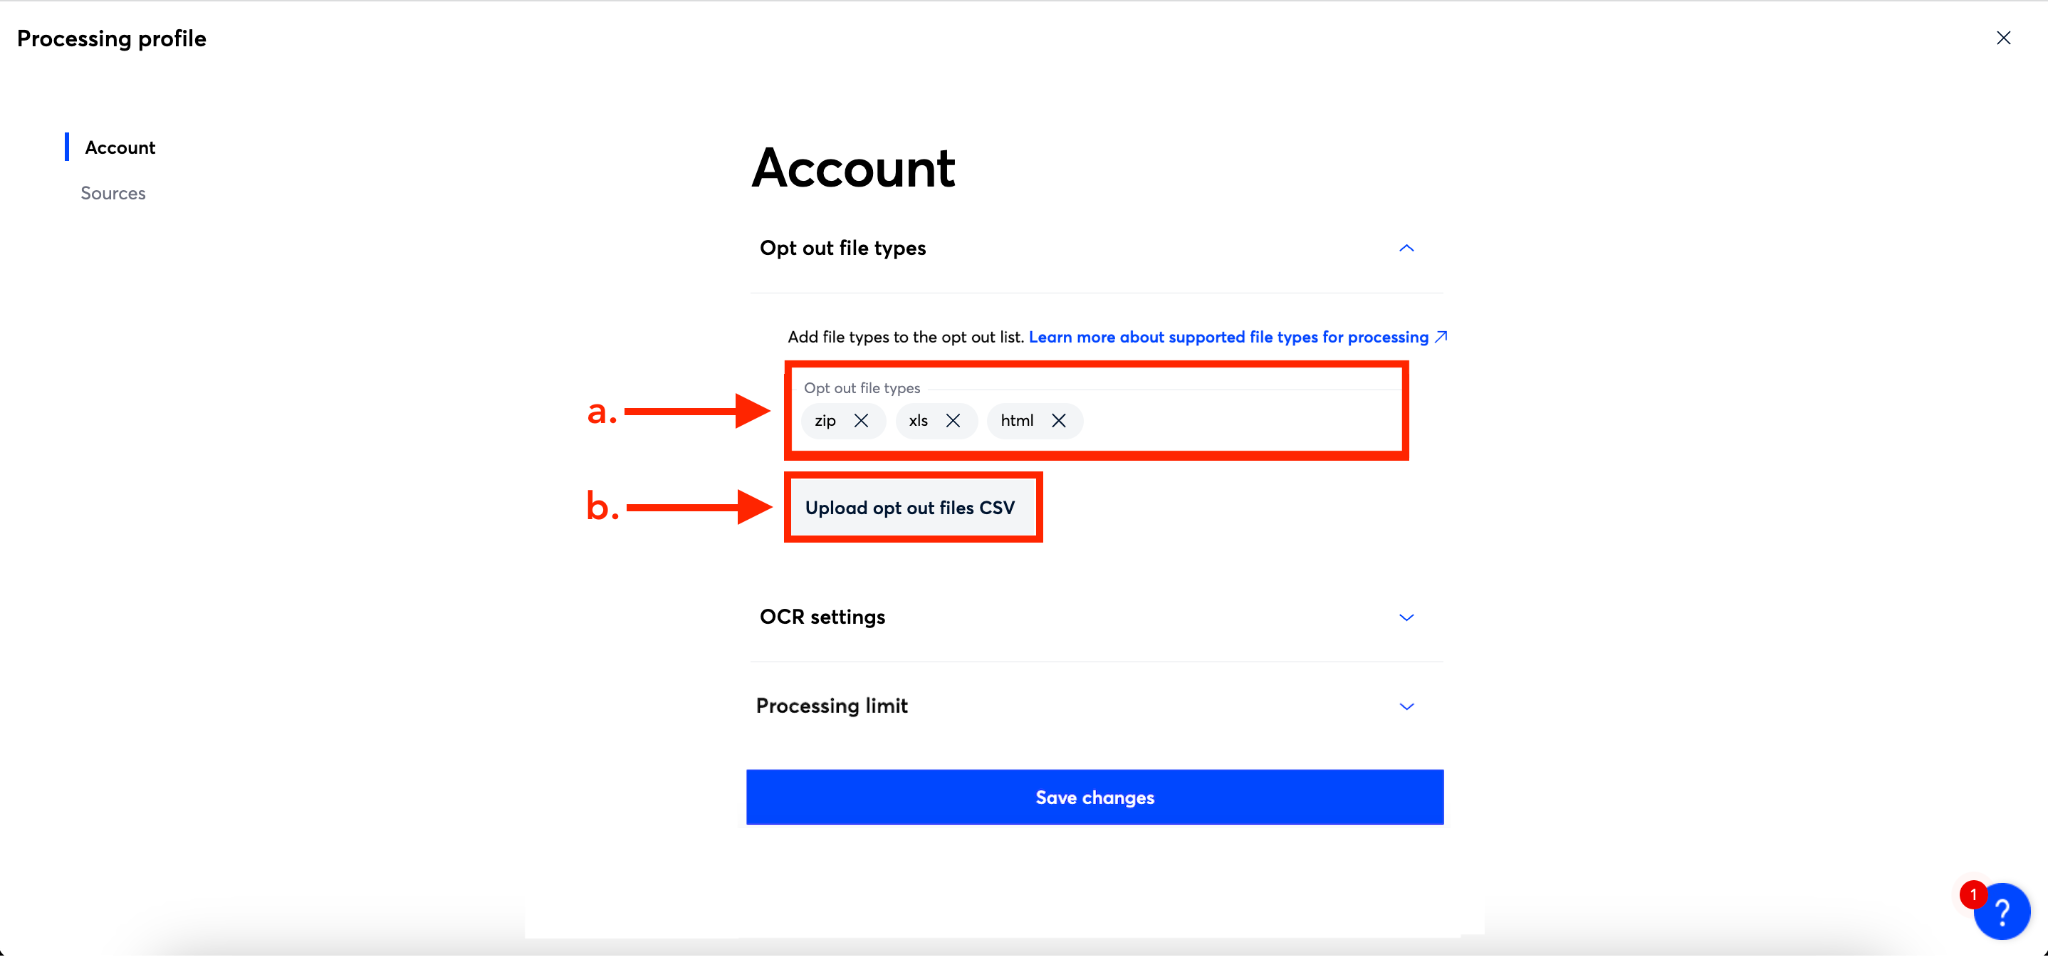
In the ‘Opt out file types’ section you’ll be able to add a list of file types to exclude from processing either manually by typing the file extension(s) into the ‘Opt out file types’ field (a), or uploading a CSV file of of extensions by clicking the gray ‘Upload opt out files CSV’ button (b).
Note: Do not put the file types in “ “ when typing them into the field.
Step 4
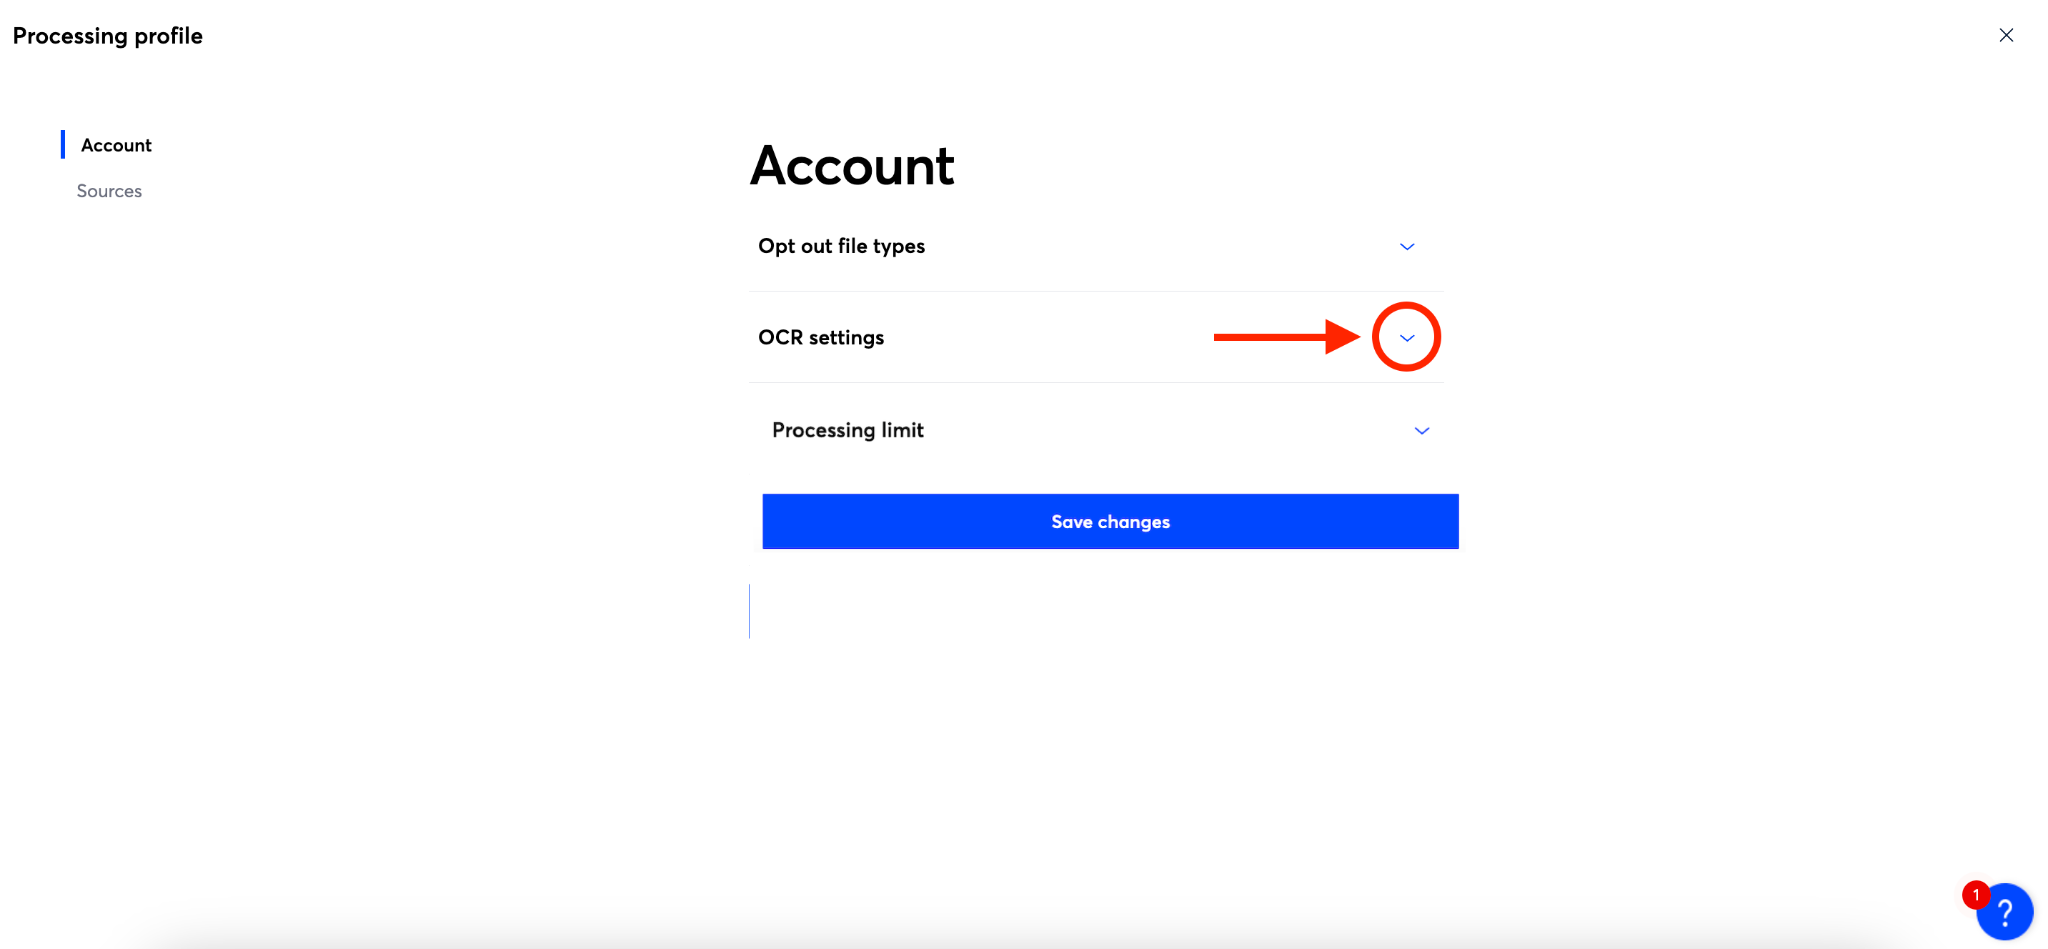
Next, you’ll click the arrow next to ‘OCR settings’ to expand the section.
Step 5
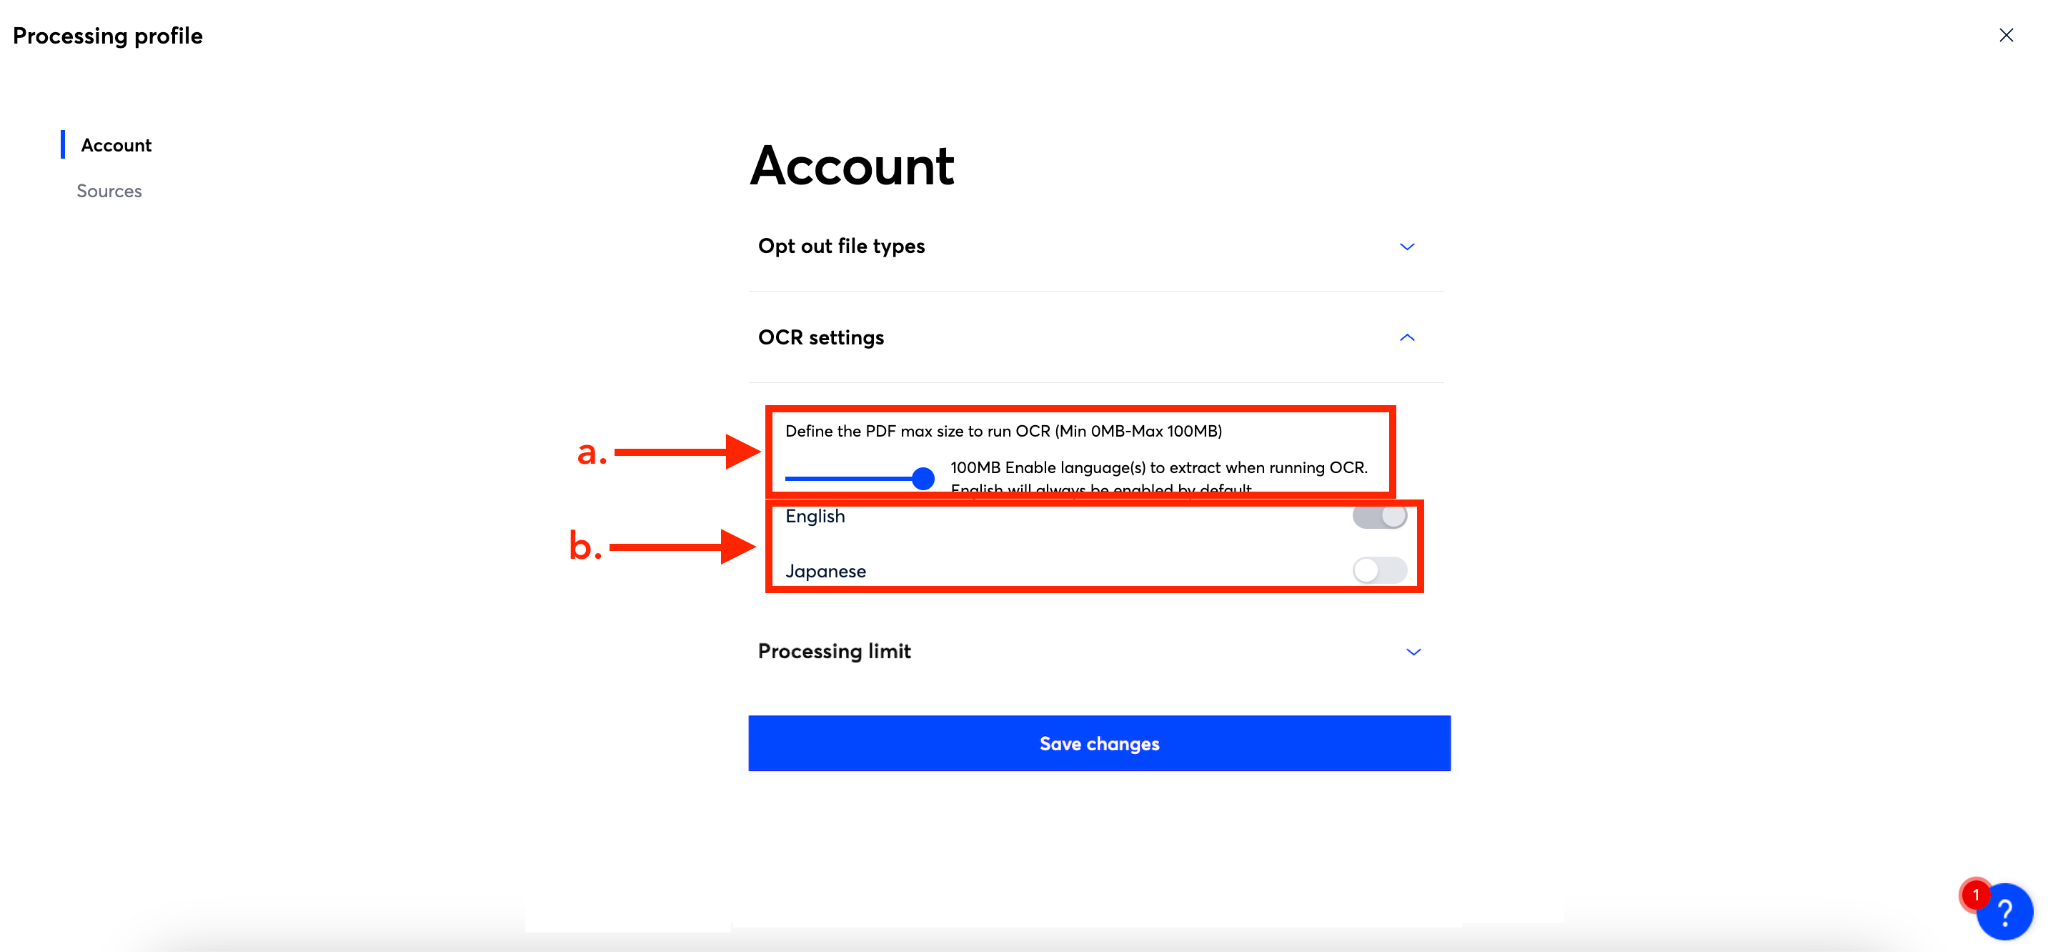
Optical Character Recognition or OCR is technology that allows Onna to provide extracted text for image files describing the image or text on the image, thus making the image more searchable.
The ‘OCR settings’ you can configure include defining the max size of a PDF to run OCR on (a) and which languages you want to use OCR for (b). Currently English is the default language, but you also have the option of choosing Japanese.
Note: The lower the file size and the fewer languages selected, the faster processing will occur.
Step 6
Your final configuration step is to set a processing limit. To do so, click on the arrow next to ‘Processing limit’.
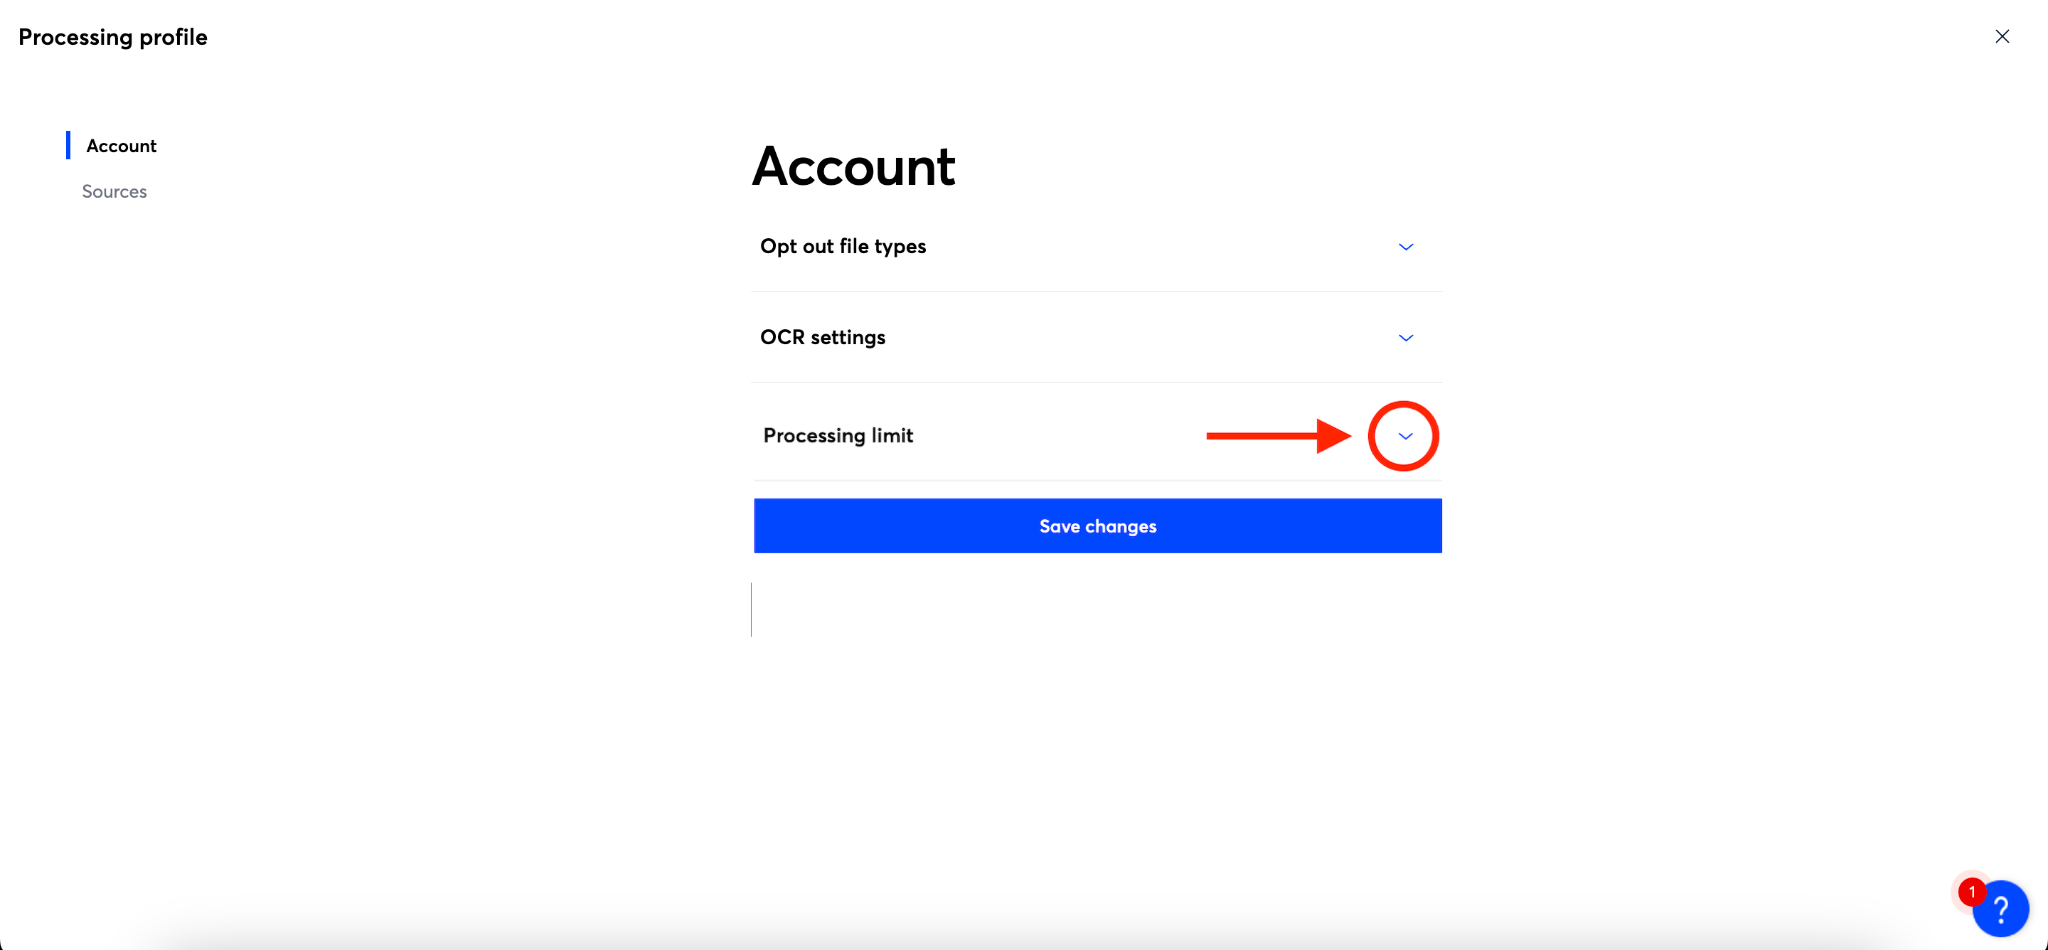
Step 7
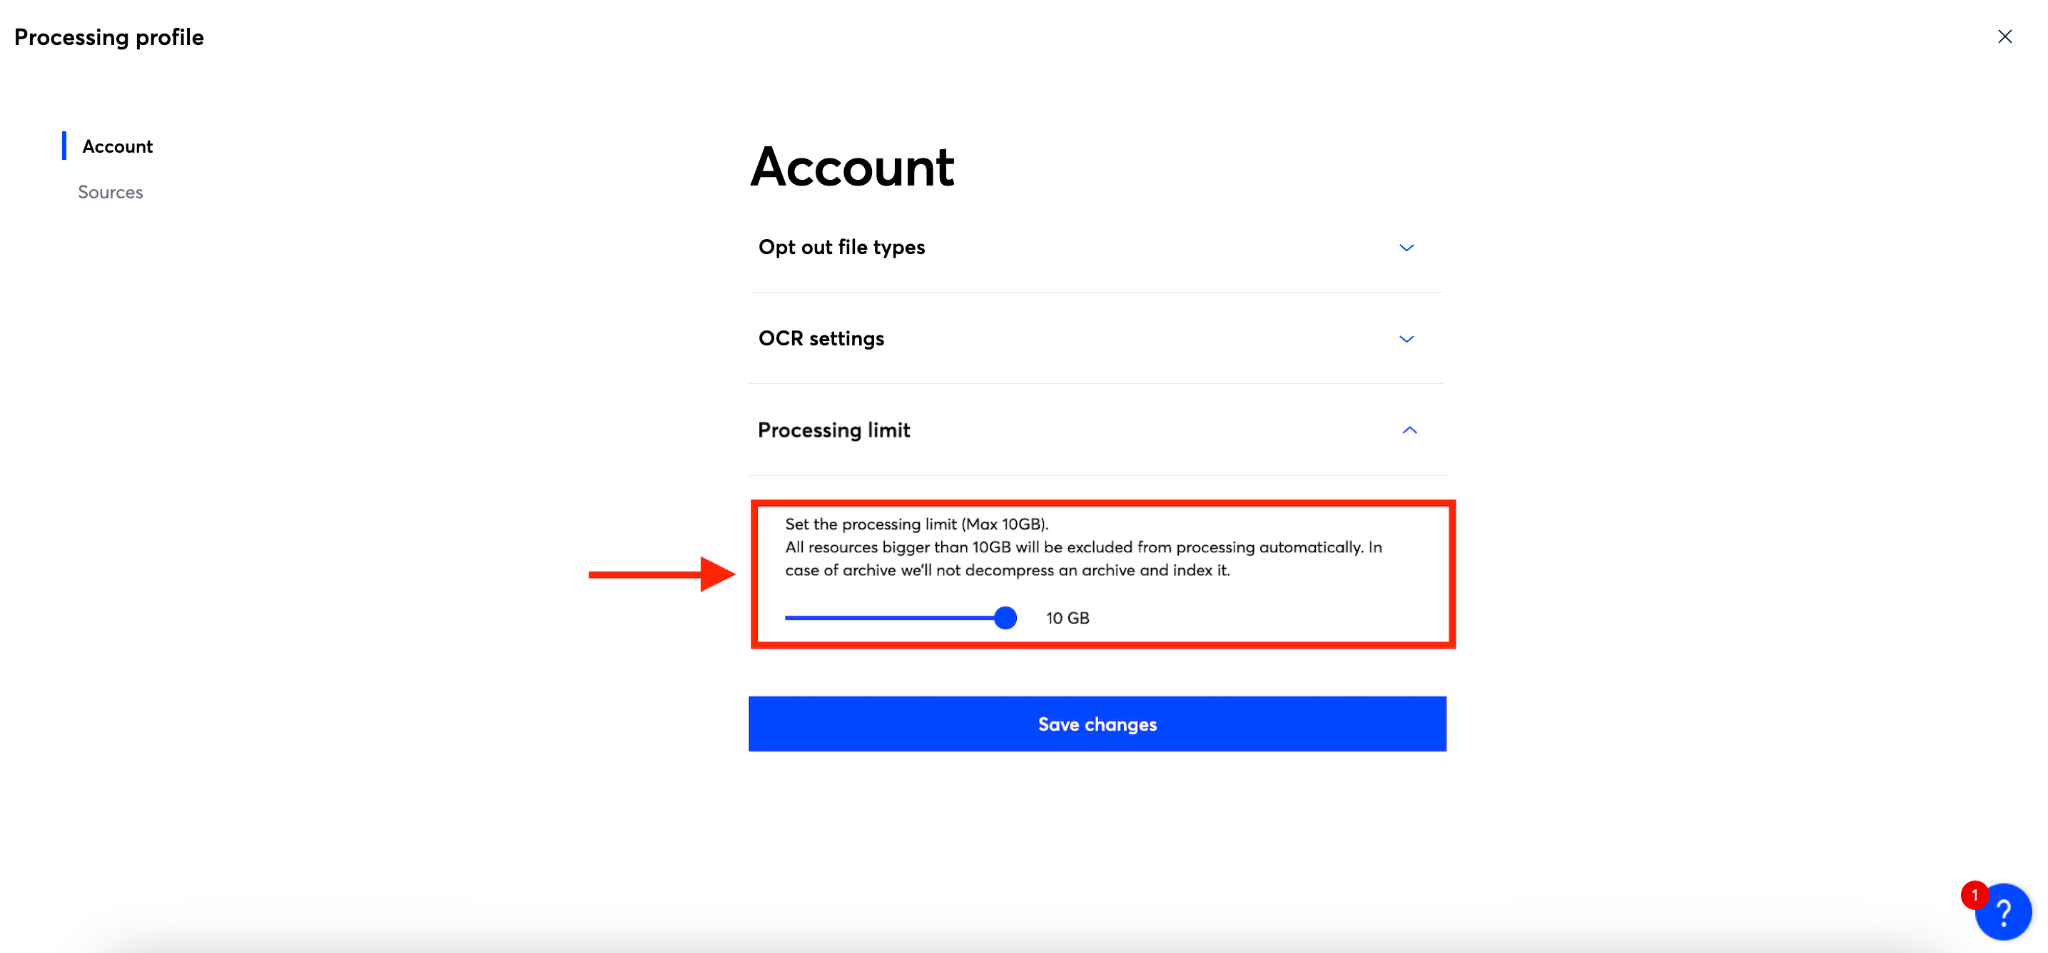
In the ‘Processing limit’ section you’ll be able to adjust the max file size you would like to process. The default limit is 10 GB, but you can set this value from between a minimum of 1 and maximum of 10 GB.
Step 8
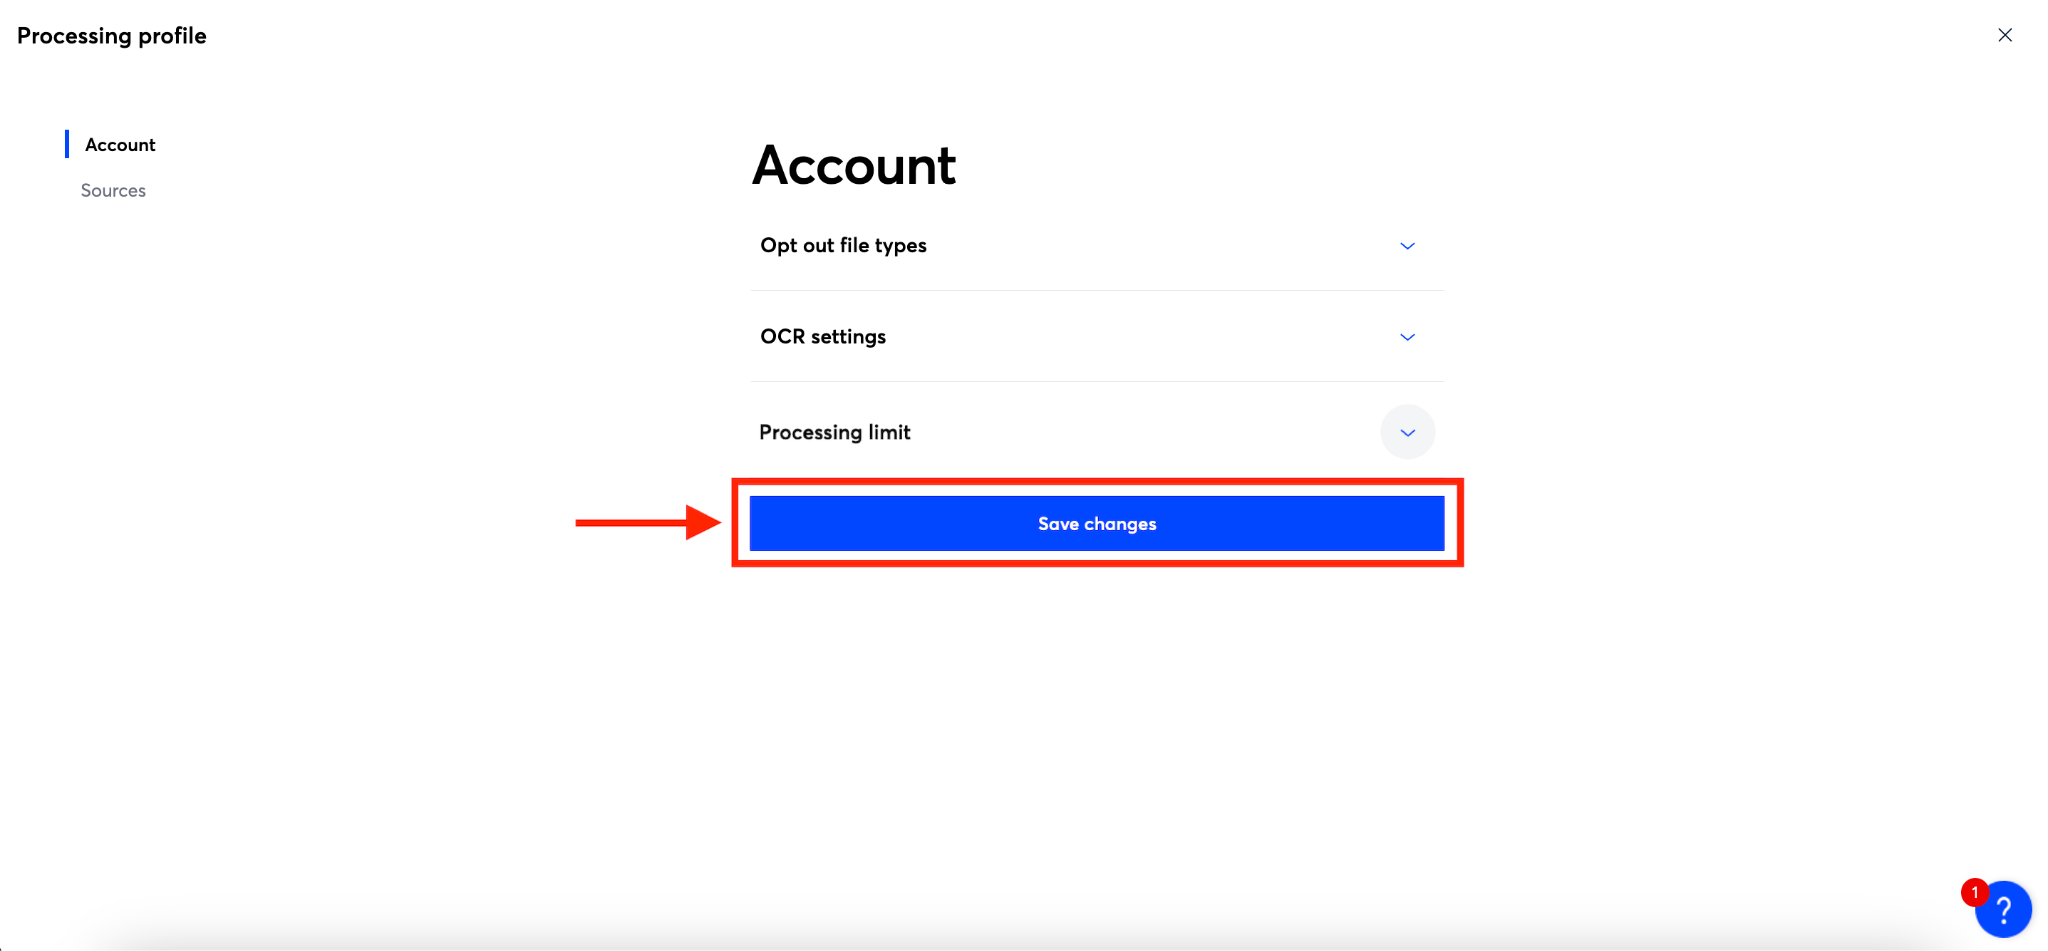
Finally, to save your configuration settings, click the blue ‘Save changes’ button at the bottom of the ‘Processing profile’ page.
Viewing Excluded Files in Onna
When files are excluded from processing due to the settings configured in your ‘Processing profile,’ they may still appear in search results. When they do, you’ll notice the following:
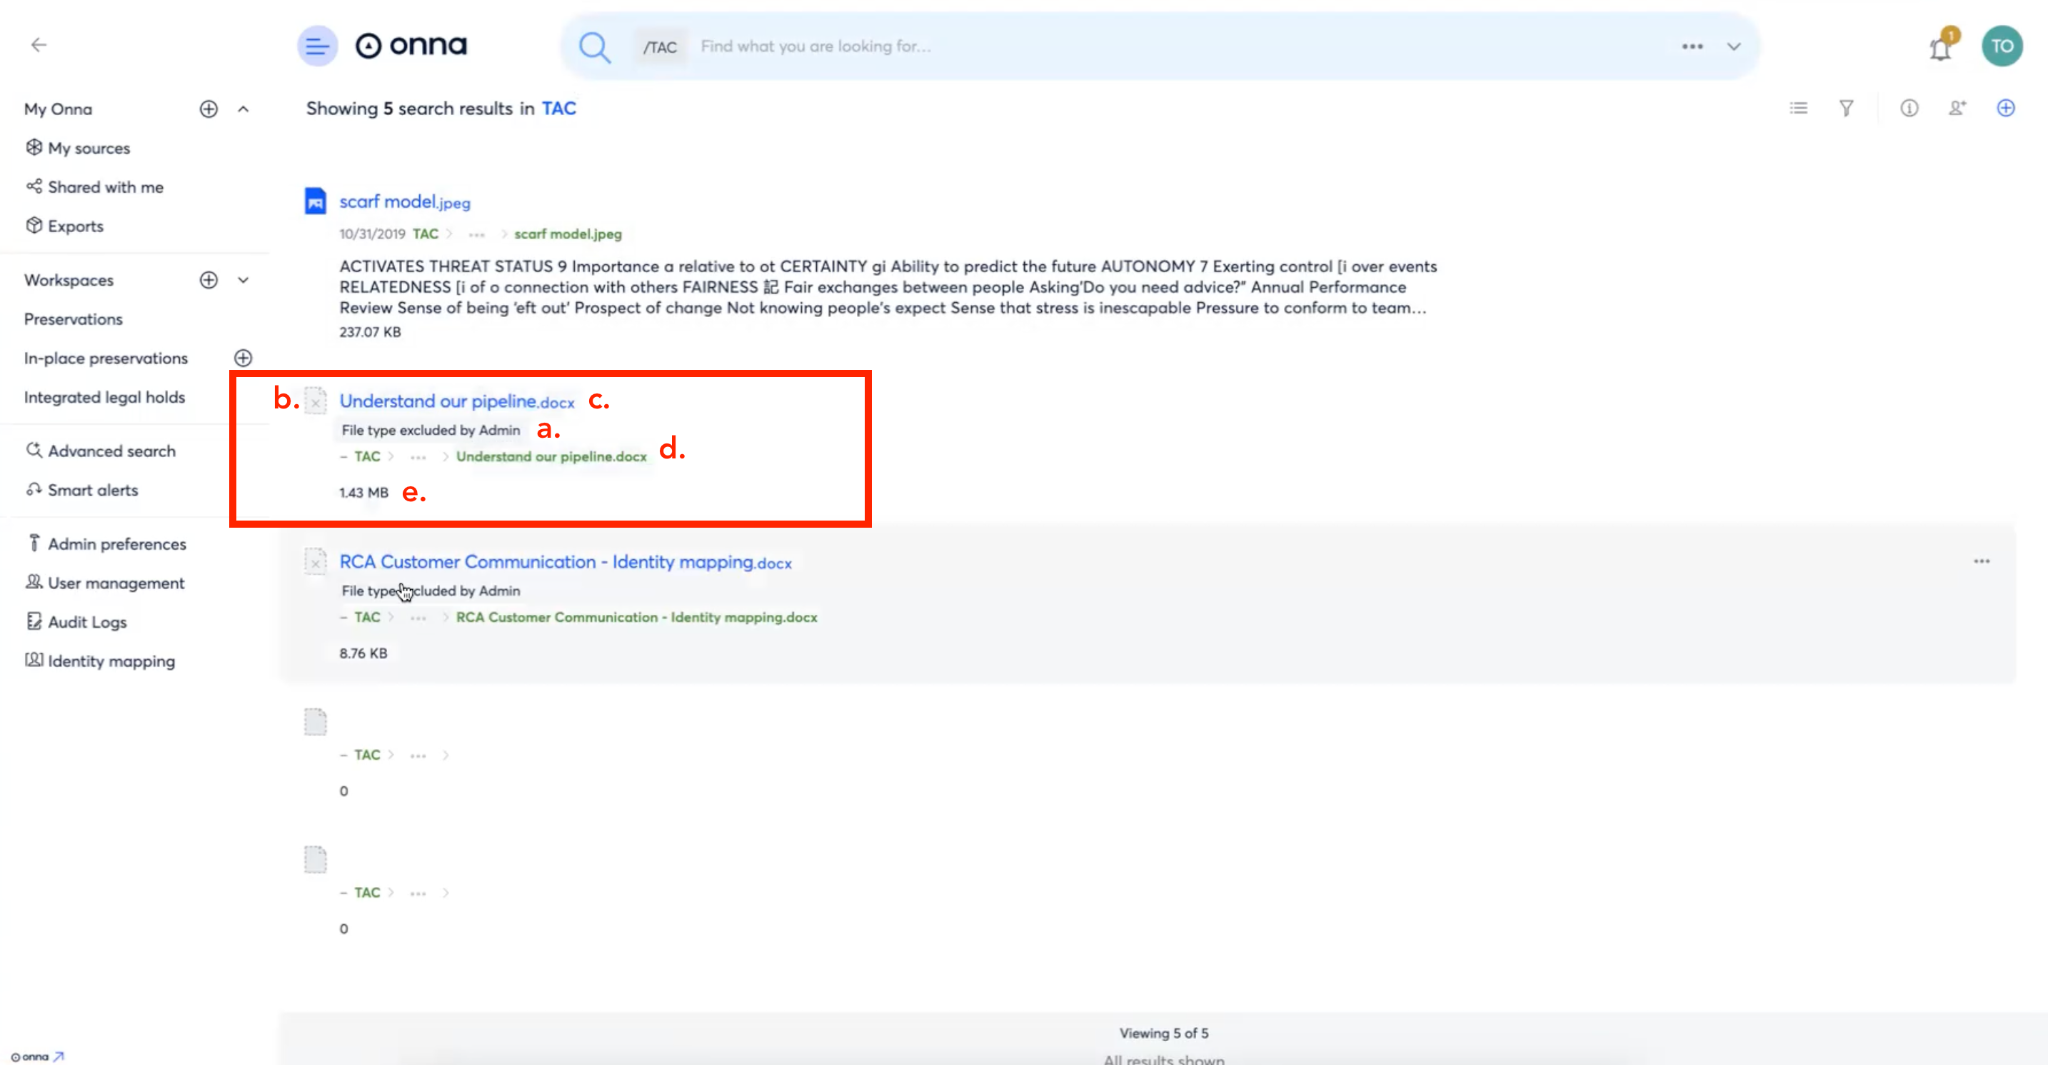
First, you’ll see a message ‘File type excluded by Admin’ (a) and you’ll notice that there is no file type icon, but rather an icon of a page with an ‘x’ in the middle (b).
You will, however, see some metadata, including the file name (c), the file path (location) in Onna (d), and the size of the file (e).
How to Process Excluded Files
There may be a time when a file has been excluded from processing, but you need to process the file. To do so, follow the steps below:
Step 1
First, click on the icon(s) next to the file(s) that were excluded that you want to process (a). You are able to select one or multiple files.
Then, click on the ellipsis next to one of the files you want to process (b).
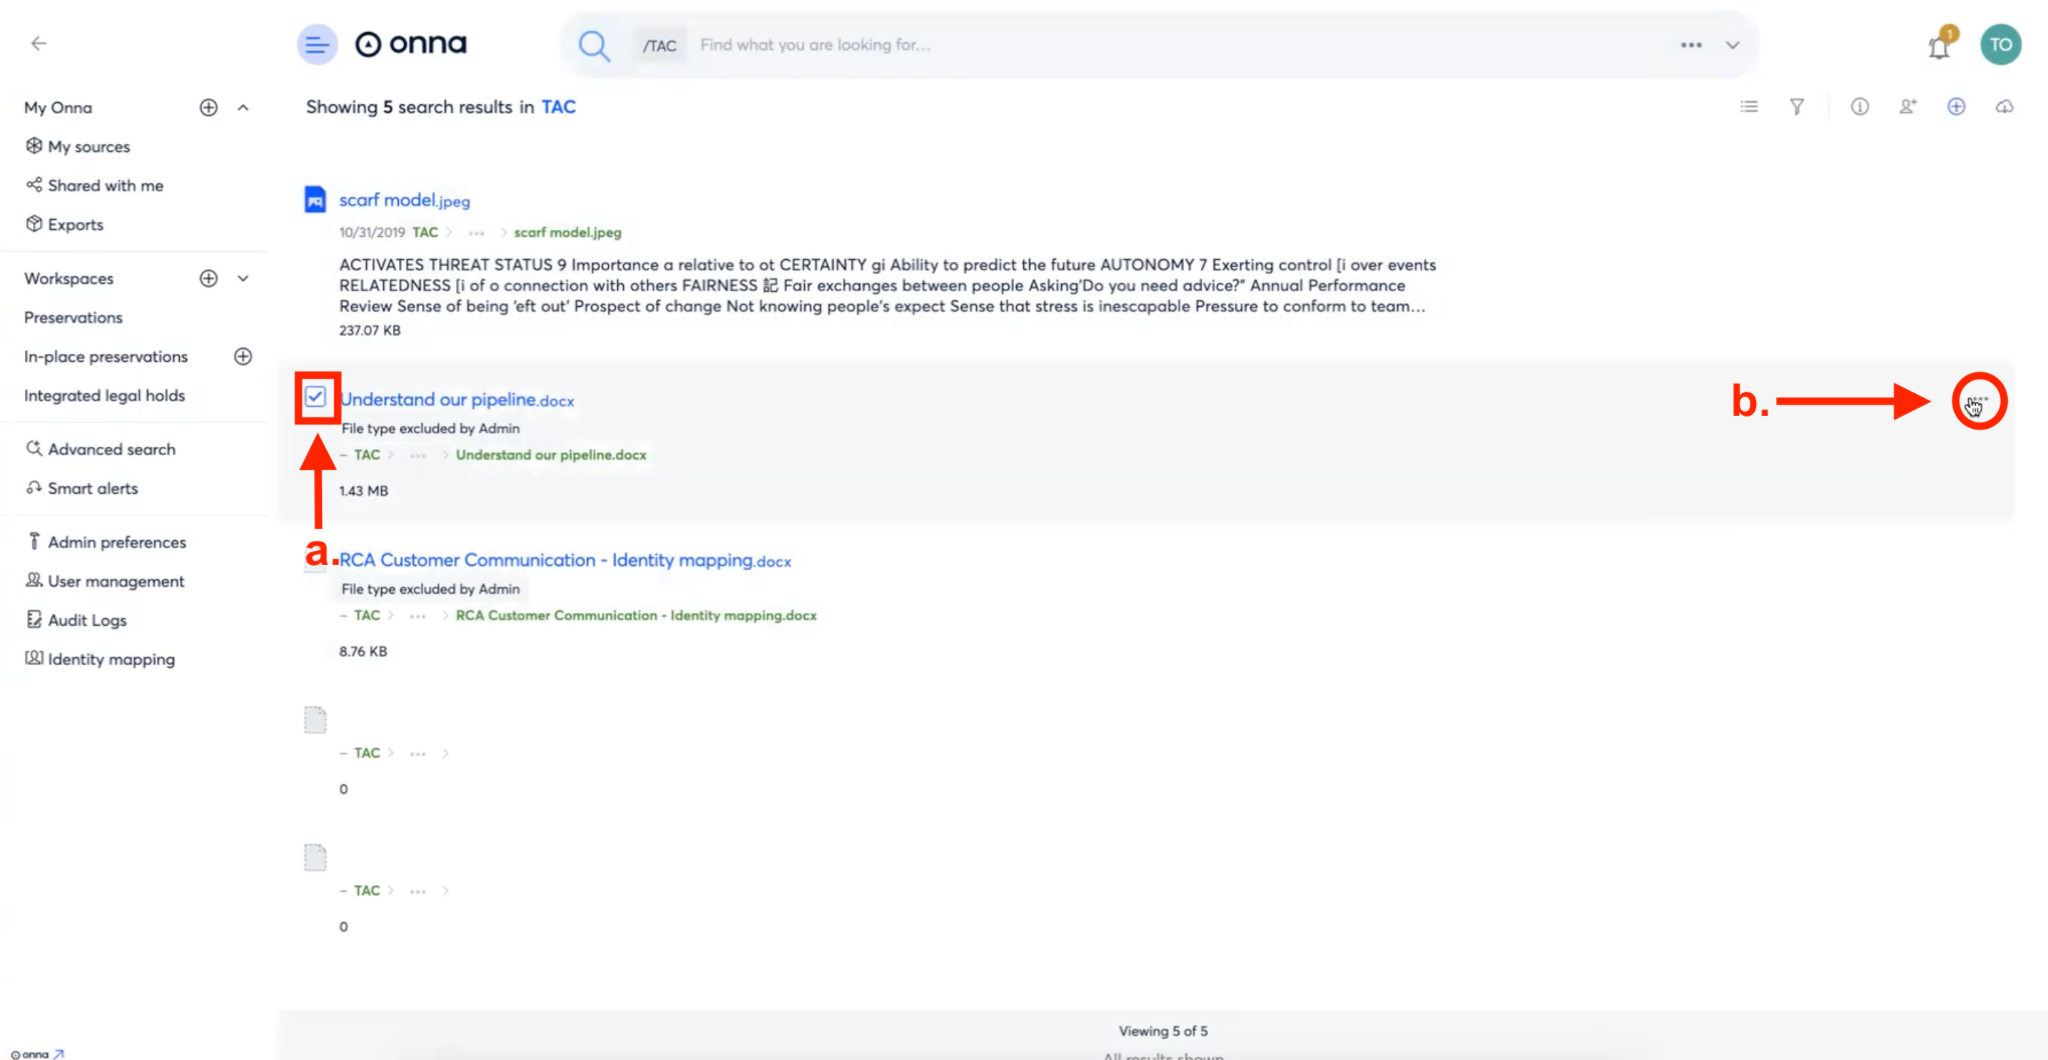
Step 2
From the dropdown that appears, select ‘Process files’. Your excluded files will then start to process.
Note: Unlike a standard sync, it is not possible to monitor the status of these files as they process.
