- 19 Nov 2024
- 9 Minutes to read
- Print
- DarkLight
- PDF
Build & Configure a Classifier
- Updated on 19 Nov 2024
- 9 Minutes to read
- Print
- DarkLight
- PDF
Classifiers are the objects used to train the machine learning process using reviewer-coded examples. The supervised learning process enables Reveal to generate predictive scores to reduce manual review effort and increate accuracy and efficiency for project content evaluation and production.
Classifiers also output “AI Models” which are basically the encapsulation of the machine learning work product that resulted from the Classifier training process. These AI Models can be reused on other projects to quickly prioritize documents without all the work involved with training a Classifier from scratch.
Building a Classifier
To create a Classifier, you must first create an AI Tag.
Once the AI Tag is created, Reveal will automatically create a corresponding Classifier of the same name. Subject matter experts will code a sample set of documents using the new AI Tag. As documents are coded, the system will begin to train the Classifier using the coded examples.
To create an AI Tag, perform the following steps:
Log in to Reveal 11.
Click on the Project Admin button in the Navigation Bar.
Click on the Tags menu option.
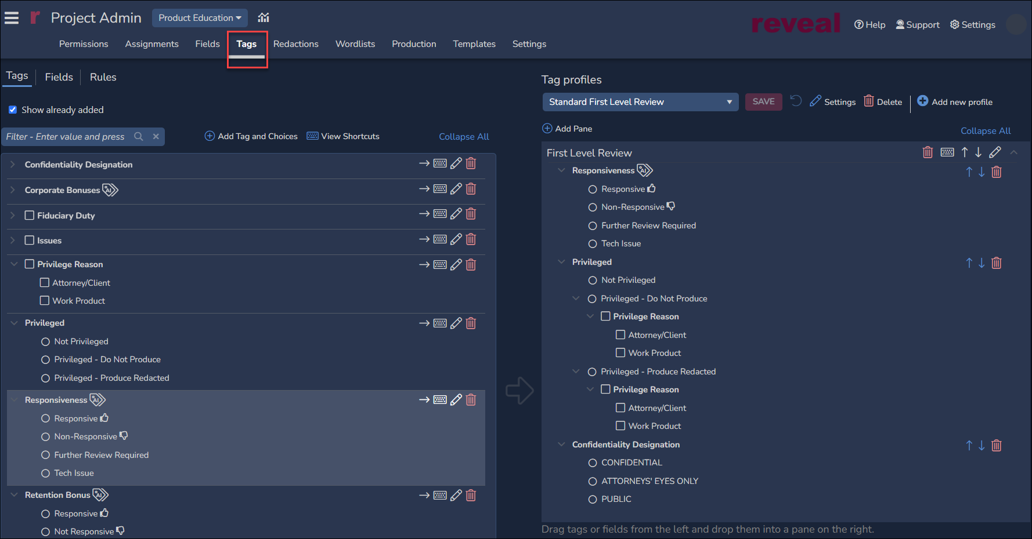
With the Tags tab selected in the left pane, click Add Tag and Choices.
To make a Tag an AI Tag, you need to ensure that the Prediction Enabled option is checkbox is selected for each choice. There are three options available when creating a Tag, two of which are relevant to AI Tags. Those options are:
a mutually exclusive(binary) tag
a multi-select tag
a tree tag, which is a hierarchical type of multi-select tag.
For mutually exclusive tags, the system will create a single Classifier and use the “positive” and “negative” choice to train the Classifier when Prediction AI is checked for these choices. The positive choice represents the type of content you’re looking for as it relates to a specific issue, whereas the negative choice represents the unwanted or not relevant content.
For multi-select tags, the system will create a Classifier for each choice where Prediction Enabled is checked. For example, if you have a multi-select tag for issue coding called “Fraud”, you may have tag choices such as “Compliance”, “Financial”, “Legal”, etc.; there would be a Classifier created for each of these choices flagged with Prediction Enabled. When coding documents using a multi-select tag, you must decide if a given document is relevant or not relevant to each of the choices, or in this case, to each of the types of fraud.
When users create the AI Tag, Reveal will automatically create a new Classifier to train the machine on how to score documents (score between 0 and 100).

Note in the above Mutually Exclusive illustration there are further choices that are not flagged for Prediction AI. These choices, Further Review Required and Tech Issue, are for management reporting and will not be part of the classifier training.
Please see the How to Create and Manage Tags article for more information on Tag management.
Classifier Card
Once the Classifier is created, its settings are configured and results evaluated in Supervised Learning. Each Classifier is represented on this page by a Classifier Card which summarizes the name, type and status of the classifier as well as providing access to the settings and configuration options available.
The gear icon in the upper right-hand corner of the card opens the Classifiers > Edit Classifier screen. This is where the classifier's settings may be refined by importing an AI Model from the Model Library or configuring batching, threshold, weight and other settings.
View Details displays graphs and reports detailing the performance of the classifier used to evaluate its effectiveness and determine whether further training is required.
To return to the Classifiers screen from either Edit Classifier or View Details, click on the "Classifiers" breadcrumb at the upper left of the screen.

Each card contains the following elements:
Classifier Name - each Classifier has a name presented on the card which either matches:
the name of the AI Tag (or tag choice, in the case of a multi-select tag type), or
the name supplied by an AI Model imported from the Model Library.
Where there are many Classifiers, the name may be searched using the Find Classifiers box at the upper right of the screen.
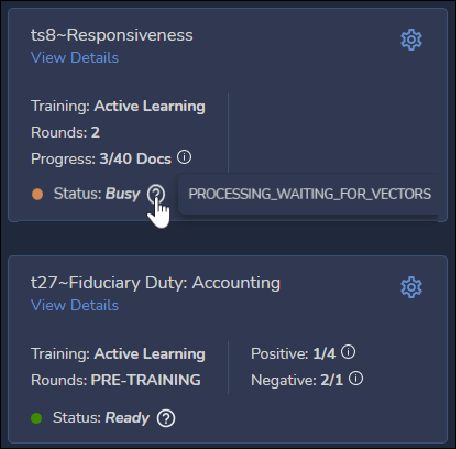
Training Method - Training sets out the type of training, usually Active Learning.
Training Rounds - The number of rounds of training, in batches defined under Edit Classifier, whose coding has been completed and fed into the AI Model that the classifier is preparing. In the illustration above, 2 rounds have been completed for ts8-Responsivenesswhile t27-Fiduciary Duty: Accounting is still PRE-TRAINING with no rounds completed as of yet.
Progress - Indicates the number of documents coded in the current round or batch. This field will not appear on the card of a classifier that is still PRE-TRAINING.
Status - Indicates the classifier's current availability. Two sample statuses are seen above.
Ready - the classifier is ready to receive training; hovering a pointer over its question bubble will indicate IDLE.
Pre-Training - the state of the Classifier prior to the first training round run.
In-Queue - the state of the Classifier once the Batch Configuration conditions have been been met and just before the training process starts.
Busy - the classifier is working, here PROCESSING_WAITING_FOR_VECTORS.
Error - reports a problem with the classifier's processing; here, ERROR_INVALID_SOURCE_DATA.
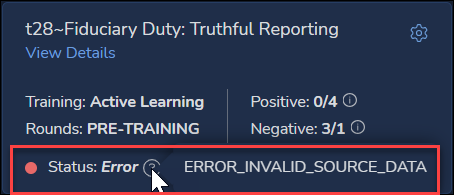
Positive - A classifier with completed rounds will report how many of the minimum number of documents required to train an AI Model have been tagged Positive. In t27-Fiduciary Duty: Accounting in the main Classifiers screen above 1 of the required 4 documents have been tagged Positive so far; in t28-Fiduciary Duty: Truthful Reporting in the error card above no documents have yet been tagged Positive.
Negative - A classifier with completed rounds will report how many of the minimum number of documents required to train an AI Model have been tagged Negative. In t27-Fiduciary Duty: Accounting in the main Classifiers screen above 2 documents have been tagged Negative of the required 1; in t28-Fiduciary Duty: Truthful Reporting in the error card above the Negative minimum of one document has already been covered, with 3 documents tagged Negative.
Configuring a Classifier
As noted above, the gear icon in the upper right-hand corner of the card opens the Classifiers > Edit Classifier screen. This is where the classifier's settings may be configured, and existing AI Models added to jump-start the classification process. AI Models are the decisions of subject matter experts codified from classifiers that have been saved into a Reveal AI Model library and may be reused in similar matters.
Here are the parts of the edit screen, with discussion of how they may be used to refine the classifier.

Name - The name of the Classifier.
Coding - Shows the choices available as the Positive and Negative values for the associated AI Tag (a multi-select Prediction Enabled classifier will only show a Positive value). There is a prompt to manage this under Admin > Tags.
AI Library Models - Shows saved AI models available to add to this classifier (by clicking +Add on an Available to Add Library Model card), and those already added.
Select how AI Library Models are combined with new training input on this classifier:
User tags, where available, are preferred for training over library model tags (the default). This option allows Reveal to utilize tagged documents to influence the calculation of the predictive scores instead of the added AI Model from the AI Model Library.
Both user tags and library model tags are weighted equally and used continuously. This option allows Reveal to equally use both tagged documents, and any added AI Model from the library, to influence the calculation of the predictive scores.
Note: When you add or remove an AI Model from the library to your Classifier, you must select Run Full Process to ensure the addition or removal of the model is reflected in the Classifier training results.
Batch Composition - This setting allows you to determine how documents are selected when creating review batches using the AI Driven Batches feature.
Active Learning with Diverse Documents - This option selects documents across score ranges that will train the classifier in the least amount of time. The goal is to train the classifier with the least number of documents tagged by human reviewers.
Active Learning with Diverse Documents is typically used when you're building a Classifier for the purpose of auto-coding documents for a production to a third-party.
Active Learning with High-Scoring Documents - This option selects the documents with the highest predictive scores. The goal is to review the most likely responsive documents first so that you more quickly identify evidence of wrongdoing or finalize your legal strategy more quickly.
Active Learning with High-Scoring Documents is typically used in early case assessment (ECA) and investigations when it is important to review the most likely relevant content first.
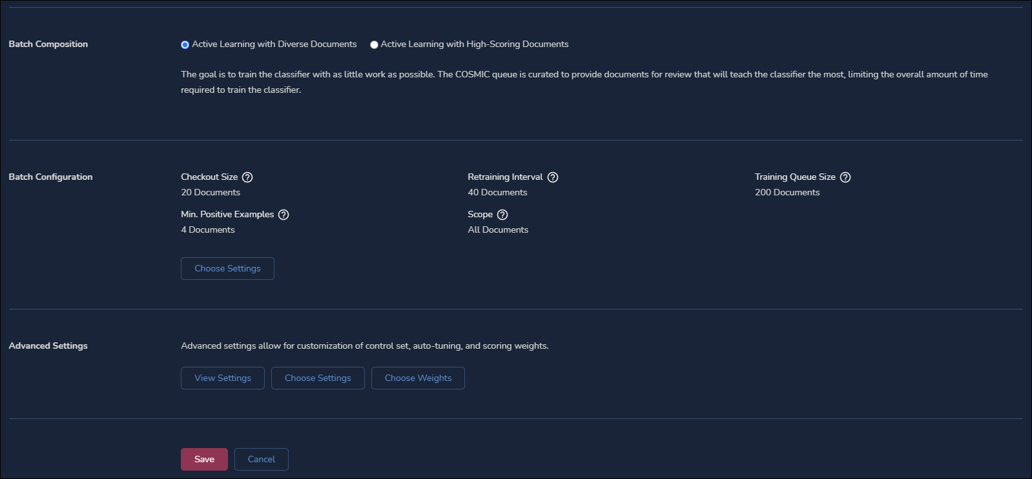
Batch Configuration - Allows you to configure the batch size and training interval settings for the Classifier and its associated review batches.
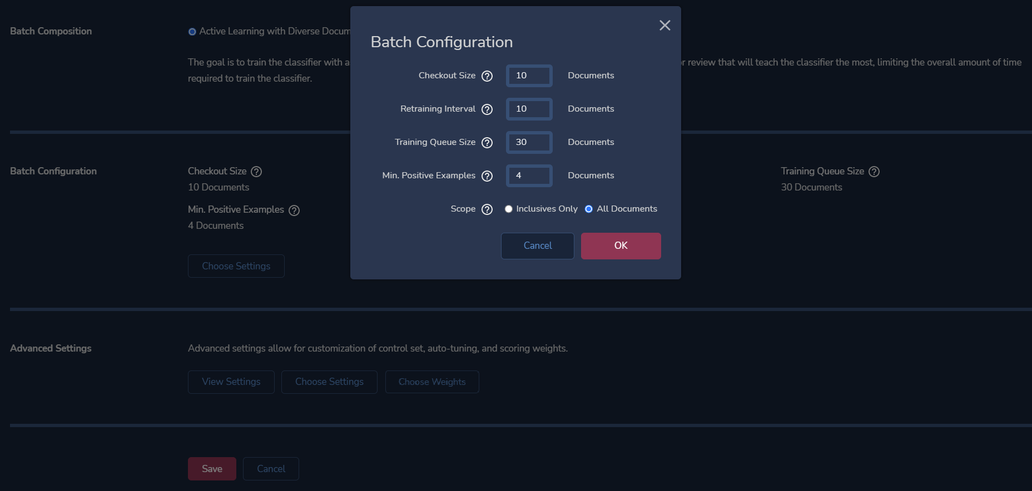
Checkout size – The number of documents available to a reviewer to checkout for review for a specific batch.
Retraining Interval – The number of documents that need to be coded in order for the next training round to kickoff for the specific Classifier.
Training Queue Size – The number of documents made available for batching at the end of each round of training.
Min. Positive Examples – The minimum number of documents that must be coded using the AI Tag's positive choice before the first round of training can start.
Advanced Settings - The Advanced Settings section provides you with the ability to view and modify the weights associated with each of the features used to calculate predictive scores for each document. You can enable and disable certain advanced settings.
Choose Settings - This option allows you to view and modify the following:
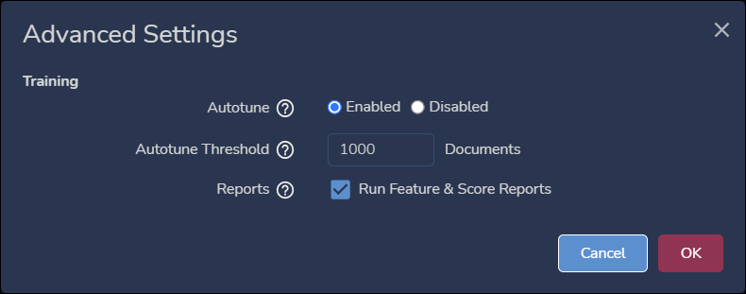
Autotune -Enable or Disable classifier autotuning. When this feature is set to "Enable", Reveal will automatically select the appropriate weighting for each feature that will influence the calculation of predictive scores for the given Classifier. A feature is either a specific keyword, phrase, or metadata field value.
Autotune Threshold– Set the maximum number of documents in which autotuning should be used to calculate predictive scores after each training round. Once the total number of tagged documents exceeds this value, the system will continue to use the last calculated set of feature weights to calculate predictive scores.
Reports- Enable Run Feature and Score Reports - This setting gives you the option of generating the Feature and Score Reports. If you're using the predictive scores to simply prioritize review, then you may not need to generate these reports since they're used to evaluate the Classifier training progress. Generating these reports will impact the performance of the training process.
Choose Weights - This feature allows you to manually adjust the weights of each feature including: keywords, phrases, metadata, entities, etc.
View Settings – Displays all current features and their associated weights.
With your classifier created and configured, it is time to train it on batches of project documents. See How to Train a Classifier for discussion of this part of the process.
.png)


