- 19 Nov 2024
- 1 Minute to read
- Print
- DarkLight
- PDF
Update the Production Database
- Updated on 19 Nov 2024
- 1 Minute to read
- Print
- DarkLight
- PDF
Database Update can be used to add a production’s images and/or a production’s Bates numbers to the database. 
Log in to Reveal as an Administrator or Client Administrator.
Open the project from the Project Hub.
Click Admin and open Production.
Create, preprocess, run and export a Production Job as described in How to Create a Production Job, How to Run Production Job Preprocessing, How to Run a Production Job and How to Run Production Job Export.
Choose Database Update from the grey side menu.
Click the +Add button.
Enter a Job Name.
Select the Production Job for database update.

Settings Options:
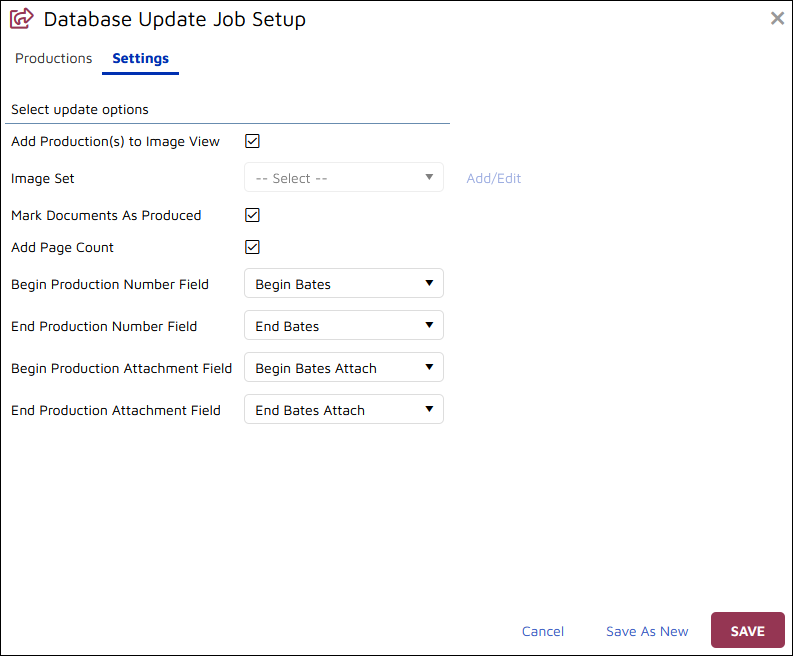
Select Add Production(s) to Image View as display options for Review.
Add or Select and Edit the Image Set to which the production images should be added.
Check Mark Documents as Produced.
Check Add Page Count to update that information for each produced document (if not already populated).
Lastly, set Production Number Fields to which production numbering will be recorded in each document record for:
Begin Production Number - usually Begin Bates
End Production Number - usually End Bates
Begin Production Attachment - usually Begin Bates Attach
End Production Attachment - usually End Bates Attach
Click Save to save the job. You also have the option to open and re-specify an existing job with a new Job Name and Production Job selection and Save As New.
Once the Database Update Job has been created, it needs to Start from the Status column dropdown menu for the job on the Database Update Jobs list. You will be asked for confirmation on start.
Once the job is started a grey gear will appear in the Status column. The gear will turn green and spin while the job is processing. The metadata index is auto-updated as part of this process, which should not take very long overall. A green checkmark will appear in the Status column when done.
The production process is complete with this step.
.png)
