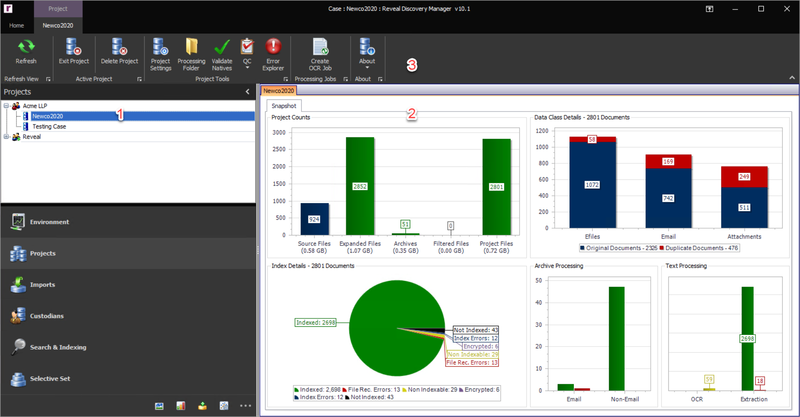
To open an existing project, navigate to the Projects Module Navigation, expand the client  the project is associated with, and click on the blue new project icon
  or green linked project icon
  to open. Once active, the project’s Snapshot will show in the Module Form. The Snapshot contains information about the project based on the Snapshot’s scope which is explained in the Snapshot Table below.

Active Project – An active project will be highlighted in blue in the Projects Module Navigation section and lets the user know which project they are currently working in. An active project linked to a Review case in the AWS environment will be highlighted in green.
Snapshot Charts – The Snapshot tab provides a visual high level snapshot of the project.
Project Counts – The Project Counts chart consists of 5 bar graphs. Each bar graph has the number of files and data size in gigabytes associated with each bar graph:
Source Files – This provides a one-to-one match of the uncompressed data imported into the project. In the above chart the Source Files is 924 which means there were 924 uncompressed files imported into the project prior to processing.
Expanded Files – Total number of files (source files and archive children) after processing prior to any data filtering.
Archives – Total number of archive files within the project.
Filtered Files – Total number of files filtered out of the project due to project level filters.
Note
Any inline email attachments that are suppressed when using the setting 'Suppress Inline Image Email Attachments' will be reflected in the filtered file count.
Project Files – Total number of files contained within the project after processing and filtering.
Data Class Details – A breakdown of original/duplicate efiles, email and attachments within the Project Files.
Note
Embedded Objects will be added to Attachments counts.
Index Details – The Index Details chart consists of the Index Status of the files within the project. A file can only have one Index Status. The individual files belonging to the various Index Statuses can be analyzed within the Selective Set Module.
Index Status – A file can only have 1 Index Status within a project.
Indexed – Total number of successfully indexed files within the Project Files. These are the files that are available for searching within the index. A file can have both electronic and OCR text. If the file has one or more of these text types, the file will be considered Indexed and one or both text files will be indexed for searching.
File Rec. Errors – Total number of unrecognizable file types contained within the import. These files will not be available for searching.
Non Indexable – Total number of files where text extraction will not be attempted as Reveal believes no usable text will be generated from these file types. For a complete listing of supported file formats please see Appendix B. These files will not be available for searching.
Encrypted – Total number of files identified as encrypted or password protected and that do not have text extracted. These files can be decrypted by using the Password Bank. Please see the Import Module for directions on how to do this. If these files are not decrypted, they will not be available for searching.
Index Errors – Total number of files where both text extraction and OCR has failed. These files will not be available for searching.
Not Indexed – Files that are flagged for indexing, but have not been indexed yet. For example, if the Index Project for Searching setting is disabled or deselected, all files that have not been indexed would belong to this Index Status.
Processing Details – A high level breakdown of the statuses of archive processing as well as text and OCR extraction.
Archive Processing – A breakdown of successful/errored email archives and non-email archives within the project.
Text Processing – A breakdown of successful/errored/pending (only for OCR) statuses of text extraction and OCR. Text extraction for electronic text will be executed for all files within the project that are not File Recognition Errors, Non Indexable, or Encrypted. If a file has electronic text as well as OCR text, both text files will be indexed for searching.
Projects Ribbon – After a project is active the following settings are available in the Projects Ribbon:
Refresh – Refreshes the Projects screen to show new projects created. This button can also be used within the project to update the Project Snapshot.
Exit Project – Exits the project; Discovery Manager remains open.
Delete Project – To delete a project first click on the project in the Projects Module Navigation and then click the Delete Project button in the Projects Ribbon.
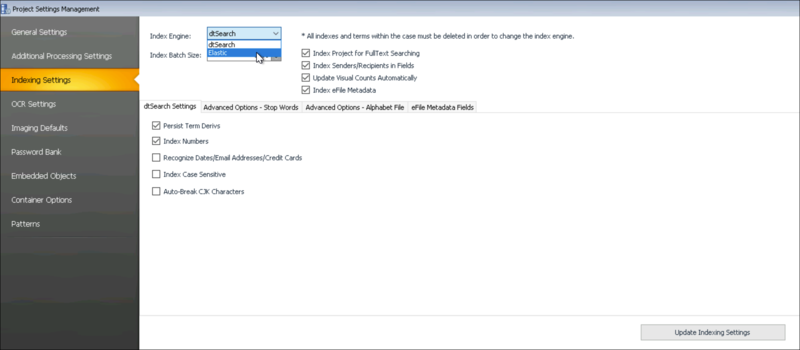
Project Settings – The Projects button launches the Project level settings that were created at project creation time that can be changed or manipulated as required afterward.

Note
If the Indexing Settings are changed, the project needs to be reindexed for the new settings to be applied to the dtSearch (used in Reveal 10) or Elastic Index (used in Reveal 11) as may be selected under Indexing Settings. Other settings can be changed using simple SQL queries provided by Reveal Technical Support.
Note
Index Project for FullText Searching - This setting is functionally the same as the Index During Import setting under New Project. Checking it both enables automatic indexing when importing data, and a field is added to the dtSearch or Elastic Index (as selected) named Text that contains the FullText of the file.
Processing Folder – Launches directly to the project’s file system Processing Folder.
Validate Natives – Sometimes it is necessary to validate that the Processing Folder contains a proper copy of each native file. This may be necessary after a network failure, or when troubleshooting an import that has the Missing Files icon. After this button is clicked, if a file is missing in the Processing Folder the File ID and the path to where the native file is supposed to be will be logged.
QC – To launch a global view of Import QC or Image QC, click the QC button and choose the appropriate option.
Error Explorer – Shows the Errors table for the project.
Create OCR Job – Allows user to create and manage OCR Jobs. These jobs can be created by using Imports, Selective Set, or Imaging Jobs as the scope of the OCR Jobs. To create an OCR Job, choose the scope, and click the Create Job button. This job can be monitored within the Processing Jobs tab within the Environment Module.
Re-OCR Errors – For any scope where OCR has been attempted, there could be errors. These OCR errors can be reattempted by selecting the Re-OCR Errors setting, choosing the job previously processed for OCR, and clicking the Create Job button. This job can be monitored within the Processing Jobs tab within the Environment Module.
Note
All OCR settings in the Project creation are determining which native files to OCR. Users also can distribute Imaging Jobs for OCR.
About – To get project specific information like Project Version, Processing Folder, and Project ID, click the About button.