Feature Flag
The new Document Viewer is currently feature-flagged and must be enabled for your project or instance. Contact your CSM or Reveal Support to request access.
Important
Whether you can enable the new Document Viewer also depends on the project’s images. If a project contains images that were loaded to the legacy image viewer, those images must be migrated before the new viewer can be enabled. Contact your CSM for guidance on the migration process.
The new Document Viewer delivers a faster, more responsive document review experience with an improved interface and additional functionality to streamline review tasks. Built entirely in React, it replaces the legacy ASPX-based viewer, so you can navigate documents and perform review actions without unnecessary page reloads.
The new viewer keeps the familiar review workflow while introducing updated controls and enhancements to features such as PDF View, Document Explorer, Media Player and Excel Viewer. You can continue to apply tags, update fields, manage folders, add notes, and work with redactions and annotations. All review data remains consistent between the new and legacy viewers, so your existing work is preserved.
To enable the new viewer:
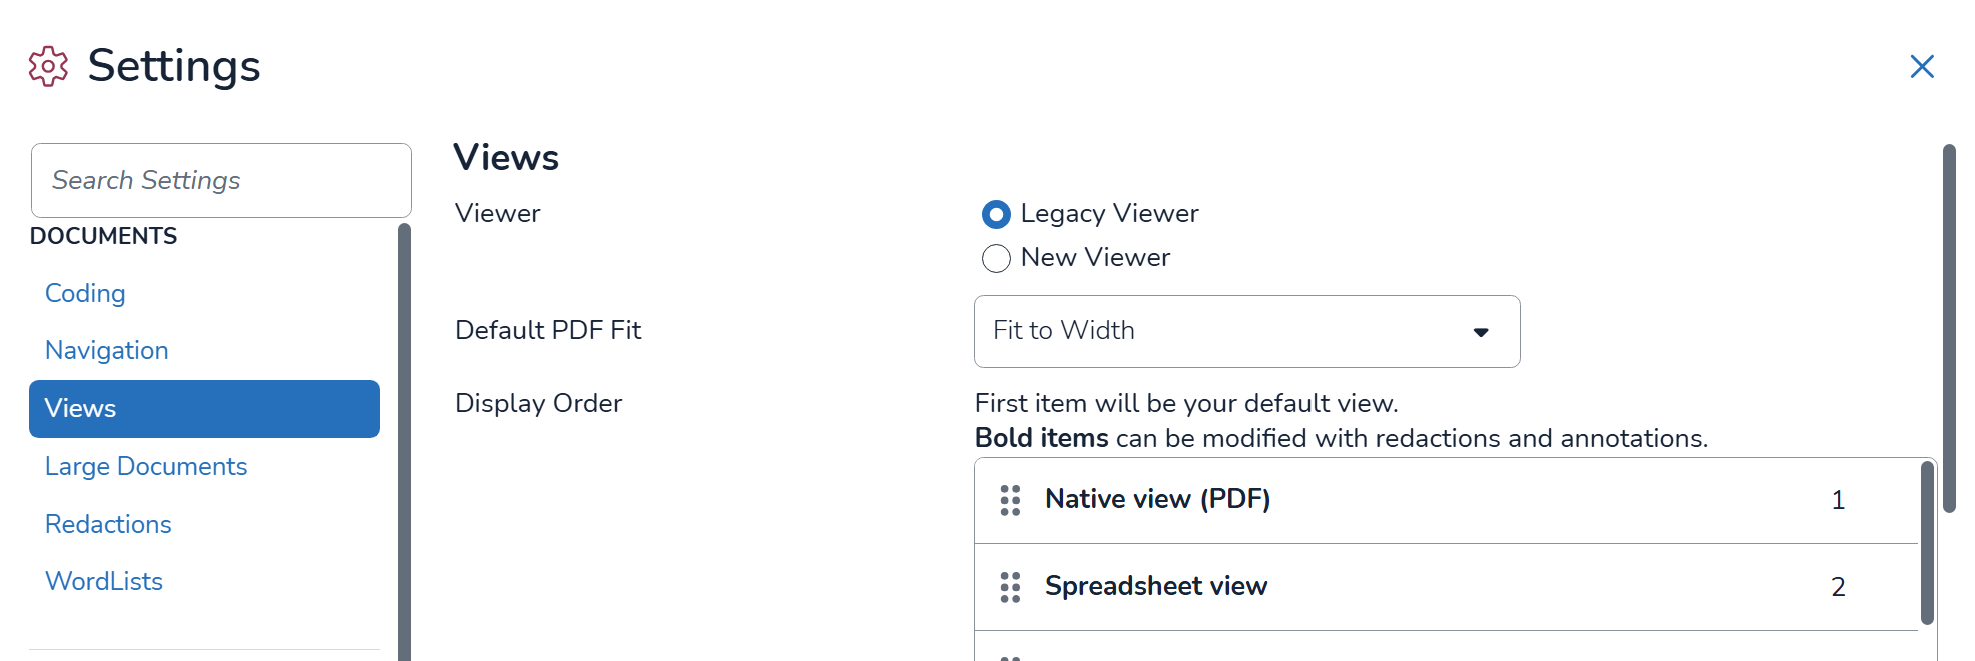
Go to Settings > Views.
Select New Viewer, and then select SAVE.
To switch back at any time, select Legacy Viewer in the same place, then select Save.
Check these items before reviewing in the new viewer:
Browser cookies – Enable third-party cookies in your browser. Without them, native files (PDF, Excel and other formats) do not load.
Permissions – The new viewer enforces your review permissions individually, including tagging, downloads, notes, work folders, transcripts and image labels. Controls you do not have permission for are unavailable. Only users in a role with the Customize Form permission can drag panels to rearrange the layout. See Permissions Matrix (Default).
To open a document, select it from the Review Grid or the Results Pane, as you would in the legacy viewer.
Note
Most existing documentation for the legacy Document Viewer also applies to the new viewer, as the core review workflows remain the same. Some articles may still show images of the legacy viewer, and some features and interface elements may differ.
Viewer layout
The viewer has a header bar across the top, the document pane, and panels around the document. This is the default layout; panel positions can change.
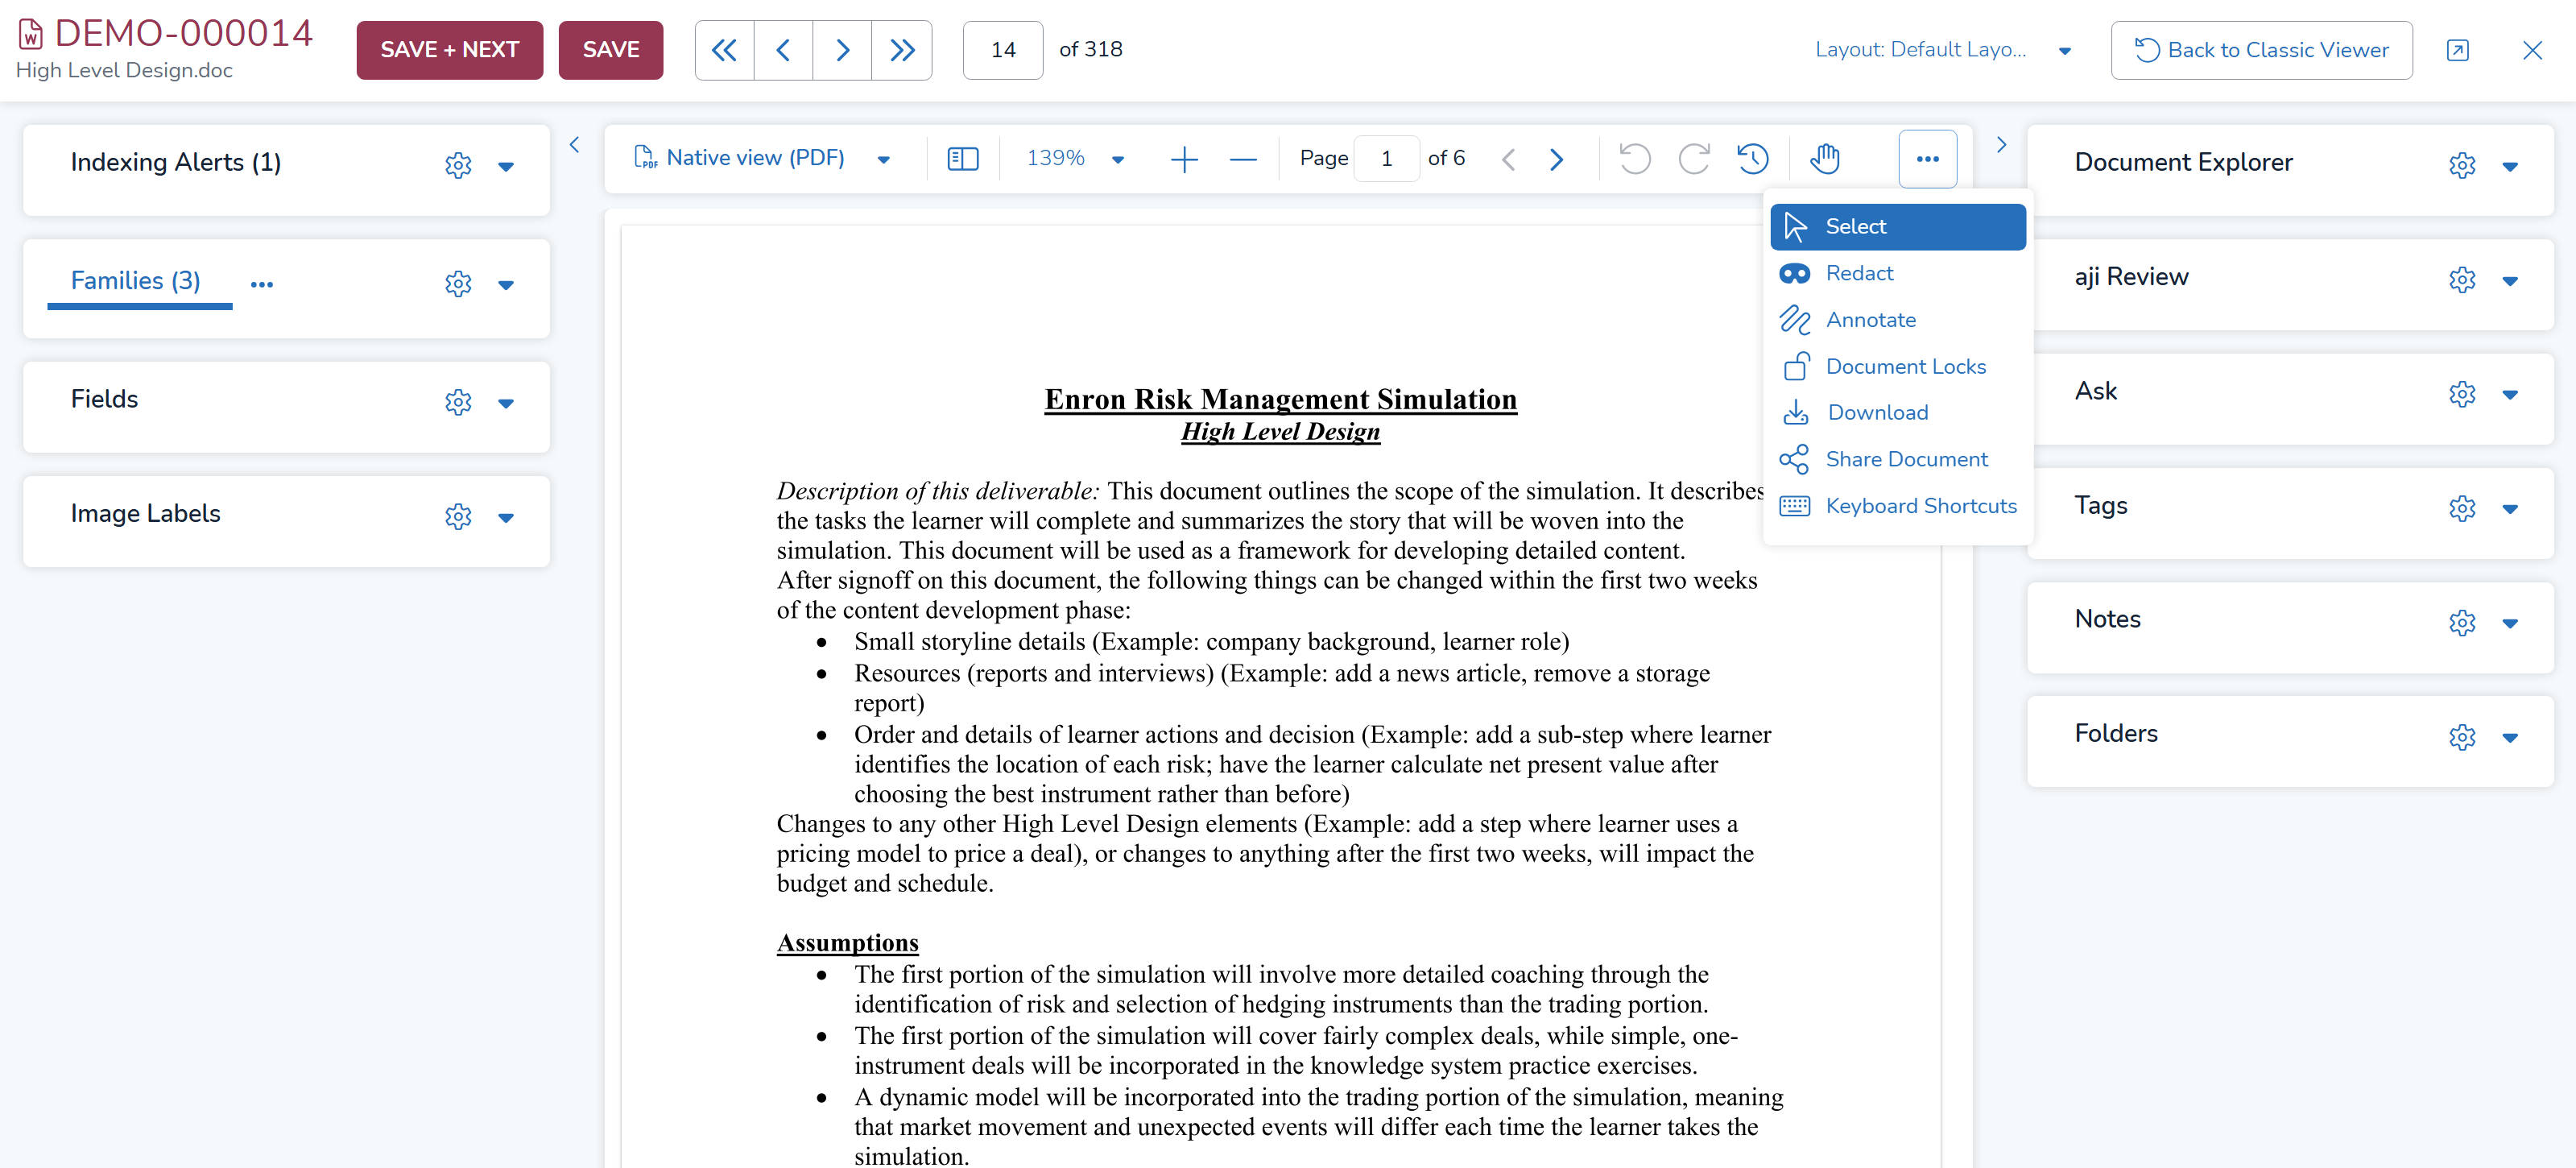
The document is in the center. The panels around it show context about the document and hold search, AI and coding tools. The diagram shows the default layout; panel positions can change. Each area is described in the sections below.
Header bar
The header bar runs across the top of the viewer and controls the document as a whole: which document you are on, saving, and moving through the review set.
Document identity – Shows the document's Begin Number (for example, TEST24…000047) and, below it, the file name (Scanned_TIFF_06.tif). The icon to the left shows the file type.
SAVE + NEXT – Saves your coding on the current document and opens the next document in the list.
SAVE – Saves your coding and stays on the current document.
First / Previous / Next / Last – Move to the first, previous, next or last document in the current document list.
Document position – Shows the current document's position and the total in the list (for example, 14 of 318). Type a number and press Enter to jump to that document.
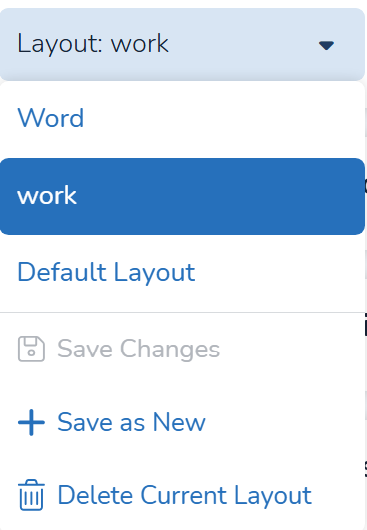
Layout – Selects a saved panel layout. Default Layout is applied first. See Customizing the workspace.
Back to Classic Viewer – Reopens the current document in the legacy viewer.
Pop out – Opens the viewer in a separate browser window, useful on a second monitor.
Close (X) – Closes the viewer and returns to the Review Grid.
Document pane
The document pane displays the document. Its toolbar contains the following controls:

View selector – Chooses which rendition to display, for example Native view (PDF), an Image set, Extracted text, OCR text or Spreadsheet view. Only views indexed for the document are listed. The first view shown follows your User Settings. The view you pick stays selected as you move to other documents during the session.
Thumbnails – Shows or hides page thumbnails beside the document.
Zoom – Sets magnification from the percentage list, or with + and –.
Page navigation – Shows the current page and page count (Page 1 of 4). Type a page number or use the previous and next arrows.
Rotate left / Rotate right – Rotates the page view 90 degrees. Rotation changes only your view.
History – Opens the document's history of review actions.
Pan (hand) – Drags a zoomed page around inside the pane.
Select (arrow) – Selects text and areas on the page, for example to copy text or start a redaction or annotation. This is the default tool.
Redactions – Opens the redaction tools. When redactions are locked, it is grayed out and labeled Document Redactions Locked in the … menu.
Annotations – Opens the annotation tools. When annotations are locked, it is grayed out and labeled Document Annotations Locked in the … menu.
Document Locks – Opens the lock settings for the document. See Locking a document.
Download – Opens a menu of available document views (Native view (PDF), Spreadsheet view, Extracted and OCR / Loaded) and native files (Exported Native File and Native View Path). Depending on the selected option, a dialog opens with the relevant download settings.
Share Document – Opens the Share dialog, where you can copy a link to the document or email it to other users. Links expire after 7 days.
Keyboard Shortcuts – Opens the list of keyboard shortcuts for review actions.
Panels
Panels provide document context and tools for searching, analyzing, and coding documents, such as Document Explorer, Ask, aji Review, Families, Fields, Tags, Notes, Folders, and Indexing Alerts, among others. You can expand or collapse each panel using the arrow  in its title bar. To pop out a panel, click the Settings icon and select the
 button.
Customizing the workspace
You can shape the viewer around the way you review:
Adjust the view
Select the arrow at the inner edge of a panel area to hide it and give the document more width, and select it again to restore it. Select the arrow on a panel's title bar to collapse or expand that panel. The gear icon on a panel's title bar opens that panel's options, including Pop Out, which opens the panel in its own window, for example on a second monitor. Popped-out panels stay in sync with the viewer.
Move panels
Users in a role with the Customize Form permission can drag a panel by its title bar onto another panel, for example Image Labels onto Fields. The target panel is highlighted when you can drop there, and the two panels combine into one with a tab for each. To move a panel without combining it, drop it in an empty spot in a panel area. Tabs that do not fit are in the … menu next to the tabs; select a tab there to open it, or drag it out to move it. You can lock panels in place so they are not moved by accident.
Save layouts
To keep an arrangement, save it as a layout. To switch layouts, choose one from the Layout dropdown in the header bar. The viewer uses Default Layout until you choose another.
What's new in the viewer
The new viewer adds some features and changes how others work. Each section below explains one change and how to use it.
Long field values
Long values in the Fields panel, such as CC lists, are cut off and end with an ellipsis (…). To see the full value:
Select Expand to show the full value in place.
For values over the character limit, select the pop-out icon. The full value opens in a scrollable window.
To change where values are cut off:
Select the Settings icon on the Fields panel, then Set Display Length.
Under Measurement, choose Lines, Characters or Don't Truncate.
For Lines or Characters, enter the limit under Truncation, for example 100 characters.
Select SAVE. To restore the default, select Reset to Default.
Reviewer notes
Reviewer notes now support Markdown formatting; see Markdown Syntax Reference Matrix.
To add or change a note:
In the Notes panel, select Edit Note.
Type or change the note, then save it.
The saved note shows the date it was last edited and the name of the user who edited it.
Adding notes in bulk and searching notes work as before; see Reviewer Notes.
Locking a document
Lock a document to make its notes, fields, tags, annotations and redactions read-only. To lock documents, your role needs the permission……
In the document pane toolbar, select the Document Locks icon.
Confirm in the Lock Document dialog.
While a document is locked, the Redactions and Annotations icons are grayed out.
Keyboard shortcuts
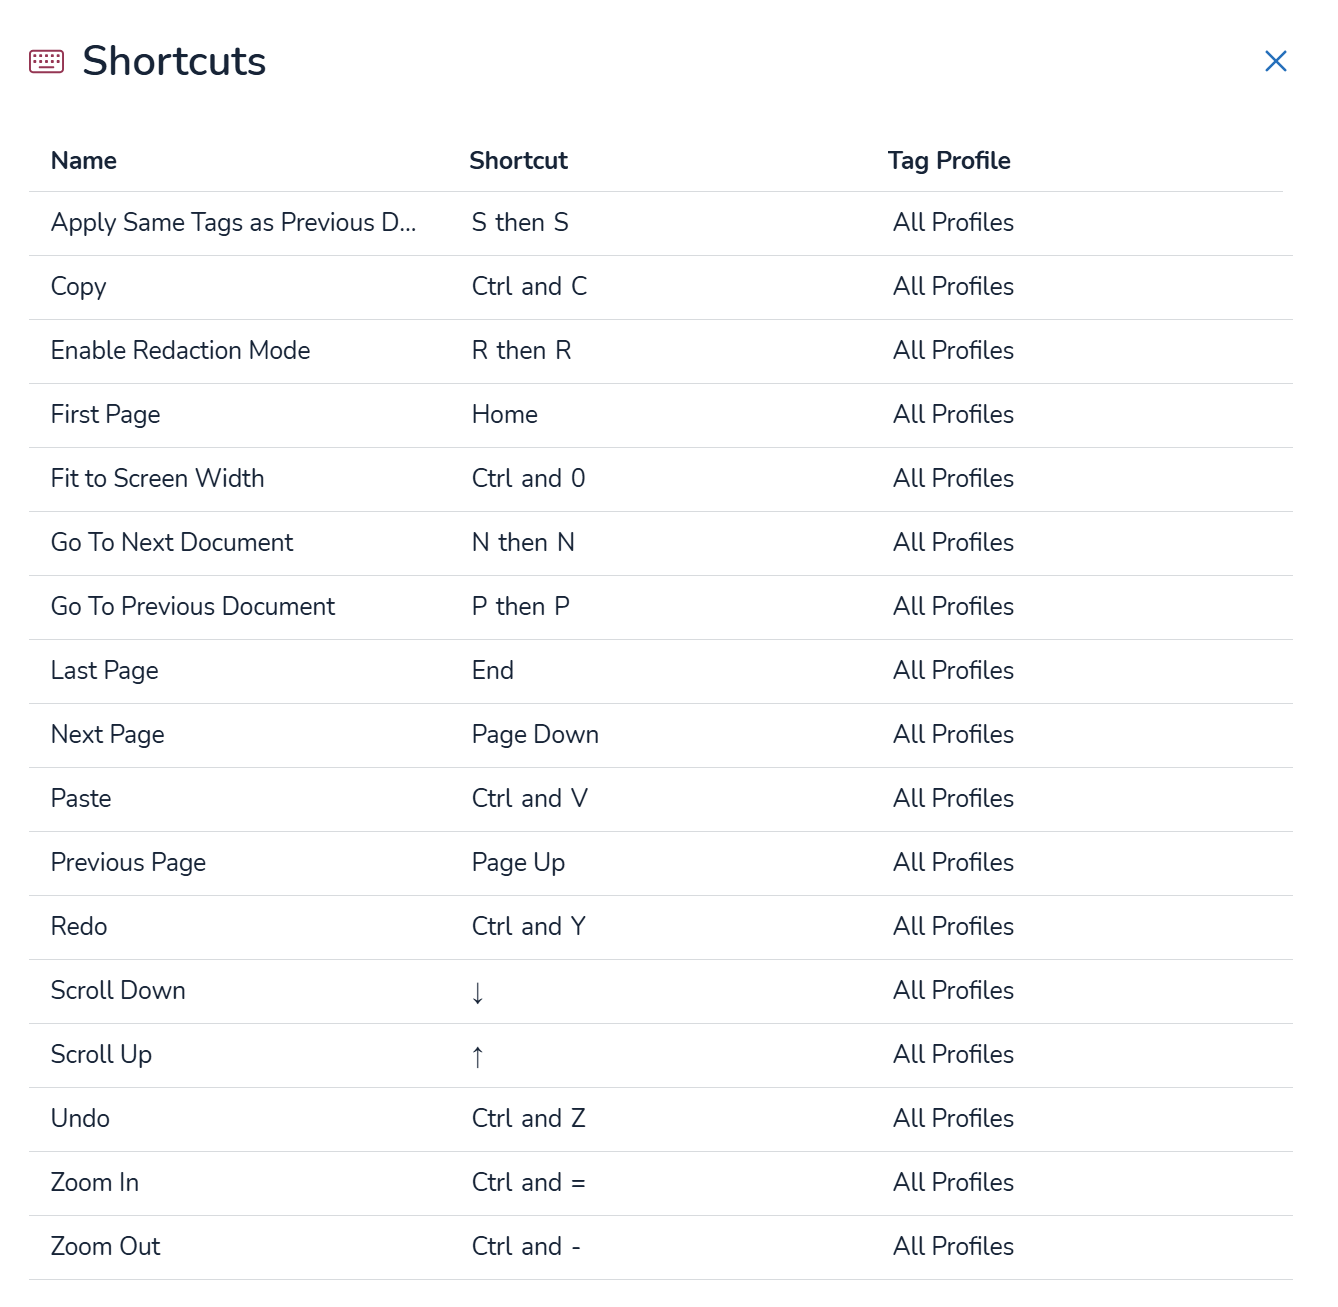
To see every shortcut you can use, select the  Keyboard Shortcuts icon in the document pane toolbar. The Shortcuts dialog opens.
The dialog lists shortcuts available alphabetically by name. It includes Reveal's built-in shortcuts, PDF and spreadsheet shortcuts, and any custom shortcuts. For custom shortcuts, the Profile column shows which profile the shortcut applies to, or All Profiles if it applies everywhere.
The shortcut dialog listing built-in shortcuts: