Overview
Notice
If your document already has burned-in redactions using Exolution, we strongly advise against redacting that same document in Blackout. See the Check Document for Exolution Redactions section.
As of 2025.5, users are no longer required to open the Exolution Web Portal and leave Reveal to redact spreadsheets.
Spreadsheets can be redacted in Spreadsheet View via Document Viewer after they have been indexed according to the instructions in the Generate Native PDF and Spreadsheet Views article. You cannot apply redactions to spreadsheets until they are first indexed.
Check Document for Exolution Redactions
Before you redact spreadsheets in Blackout, you should make sure they have not already been redacted using Exolution. Files that have burned-in Exolution redactions in these fields should not be re-redacted in Blackout.
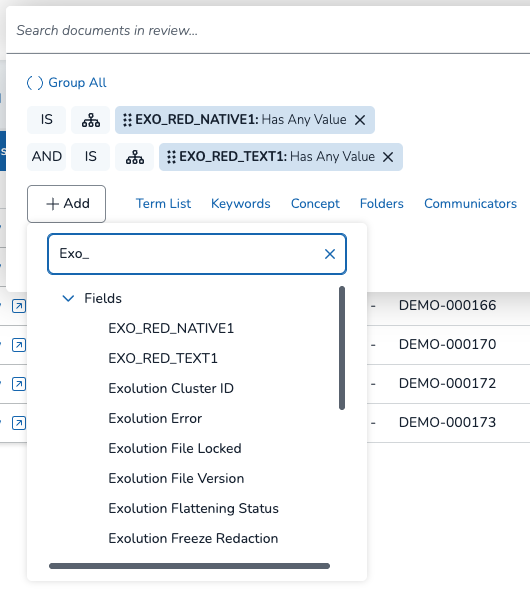
To see whether or not your Document has exolution redactions, perform an advanced search for files with redacted Exolution natives and redacted Exolution text, shown below (IS Exo_Red_Native1: Has Any Value AND IS Exo_Red_Text1: Has Any Value).
Important
The EXO_RED_NATIVE1 and EXO_RED_TEXT1 fields are Reveal’s default names for redacted Exolution native and text files. Since the field names are customizable, they may be different in your project / environment.
Items That Are Flattened
Flattened items include:
Cells
Lists
Charts
Pivot tables
Note
Pivot tables are flattened first, and then data validation is removed so it doesn’t mess with the pivot table structure. Any filtered data stays the same as when the document was received.
Perform Redactions
Whenever you open a spreadsheet document in Document Viewer — whether in the Grid or Results Pane — Spreadsheet View will be enabled and redactions can be made. Users can also view and manage multiple versions of a spreadsheet directly within the spreadsheet view. Click the below icons to switch between Spreadsheet View, Native View, and Image View.
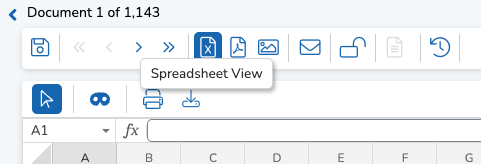
To enter redaction mode, press the ![]() blue mask icon. A new toolbar will appear with the following icons:
blue mask icon. A new toolbar will appear with the following icons:
.png)
Toolbar Actions
Redaction Profile + Labels: Use the dropdown to select which label to use when applying redactions. Redactions will have a different color depending on which profile they are a part of. A profile can be composed of individual labels. See Manage Redactions for instructions on how to create and edit redaction profiles and labels.
Draw Redaction: Toggle redaction mode on/off. When redaction mode is off, selected cells will have a blue outline. In redaction mode, cells will have a red outline.
Hide Images: Show or hide images in the spreadsheet. This includes graphs.
Images that cover information can also be moved by holding and dragging to another location on the spreadsheet. This is a temporary action. When proceeding to the next document, or if the document is closed and re-entered, the images will return to their original place.
Undo / Redo: Undo or redo the redactions.
Delete Redaction: Delete redactions that are currently selected.
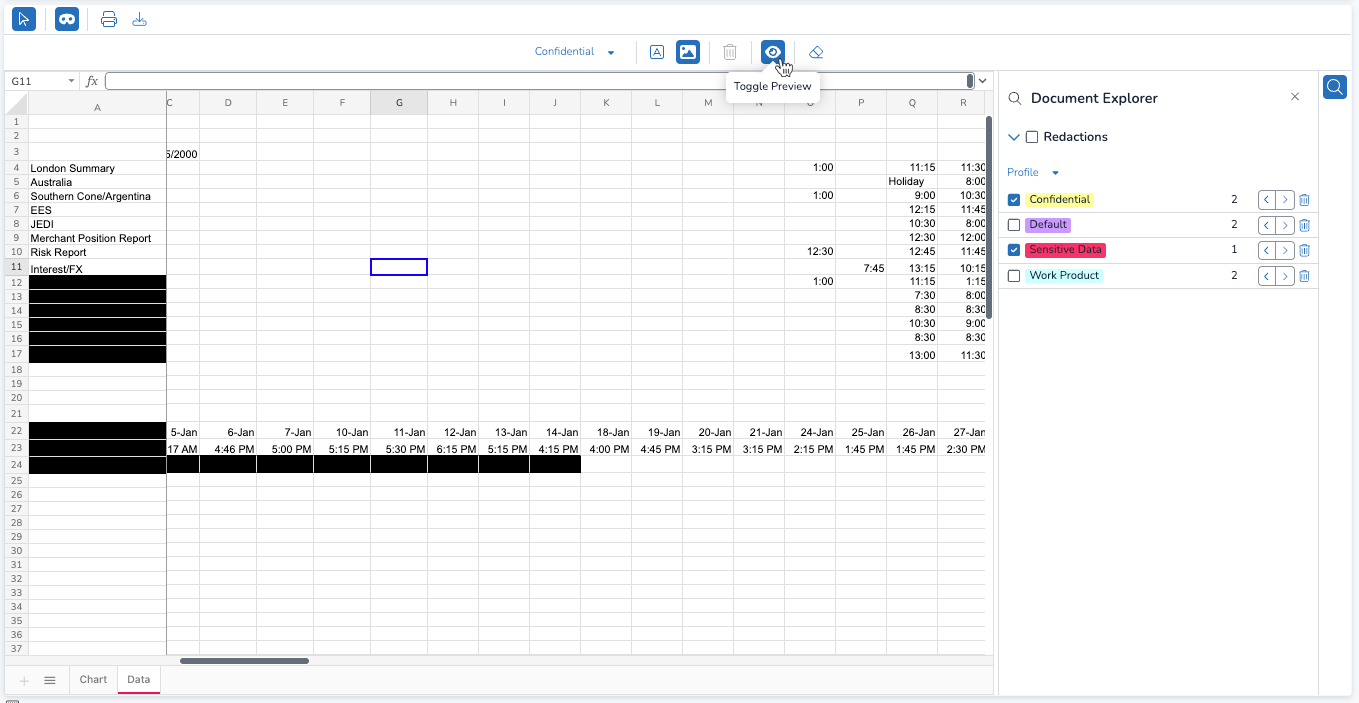
Toggle Preview: Show what redactions look like when burnt in. Highlighted / colored redactions will turn black.
Erase Annotations: Delete annotations as you select them. When Erase Annotations is on, selected cells will have a blue outline.
When in redaction mode, redacting is as easy as dragging the curser across a range of cells. An individual cell can be redacted multiple times with multiple labels or across multiple redaction profiles.
Note
Keep in mind: A cell will display only the redaction color of the most recently created redaction profile.
Partial Redaction and Redacting Comments
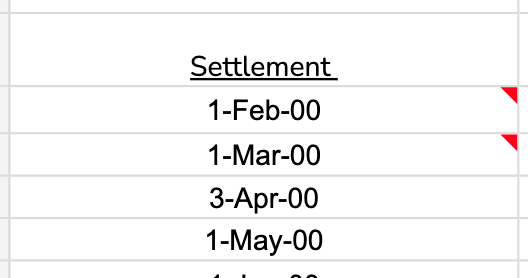
The Partial Redaction modal allows you to partially redact a cell’s content, and/or redact comments attached to a cell. Cells with comments will display a red triangle in the upper right corner of the cell.
Apply Partial Redaction
Click the
 select icon to turn off redact mode. This allows you to double-click cells in your spreadsheet without accidentally redacting them entirely.
 Double-click the cell you want to partially redact to open up the Partial Redaction modal, shown below.
Choose between the Contents (cell contents) or the Comments tabs.
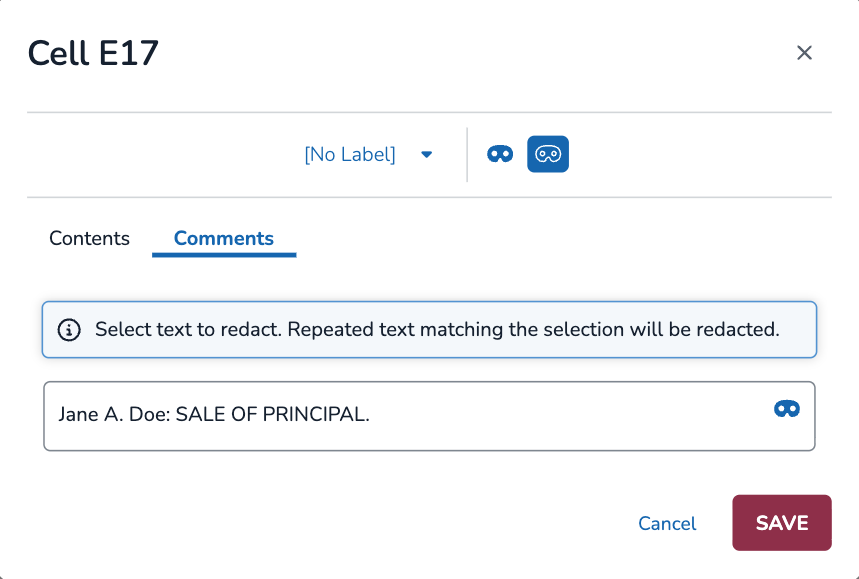
Use the
 dropdown to select a redaction label. You can perform multiple redactions across different labels.
Click and drag your mouse to highlight the specific text you want redacted. Release you mouse to perform partial redaction.
Redactions can overlap, even if they are part of two different labels.
Note
Repeated Text Matching will automatically redact all text that matches the content you highlighted. For example, if you redact a name that appears multiple times in that same cell, all those names will auto redact as well.
Currently, there is no way to turn off repeated text matching.
Press SAVE to apply your partial redactions.
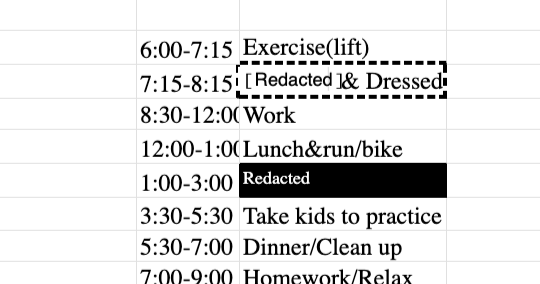
Partially redacted cells will be surrounded by a red dotted outline. If you would like to see your partial redactions applied to your cell before printing or producing the document, select the Toggle Preview  icon. If the partial redaction label is “Redacted” the cells will appear as “ [Redacted] “. In preview mode, the red dotted outline will turn black.
In the modal, three mask buttons also allow you to quickly perform the below redaction options.
Next to the redaction label dropdown:
.png) Redact Cell + Comments – Redact the whole cell and its comments. This is functionally equivalent to redacting the cell outside the partial redaction modal.
Redact Cell + Comments – Redact the whole cell and its comments. This is functionally equivalent to redacting the cell outside the partial redaction modal. Partially Redact Cells – Switch to Partial Redaction mode to drag and create redactions. This mode is on by default when the modal opens.
In the text box:
- Redact Full Content – Redact all of the text in the text box. Depending on your tab, this would be the entire cell’s contents or the entire comment.
Delete Partial Redactions
In the Partial Redaction modal, you can click any redaction and then delete it using the trash icon (shown below).

Note
Repeated Text Matching will automatically delete all matching redactions. For example, if you delete a redaction for a name that appears multiple times in that same cell, those same redacted names elsewhere will delete as well.
Currently, there is no way to turn off repeated text matching.
Outside the Partial Redaction modal, you can delete partial redactions by:
Clicking a partially-redacted cell and pressing the trash icon.
Selecting the eraser tool from the toolbar and dragging over the partially-redacted cell.
Bulk-deleting redactions through document explorer (see Document Explorer).
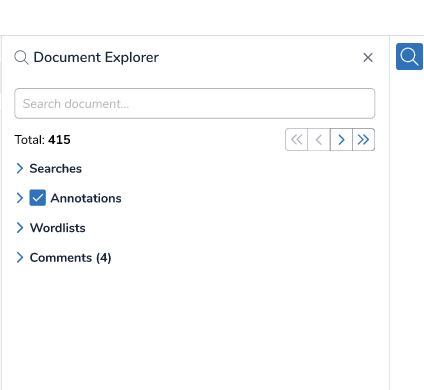
Document Explorer
Press the magnifying glass icon to the right of Spreadsheet View to open Document Explorer, where you can toggle certain redactions on and off. The dropdown under Redactions allows you to choose between seeing redactions by:
Label – by redaction label
Profile – by redaction profile
User – by user who performed the redaction
Sheet – by each sheet
Creation Date – by the date the redaction was created
Last Modified Date – by the date the redaction was last modified
.png)
Each list item has a checkbox, where you can toggle on/off visibility of each specific redaction. The number to the right shows how many redactions exist for that category.
The trash icon lets you bulk delete all redactions in a category. A Delete Reactions warning will pop up to verify you want to proceed with this action. Click DELETE to confirm.
Click in between a redaction name and number to open up a list of each redaction under that category. Each item details the cell range, date created, which user created the redaction, and which profile the redaction belongs to. You can identify the type of redaction by the upper left icon:
Full Cell or Cell Range Redaction | Partially-Redacted Comment | Partially-Redacted Text |
|---|---|---|
|
|
|
Selecting an item will highlight its redaction in your spreadsheet via a grey box and blue border. Selecting multiple redactions in this manner, then pressing the delete icon in the toolbar, is a quick way to edit redactions within a specific category. The Select All and Clear All buttons make it easy to choose or deselect all items.
The [ < ] and [ > ] arrow keys let you move down the Document Explorer list within a category, viewing each item one at a time in the spreadsheet view. If the redactions is on a different sheet than what’s currently on the screen, Spreadsheet View will automatically change to that sheet and highlight the redaction.
In addition to redactions, you can expand and collapse tabs to see additional content like searches, annotations, images, comments, or wordlists.
Redaction History
In the upper toolbar, pressing the clock icon opens up document history, where you can view all action history — including redactions — across documents in your project. Redaction entries will include who issued the action, whether a redaction was created or deleted, and the area of redaction.
.png)
Export Redacted Files from Document Explorer
Exporting files with redactions is as easy as viewing / hiding redaction profiles and pressing the export button.
Under Document Explorer, choose which redactions you want visible through the dropdown.
Click Toggle Preview to view what your document looks like with burnt in redactions. Notice how, in the picture below, only the red and yellow redactions are present in the Spreadsheet view.
Partially-redacted cells that are visible, based on your chosen labels, will change from a red to a black dotted outline.

Once you’re satisfied with how the document looks, press the print icon.
Type your file name.
Decide whether or not to include redactions. The redactions included in the document will be the same redactions currently visible to you.
Press PRINT.
Supported File Types – Spreadsheet View
The below table lists all supported files that can currently be opened up and redacted in Spreadsheet View.
.csv | .xlam | .xls |
.xlsb | .xlsm | .xlsx |
.xltm | .xltx | .xlw |
.xml |