Instance Processing Overview Grid
Instance and Company Admins can view a list of all their processing, numbering, indexing, promote, and OCR jobs across their instance by navigating to Home page > Processing. Company Admins that use this tab will only be able to view jobs that are associated with their assigned companies.
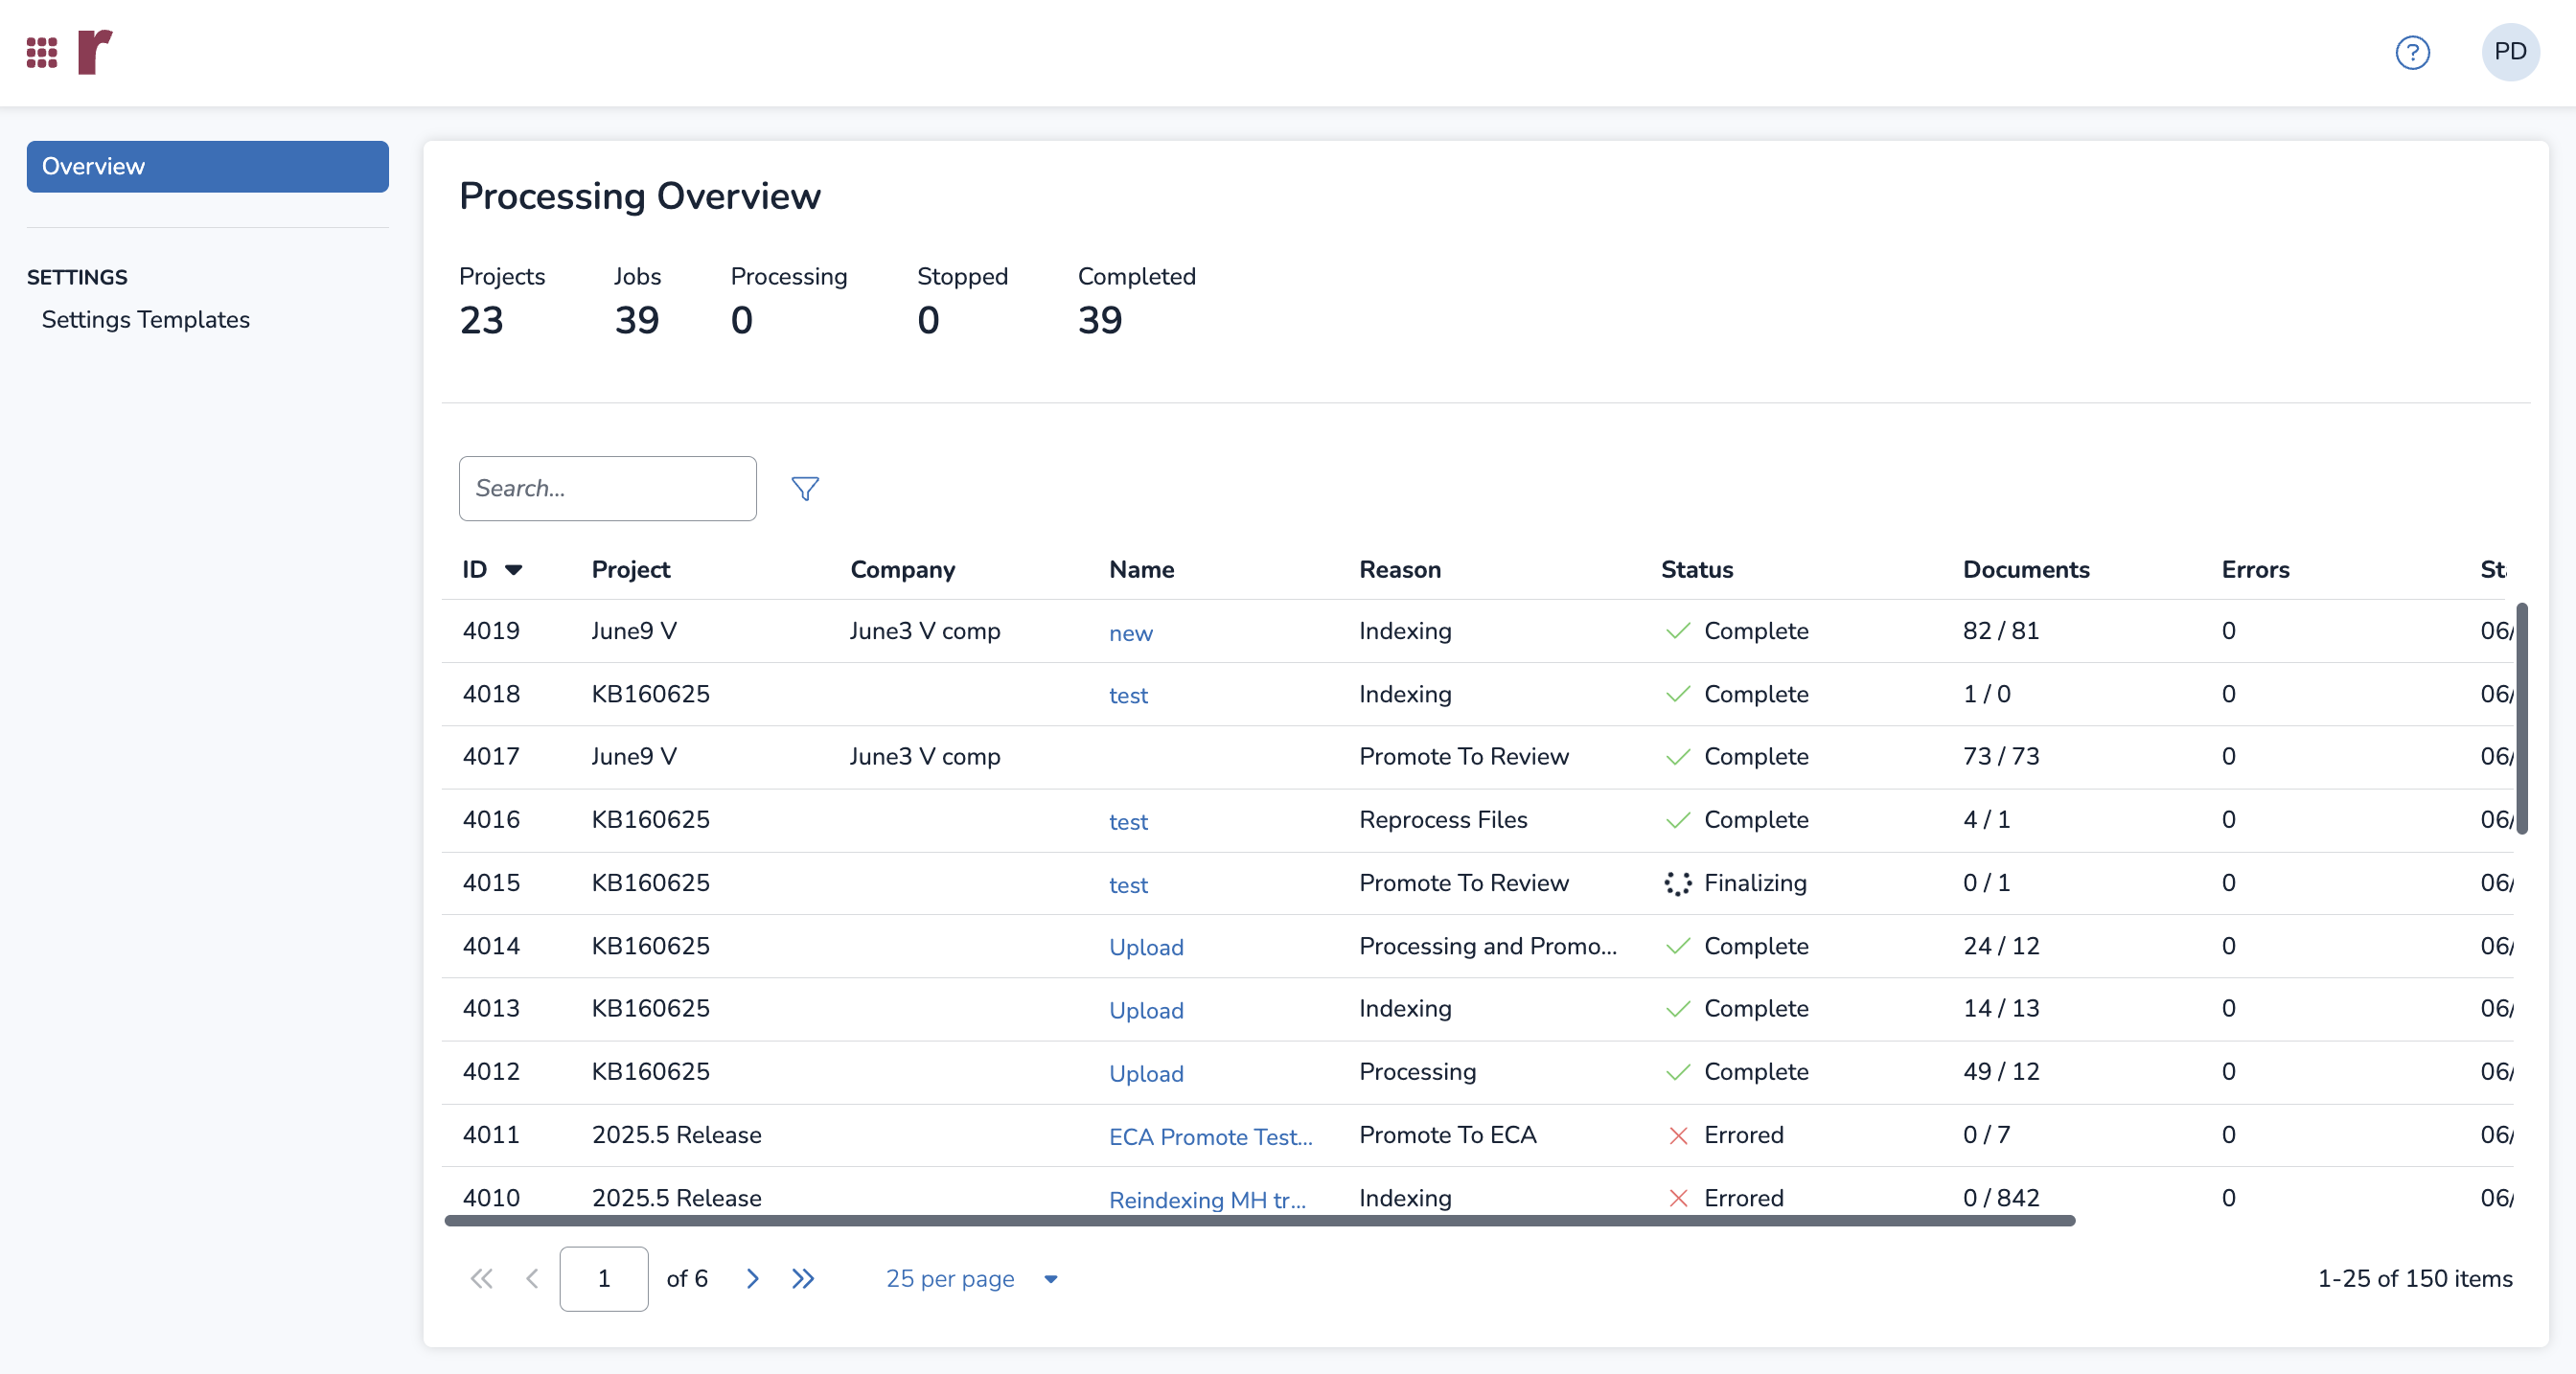
This screen is functionally the same as the Processing > Processing Jobs screen, but job visibility is not limited to one project only. Some new columns list additional information for each job, including Project, Company, and the Reason for the job.
Above the grid, users can see the total number of projects, number of jobs, how many processing jobs are in progress, and how many processing jobs have completed or stopped.
Note
Jobs that were run in Discovery Manager – but not created for a specific Reveal project – will appear in this grid and have no associated company; the value under the Company column will be blank.
Only Instance Admins can see these jobs.
Users can also filter through the grid by selecting the blue Funnel icon next to the search bar, culling search results by:
Project
Company
Name
Reason the processing job was created
Status of the processing job (Complete, Errored, Finalizing, InProgress, Paused, Pending, and Started)
Number of Documents in the processing job (less than, equals, or greater than)
Number of Errors present in the completed processing job (less than, equals, or greater than)
Date Started (before, between, after, or on)
Date Completed (before, between, after, or on)
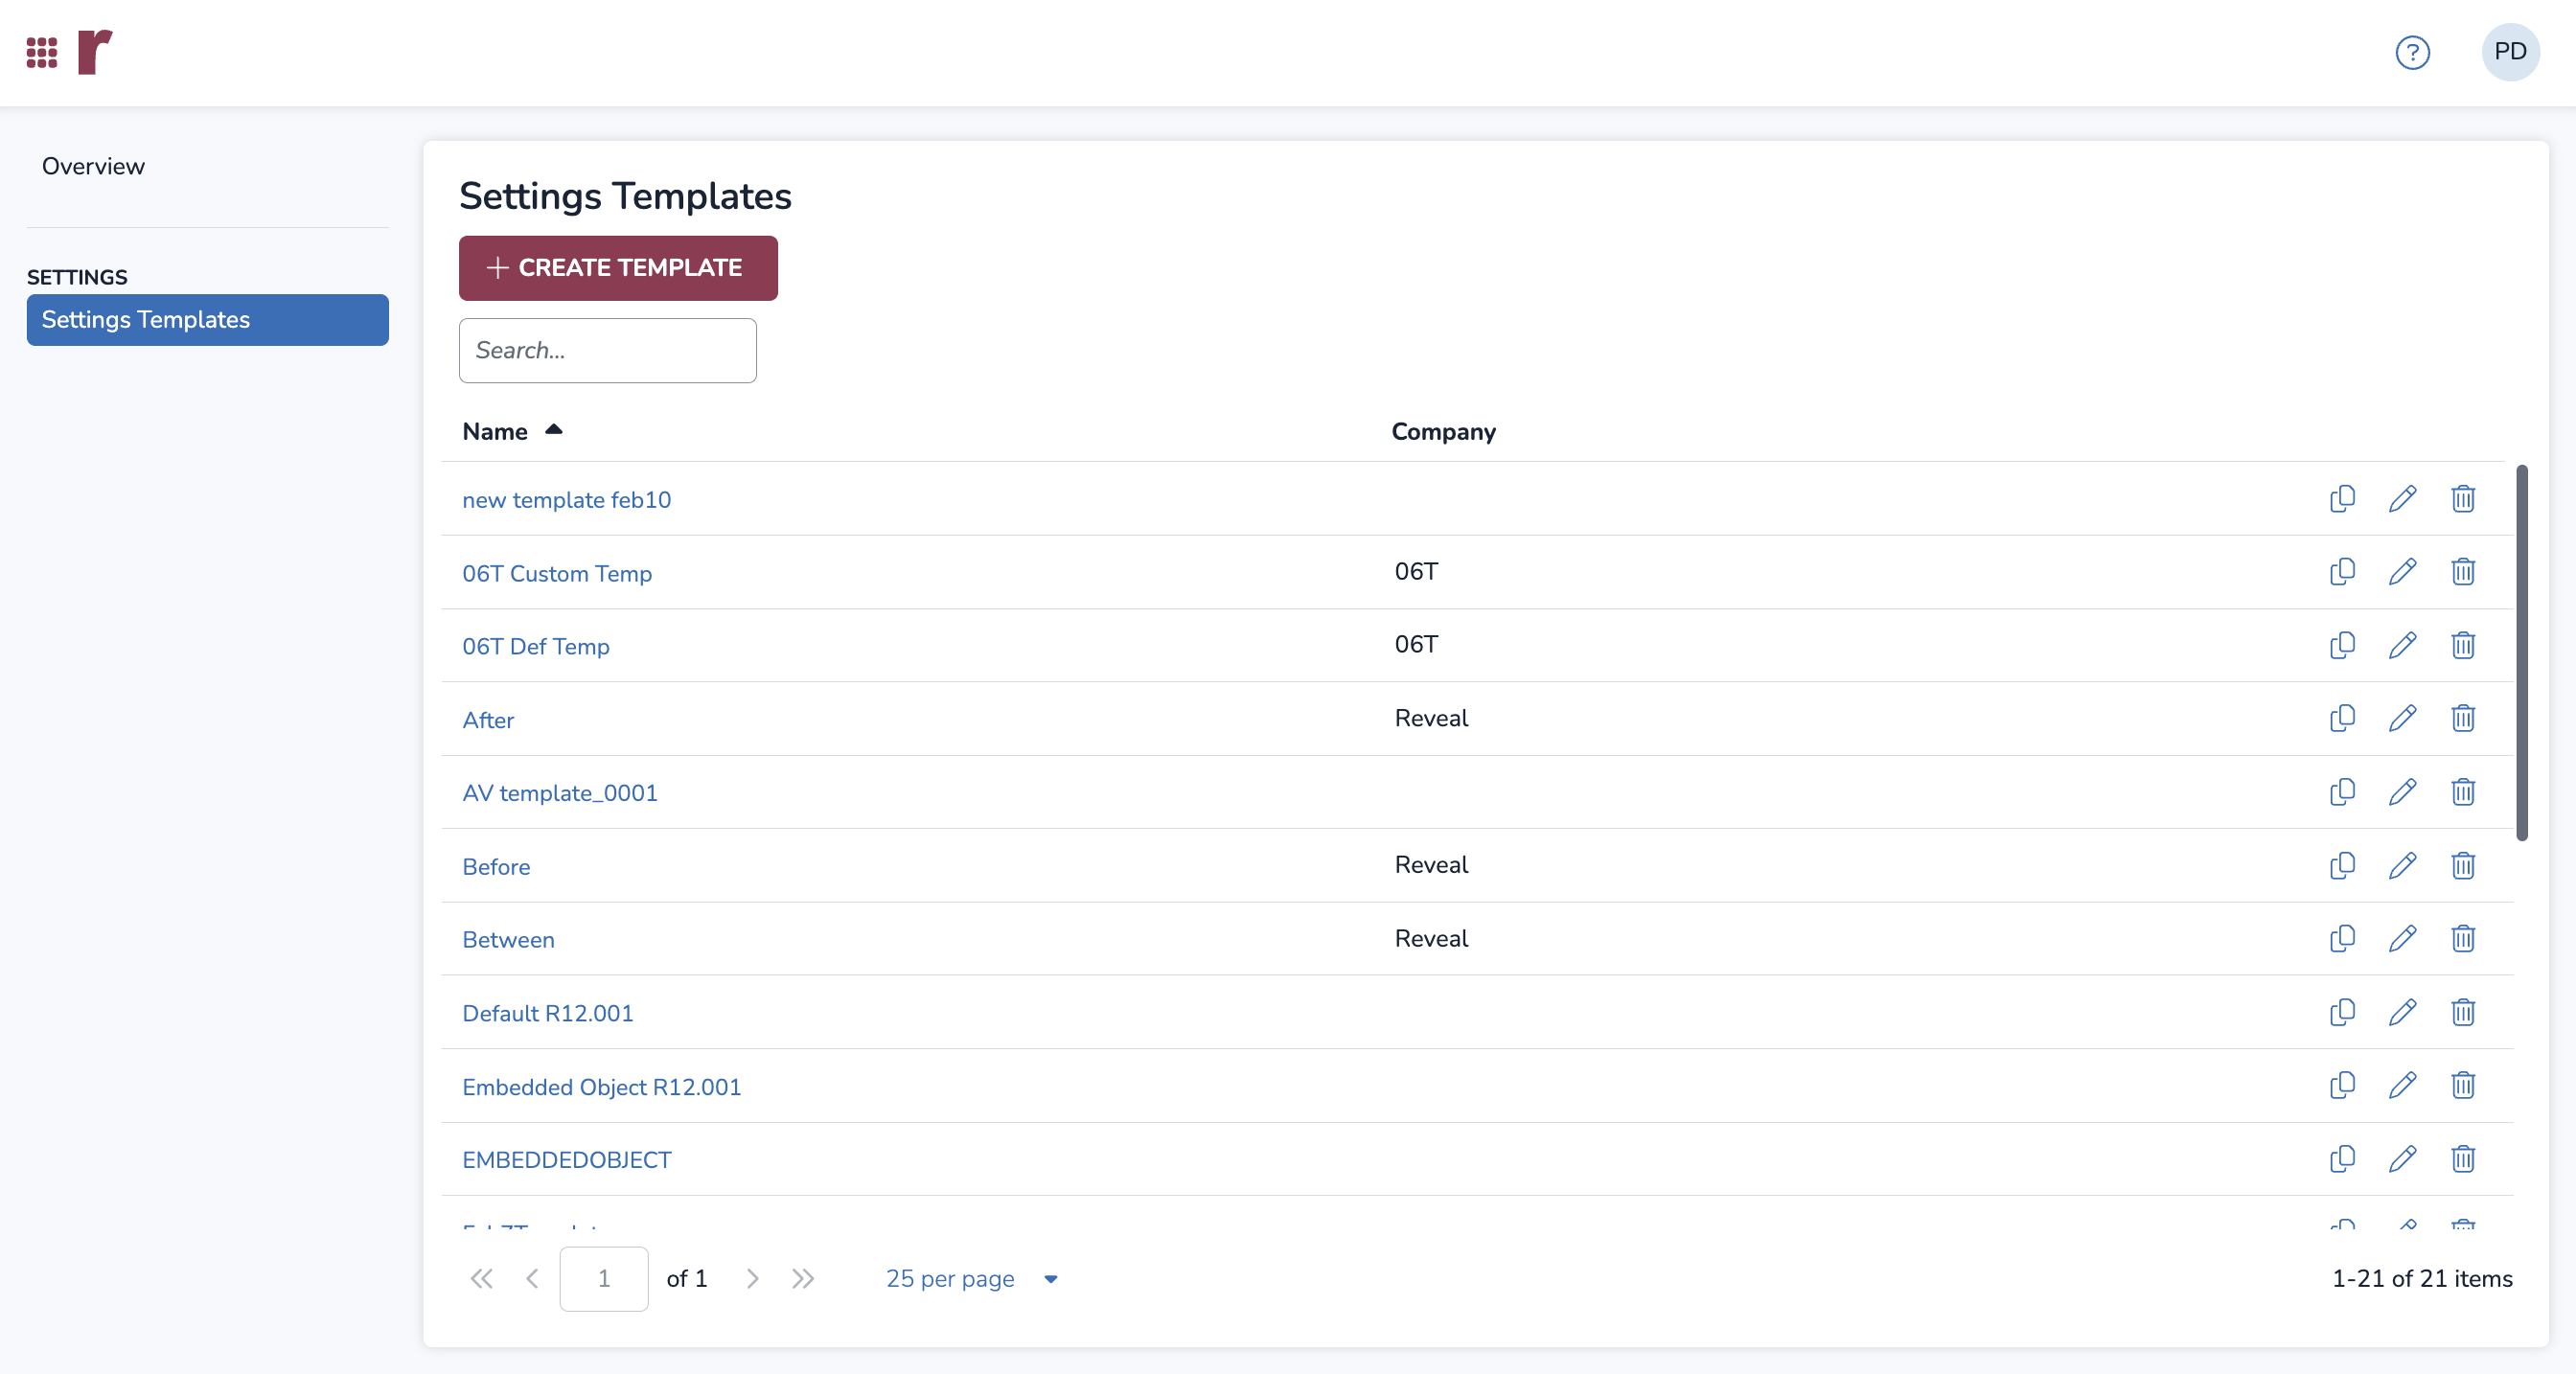
Processing Settings Templates page
Instance and Company Admins can also access Processing Templates in Home > Processing under the Settings Templates tab. Processing templates can be searched through and filtered alphabetically by name. Company Admins that use this tab will only be able to view templates that are associated with their assigned companies.
Note
When creating a template in Discovery Manager, it will not be automatically assigned to a company. In order to assign unassigned templates to a company in this Settings Templates tab, a user must be an Instance Admin.
To the right of each template in the list, users can click:
The
.png) Copy icon to copy a template.
Copy icon to copy a template.The
.png) Pencil icon to edit a template.
Pencil icon to edit a template.The
.png) Trash icon to delete a template.
Trash icon to delete a template.
Create a Template
Select +CREATE TEMPLATE to create a new processing template.
I. General tab
Name: Name your template.
Company: Use the dropdown to associate your template with one or more Companies.
Date Filter Operation: A dropdown menu 3provides these options: None, Before, After, and Between.
To disable date filtering, select None.
To enable date filtering, choose Before, After, or Between.
Then, Select your dates in the Date Range field.
Excluded File Types: Use the dropdown menu to choose to exclude file types:
None
By Extension - displays a text input field e.g. “.xls, .msg, .gif” separated by a comma.
By Signature - Click on Select File Signatures to choose which signatures you want to exclude from the modal.
NIST Documents: Check the Remove checkbox to exclude NIST Documents from processing.
Deduplication: This option will affect how you export your files after processing. Select from the below options.
None - No deduplication; all documents you select will be exported.
Project Level - The export generated will only include the original files within the entire review project.
Promote to Review - The export generated will only include the original files within the entire review project, while also automatically adding every export to your review population.
Native Email File Type: Choose which file type you would like to create when exporting native emails. Options include:
.msg, .rtf, .html, .mht, .txt .eml
Password Bank: Type passwords needed to access locked documents — only one per line.
Note
This is not a brute-force password-cracking solution. It is recommended to receive a list of passwords from the custodian of the data, or from the client.
The number of passwords in the Password Bank will affect the speed of import and will be applied to imports moving for as part of the import process. It is highly recommended to keep the password bank within a range of 25–50 passwords maximum.
Embedded Object Extraction: Choose whether to extract embed objects as individual files in Spreadsheets, Emails, Presentations, and/or Word Processing.
Warning
Embedded Object Extraction should not be selected unless required. You should test this setting before using it on a production project. Embedded Object Extraction can have significant negative impacts on import performance and will add many additional records to the project.
Suppress inline images: By default, all inline attachments are extracted from the body of an email and given their own record as an attachment. Check this box to prevent processing from creating the attachment record and instead considers it a filtered file. The inline attachments will be added to the filtered columns in the Project and Import Snapshots.
Note
Inline attachments are embedded in the body of an email. Examples of inline attachments are images within a signature line of an email, or any other item that isn’t properly attached to the email, like a screenshot. If getting text for embedded screenshots through OCR is desired, leave this unchecked.
Additional Hashing: Check the Enable Sha256 checkbox for hash generation.
Recovery: Check the Recover deleted files from images checkbox to restore unallocated files, which can be identified from forensic images.
ScanPST: Check the Enable ScanPST checkbox to run if any errors are encountered during ingestion.
Child Documents: This setting is checked by default, enabling child document extraction. If unchecked, no extraction will occur at all during import, leaving all files, including embedded objects and attachments, the same as imported.
Warning
Unchecking the Extract Children box permanently turns off any and all kinds of extraction for your project, and cannot be adjusted after project creation.
Feature Flag
The Extract Children setting is included in this release but currently turned off by default. It will not appear in your environment unless it is manually enabled by Reveal.
II. Numbering tab
Prefix: Enter a prefix for your document’s begin numbers.
Digits: Choose how many digits you want for each begin number.
Start Number: Choose the number where document numbering starts.
In the Preview section, you can see how the first three documents will be numbered based on the settings above.
III. Sorting tab
The Sorting tab allows you to configure how files are sorted when numbering documents during export.
In the Available column, you can search in the search bar and then select the sorting Fields you want to include. By clicking the right arrow ![]() , they will move over to the Selected column.
, they will move over to the Selected column.
IV. OCR tab
OCR: Check the OCR During Import checkbox to OCR documents as they’re imported. If not, skip to step 4.
Mode: Choose from the following OCR modes. Reveal defaults to Most Accurate.
Most Accurate: Favors accuracy, generating the fewest errors.
Balanced: A balance of favoring accuracy while decreasing OCR time.
Fastest: Favors speed, finishing the OCR job quickly.
File Types to Image: Check the following checkboxes:
Check the All PDF checkbox to allow all PDFs to OCR, regardless of whether or not they already contain extracted text. If left unselected, only image-only PDFs will run through OCR.
Check the Index Errors checkbox to allow documents with index errors to be OCRed.
Click SAVE to create your template.
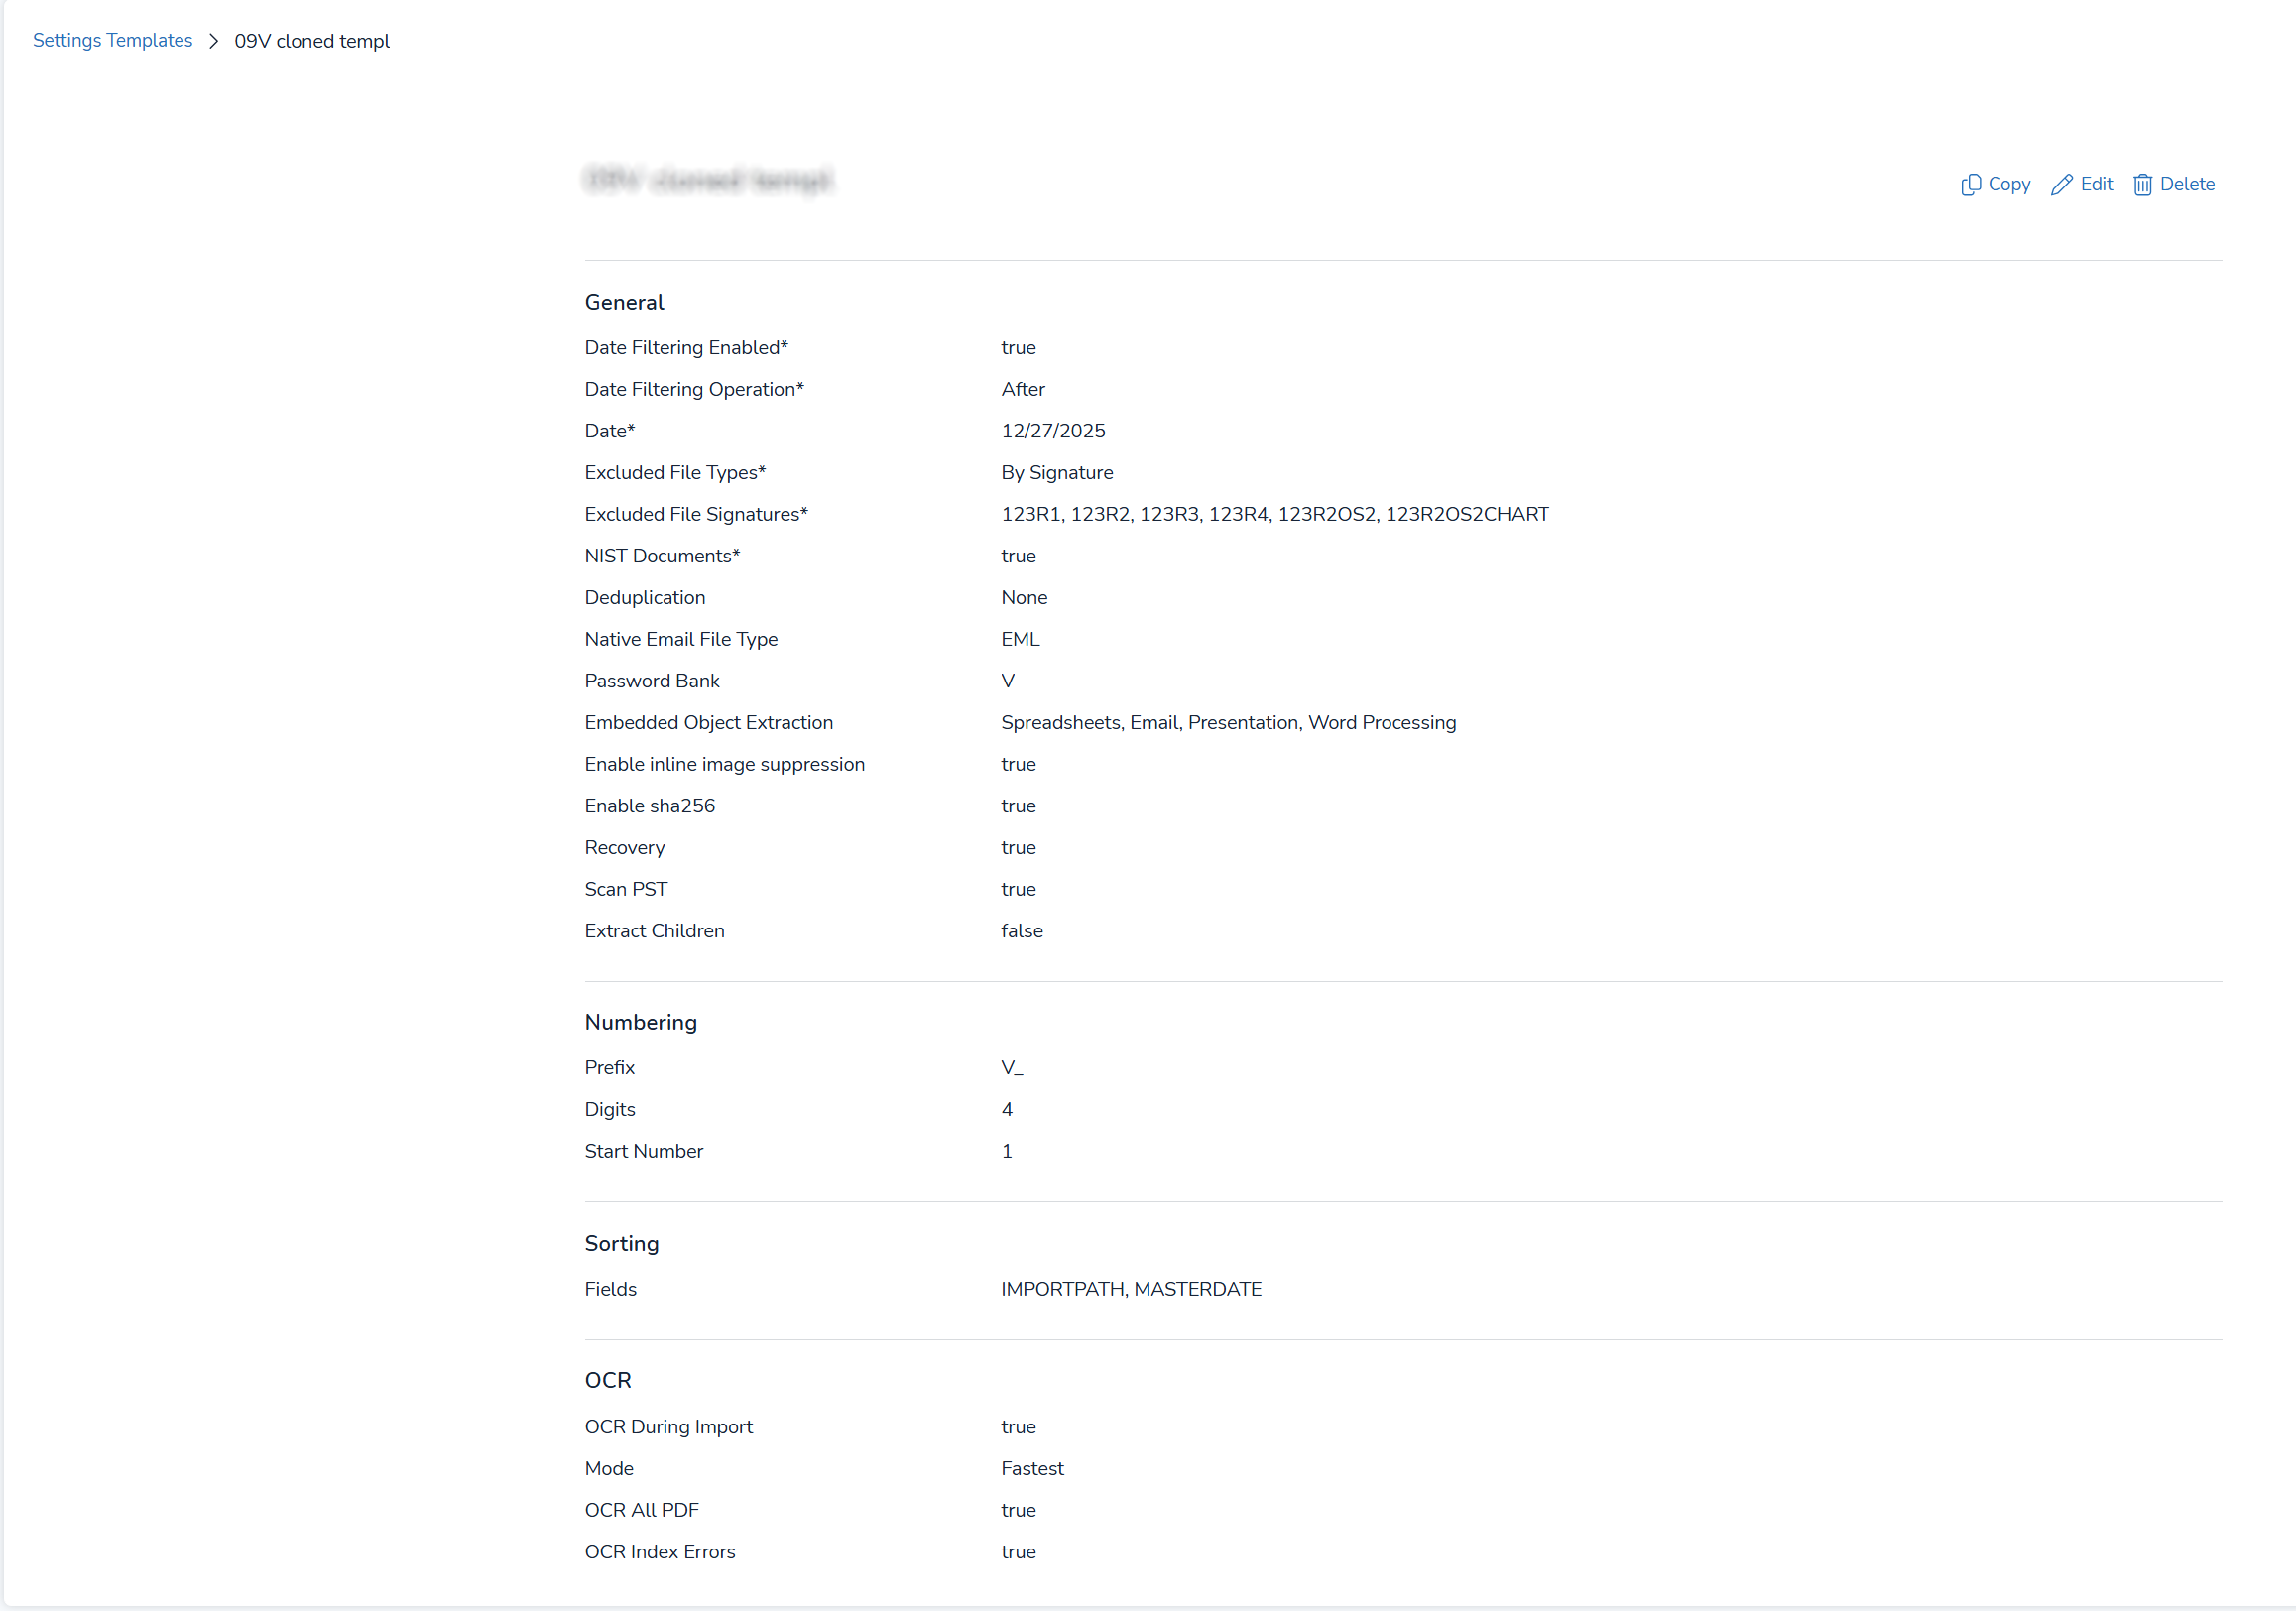
Setting Template Details
Selecting a template name will bring you to its own screen that lists all the settings for that template. Here, users can also copy, edit, or delete a template by pressing the respective icons in the upper right corner of the screen.