The Reveal Upload Manager is a desktop software that enables users to transfer Native files, Load files, and Images straight from their PCs or their network to the appropriate data staging location for processing in Reveal. It accommodates large data uploads by ensuring efficient and rapid file management.
Upload Load Files
In the Uploads modal:
Select Load Files for the Files setting.
For the Method setting, choose either Add Documents or Overlay Data.
Select Metadata + Renderings for the Files to Upload setting.
Set Files Source to My Computer.
Choose the Reveal Upload Manager as the Upload Method.
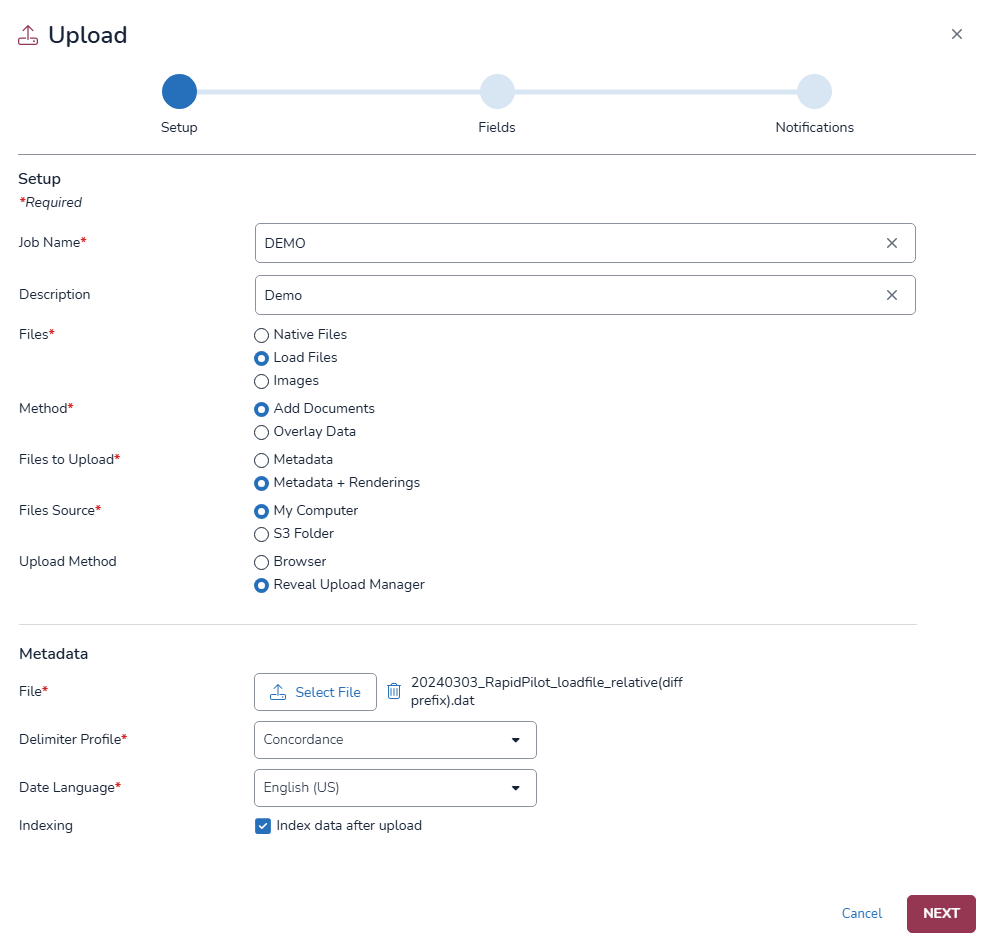
Within the Metadata section, select the the location of your load file.
Specify the Delimiter Profile used and the Date Language within the load file.
You can choose to automatically index the data after the upload completes by checking the Index data after upload box for the Indexing setting.
Click Next, fill out the mappings in the Fields tab and select which users and teams need to be notified for when the upload completes in the Notification tab.
After filling out all tabs, click on

You will be redirected to the following Uploads page:
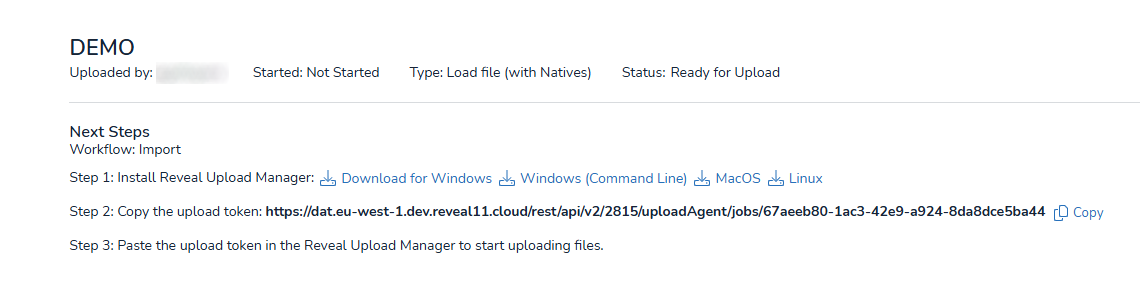
Here, users can Install the Reveal Upload Manager application, which is available for Windows, Windows (Command Line), MacOS, and Linux.
Note
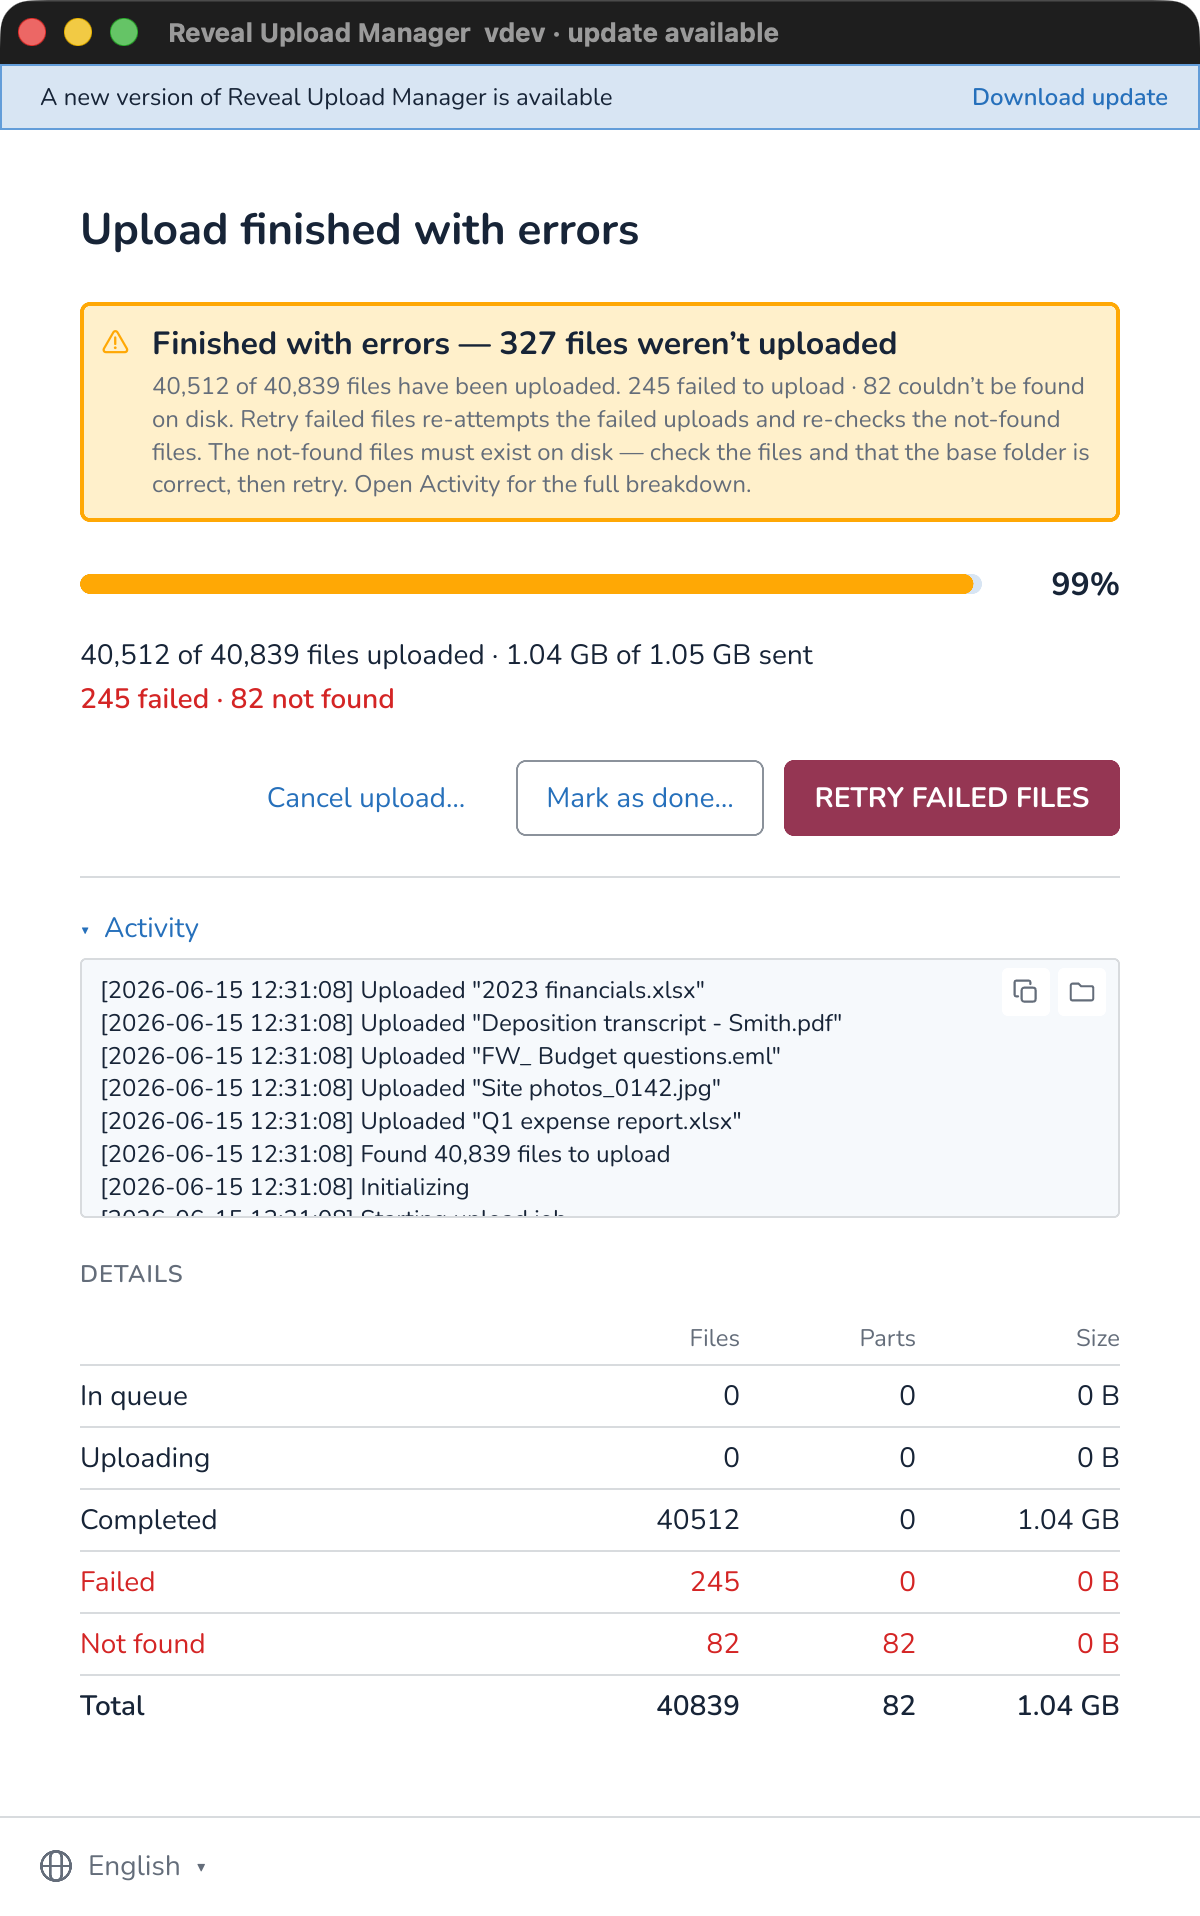
Make sure that you are using the most recent version of the Reveal Upload Manager application. The application will display a message banner at the top within its interface when an updated version is ready. To download the new version, simply click on it, and it will be saved in your PC.
Click on the Copy icon to the right of the URL displayed in Step 2. This will copy the Upload Token which is needed by the Upload Manager to find your data. The generated Upload Token will remain valid until the upload is complete. You can pause and resume the upload job as needed during this time.
The token is also accessible in the Uploads tab in the web through the
 blue key icon in the far right of your upload project.
 Note
Users can copy the access token and share it with other users to allow them to upload data directly from their local device.
Open the Upload Manager application.
Note
Note
The Reveal Upload Manager application automatically matches your operating system's light or dark theme. If you change your system theme while the application is running, the application updates automatically. There is no manual theme setting within the application.
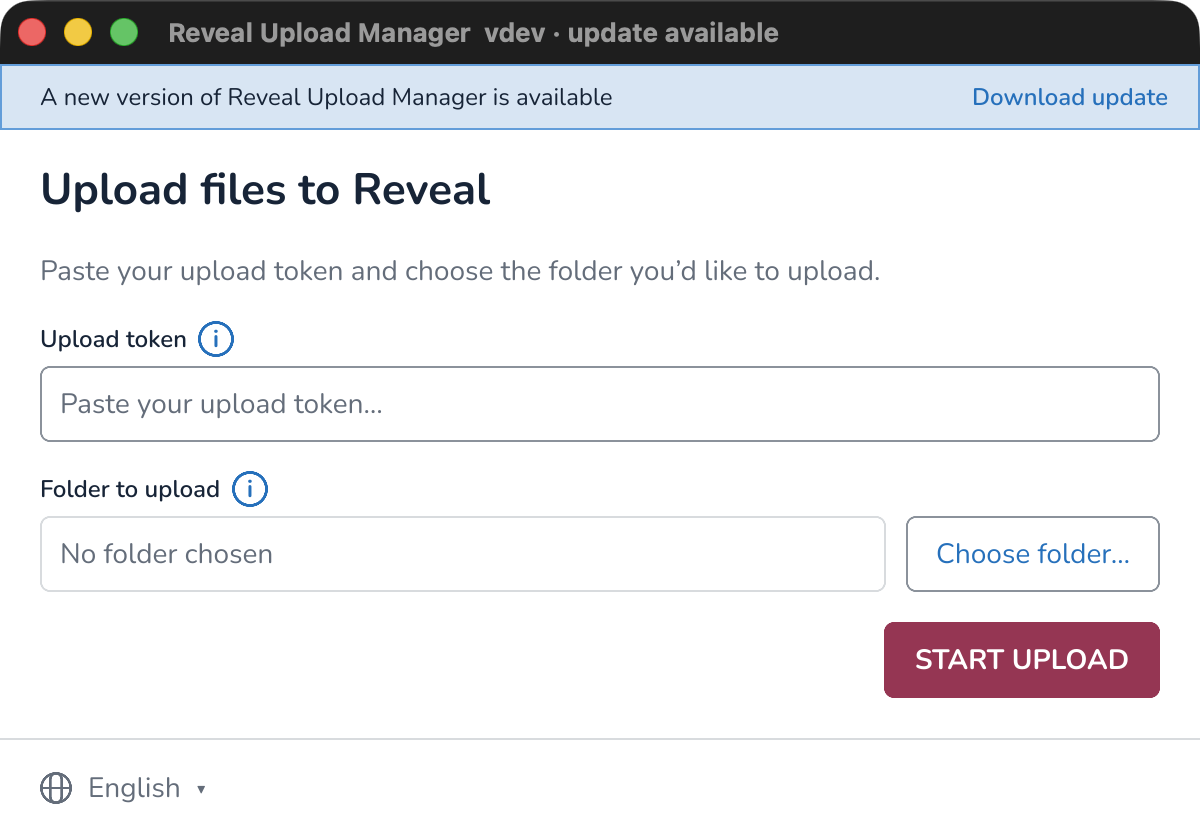
Paste the token you copied in the Upload Token field.
Click the Choose folder button for your upload.
Important
For Load files, the Base Folder must sit one level above the volume folder(s) referenced in your DAT file. When uploading a Load file, the system reads the file paths listed in the DAT file and searches for those files relative to the Base Folder you select. If the Base Folder is incorrect, the system will not be able to locate your files, which can result in “File Not Found” errors during the initialization stage of the upload.
Choose your preferred language from the following 9 options: English, Spanish, French, German, Italian, Portuguese, Dutch, Russian, and Korean. You can change this setting at any time, including during an upload, and your selection will be saved for future sessions.
Note
Versions 2026.4.2 and later support OneDrive. Files are first downloaded and then uploaded to the S3 folder for processing. Because the process involves both downloading and uploading files, it may take longer to complete.
Click Start Upload.
Once the upload is initiated, it runs independently and does not require the browser to remain open or conduct any monitoring.
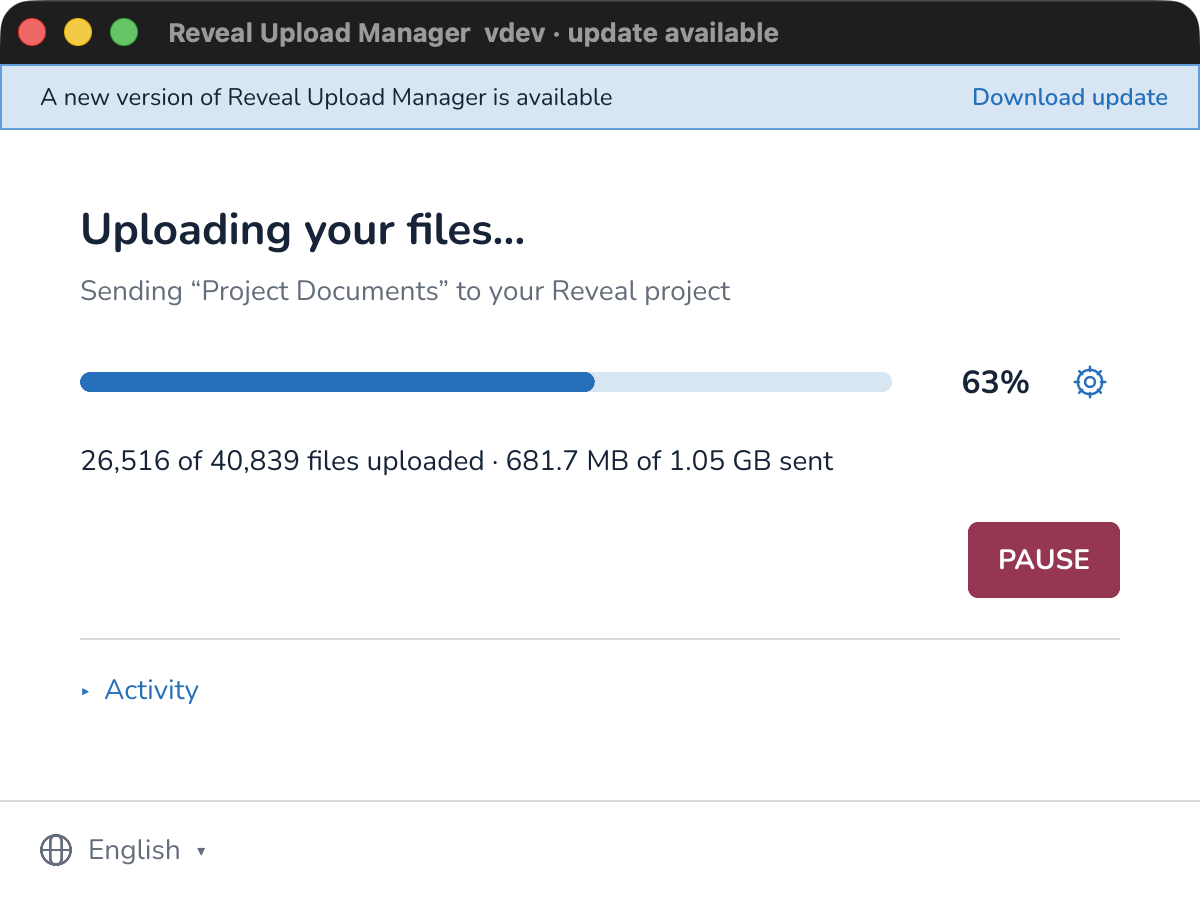
Click the Advanced Settings button to open a pop-up where you can adjust the Upload Speed using a slider. You can set the speed to slower or faster as needed. This setting can be changed at any time, including during an active upload or while an upload is paused and resumed, and it will take effect immediately.
The maximum number of concurrent uploads for the Uploader is equal to the number of core CPUs in your computer.
Once the upload is initiated, it runs independently and does not require the browser to remain open or conduct any monitoring.
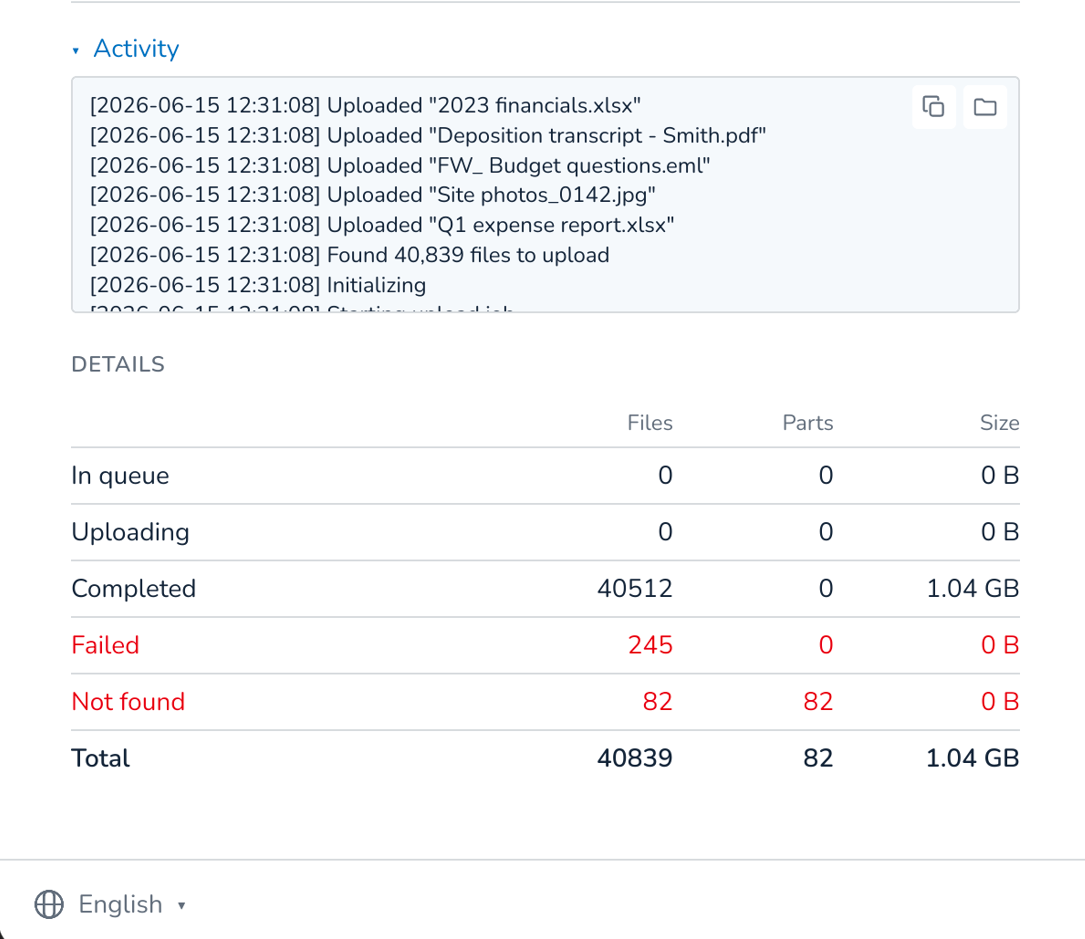
The Activity dropdown will let you know when the upload starts and completes and other details.
You can see the progress both on the Upload Manager and the web browser.
In the status log, the upload is separated into files, parts, and size.
Files: The full document or item you’re uploading.
Parts: A smaller piece of a file. Large files are split into parts (16 MB–512 MB each) to make uploads faster and more reliable. Multiple parts can upload at the same time, and if the upload is paused or interrupted, only the parts in progress are affected. Any errors impact just the individual parts, not the entire file, and you can resume uploads without starting over.
Size: Sizes of the files.
During an upload, users can choose to Pause at any time. When they select Resume, the upload continues from where it left off using the same folder path that was originally selected. During the resume process, Upload Manager automatically checks any files previously marked as Not Found. If those files have been restored or are now accessible, they are uploaded. Files that are still unavailable remain marked as Not Found, and files that have already been uploaded are not uploaded again. If users select Start over, the upload begins from the beginning.
.png)
To prevent conflicts, such as using the same token in multiple instances, the system locks the upload while it’s active. When you exit and reopen the app, you may need to wait about 60 seconds for the lock to clear because the database updates every minute to indicate the upload is still in progress.
If an upload finishes with errors, users can review the failed files and choose to Retry Failed Files, Mark as Done, or Cancel upload. These actions remain available even if the token field is empty, preventing the upload from becoming stuck in a disabled state.
If the upload is interrupted because too many files cannot be found, the upload session remains preserved. Users can choose to Upload Anyway to upload only the files that were found, or Choose a Different Folder to rescan for the missing files. This allows you to continue the upload without starting over.
Performance
Upload speed depends on your local environment. The system is designed to fully utilize available resources, so performance is generally limited by your internet connection and CPU.
In high capacity environments, the system can achieve speeds of up to 2 terabytes per hour and 2,000,000 files per hour (approximately 555 files per second). With uploads as large as 10 terabytes and up to 10 million files in a single job.