You can add supported documents to an open case using any of the methods described below.
Drag and Drop
Documents Explorer Ribbon
When documents are added, the Batch panel opens and displays the progress and status of the document import.
The easiest way to add a document is the drag and drop method. With the case you want to add a document to open in TRIAL DIRECTOR EVIDENCE, follow the steps below:
Open the file location in the local file explorer.
.png)
Note:
You may also drag files directly from your desktop.
Hold left click on the file and drag the file over to the TRIAL DIRECTOR EVIDENCE Documents Explorer.
.png)
Release left click to drop the file into the Documents Explorer.
After dropping the file into the Documents Explorer, the Add Documents wizard appears displaying the selected files you are attempting to add.
.png)
To add additional documents to a case, click the Select File or Select Folder button.
If you click Select Files, Windows Explorer displays. Select the items you want to add and click Open.
If you click Select Folder, the Browse for Folders dialog displays. Click on the folder you want to import and click OK.
Check Include Sub Folders if you want to include all documents in a given folder and all documents in the folders below the selected folder.
Note:
If including sub folders, this check box must be selected before you select a folder to import.
Review the information in the Add Documents dialog.
Select the document import settings options.
.png)
When finished, click the Add button.
The Batch panel opens and displays the progress and status of the document import.
Once the documents are added to the case they appear in the Documents Explorer.
Add Documents via the Documents Explorer Ribbon Bar
To add a document to the case via the Documents Explorer ribbon bar, open the case where you want to add a document and follow the steps below:
Open the Documents Explorer.
.png)
The documents already added to the case appear.
Click the Add button.
.png)
The first step of the Add Documents dialog appears.
Either click the Select Files or Select Folder button. If you would like to include subfolders, ensure the Include Sub Folders check box is selected prior to clicking the Select Folder button.
If you click Select Files, the local file explorer appears. Locate the file you want to add, select it, and click Open.
.png)
If you click Select Folder, the Browse for Folders dialog appears. Locate the folder you want to use and click OK.
.png)
Click the Next button in the Add Documents dialog.
The document naming options appear in the dialog.
.png)
Review the document's naming options.
Click the Add button.
The Batch panel opens and displays the progress and status of the document import. For more information about the Batch panel, see Work with the Batch Panel in TRIAL DIRECTOR.
Once the document, or documents in a folder, are added to the case they appear in the Documents Explorer.
Note:
For more information on adding documents, see Understand the Add Documents Dialog.
Batch Image Documents
After documents have been added, you can batch image all documents or select documents individually to image.
Batch Image all Documents
From Evidence, click the Documents tab.
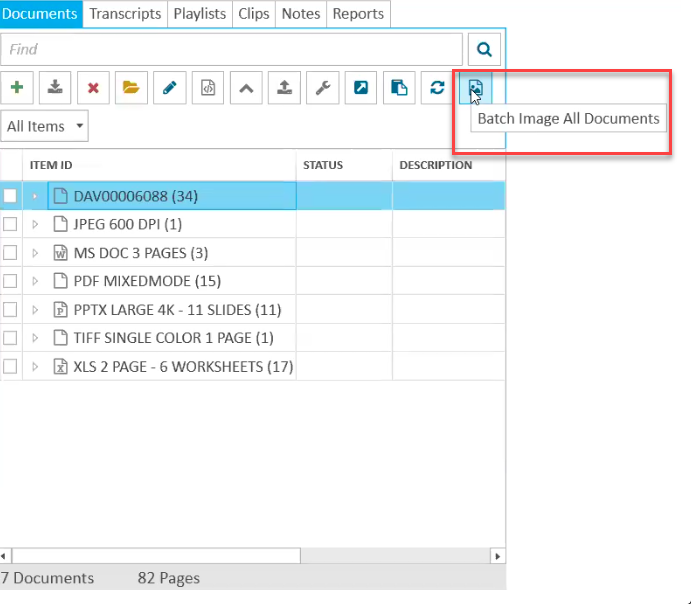
Click the Batch Image All Documents icon.

The Batch Panel will open showing the progress of all documents being imaged.
Batch Image Selected Documents
From Evidence, click the Documents tab.
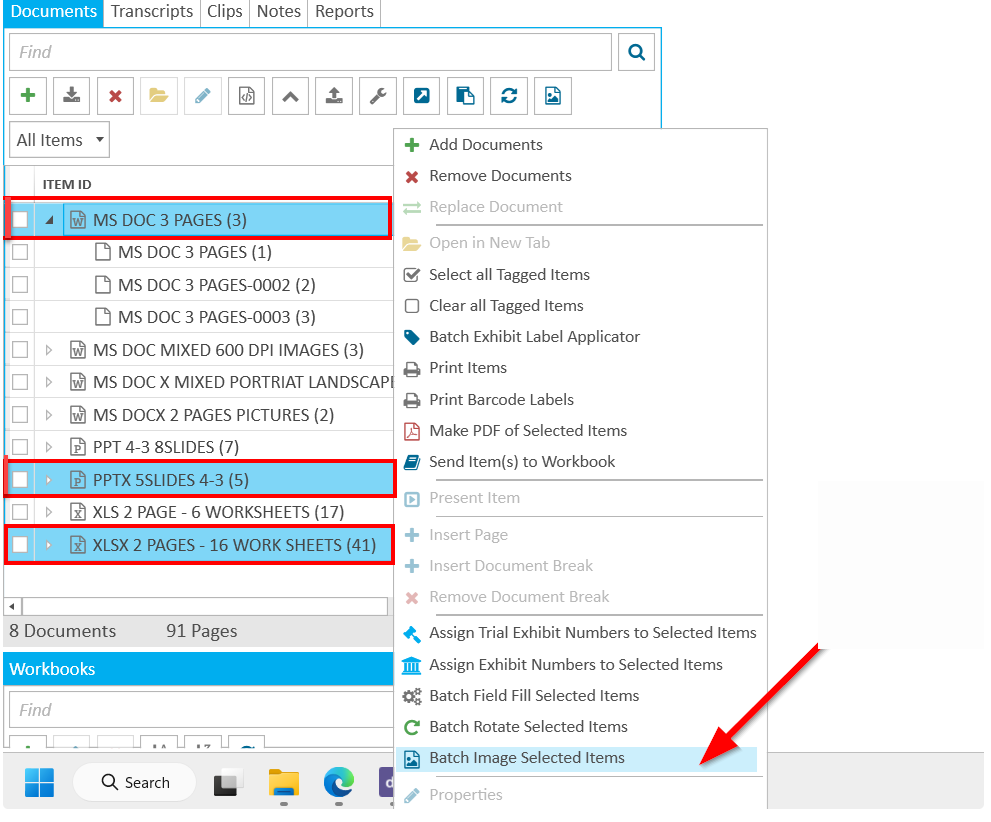
Hold Control to select the documents you want to image.
Right click to open the right click menu and select Batch Image Selected Items.

The Batch Panel will open showing the progress of the selected documents being imaged.
Note:
Cases created in TrialDirector 2023.8.12 will not apply Batch Imaging to Microsoft Office Items. These are treated as legacy cases. To receive the benefits of Batch Imaging, after upgrading to 2024.10.0 – remove all Microsoft Office Items from the legacy case and re-add them. Once the Microsoft Office items are re-added to the legacy case, the user will have the option to Batch Image any newly added Microsoft Office items.