The TRIAL DIRECTOR Presentation module is used to display case materials in the courtroom. Trial exhibits, clips, transcripts, and multimedia prepared in TRIAL DIRECTOR EVIDENCE can be loaded onto the presentation display and shown to the judge or jury, annotated in real time, and admitted as exhibits as the trial progresses.
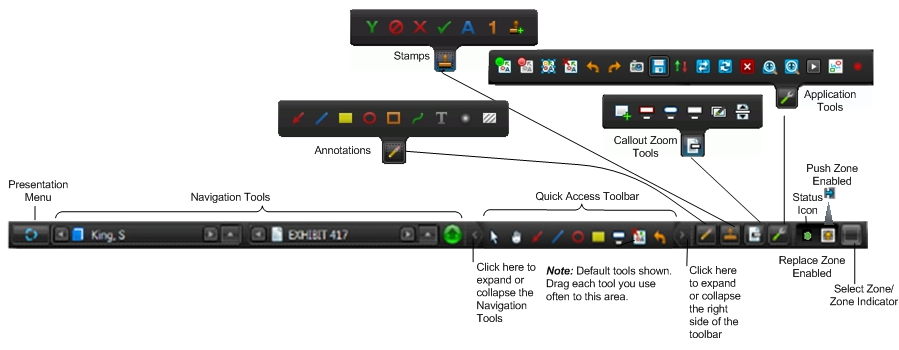
Before you present at trial, become familiar with the presentation tools and concepts, configure your preferences, and decide how you will load items during trial.
The Presentation Display
The presentation display is the screen your audience sees. You control what appears on it, how items are arranged, and how they are annotated, using:
Presentation zones – areas of the display where items appear. See Use the Presentation Zones.
The Presentation toolbar – buttons for loading and working with items. See Use the Presentation Toolbar.
Display and exhibit controls – see Control the Presentation Display and Exhibit Presentation Controls.
Presentation Preview and Mirror Mode – see Use Presentation Preview and Use Mirror Mode.
Preferences and Themes
In preparation for trial, you can configure the Presentation module to suit your requirements, including the theme and the way multipage items are displayed. For more information, see:
Loading Items onto the Display
To present items, first open the case in TRIAL DIRECTOR. For more information, see Open a Case in TRIAL DIRECTOR.
You can then load items onto the presentation display in several ways, depending on how you prefer to work during trial:
Keyboard – see Load Items By Using a Keyboard
Script – see Load Items By Using a Script
Toolbar – see Load Items in Presentation By Using the Toolbar
Barcode reader – see Load Items By Using a Barcode Reader
Presenting Items
During trial, you present different types of items to the judge or jury, and each type has its own presentation options:
You can also annotate items as you present them. For more information, see Use Annotations in Presentation and Use Annotations and Callouts in Transcripts and Video.
Snapshots and Saved Stages
As you present, you can capture the presentation screen in two ways:
A snapshot is a flattened image of the presentation screen. See Use Screen Snapshot and Grab Screen Commands.
A saved stage stores the layout of the exhibits as they appear on the presentation screen. When you load a saved stage, the exhibits stay live, so you can play video, page through a transcript, or continue presenting as usual. See Save and Load Stages.
Admitting Trial Exhibits
You can admit trial exhibits directly from Presentation by admitting party, witness, and trial exhibit number. When you admit an exhibit, a sub-workbook named Admitted (today's date) is automatically created under the Admitted workbook. For more information, see Admit Trial Exhibits in Presentation.
Commands and Keyboard Shortcuts
Time is crucial during any trial. Experienced users often rely on keyboard shortcuts and command lists to add exhibits, annotate exhibits, call up clips, and more without leaving the presentation display. For more information, see Commands and Keyboard Shortcuts.