Users are individual accounts in your instance which can be granted access to different projects, areas, and permissions within Reveal. For information about how users function in Reveal, see About Permissions.
Once a new Reveal project is created within a company, users may be assigned to those projects and given appropriate role permissions.
In Review Manager, users are created and managed under Project Setup > Users.

For information on how to create a user in the Web environment, see Manage Users – Web.
Create users – Review Manager
From Project Setup > Users:
Click the Users by Project tab.
Choose a project from the Select Project dropdown.
Click Add.
In the Users List modal, click Create New.
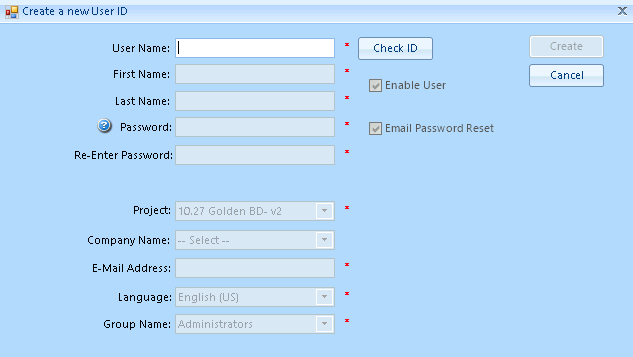
In the Create a new User ID modal:
User Name: Type a user name.
Click Check ID to verify the ID is not already being used. This will also allow you to populate the rest of the fields
First Name: Type your user’s first name.
Last Name: Type your user’s last name.
Password: Enter a password for your user’s account.
Re-Enter Password: Re-enter the password for your user’s account.
Check Enable User to make the account active upon creation. Unchecking this box will create a deactivated user.
Check Email Password Reset to send a password reset email. This allows the user to create their own password for their account.
Project: Choose a project from the dropdown. This should already be selected for you.
Company Name: Assign your user to an existing company
E-Mail Address: Type your user’s email. This must be a unique – you cannot reuse an email of another existing user.
Language: Set a default language for the user's interface.
Group Name: Assign your user to a role group, setting permissions within their project.
Click Create to finish setting up your new user.
Manage users – Review Manager
From Project Setup > Users, two tabs allow you to perform a variety of management actions on your users.
Users by Project tab
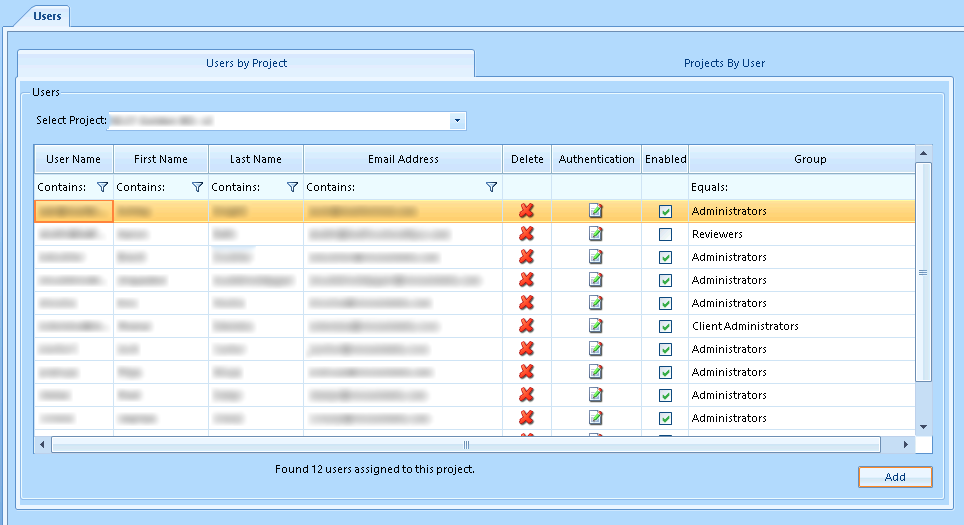
In the Users by Project tab, you can:
Add multiple users to a project
Delete a user from a project
Enable / disable users
Reset authentication
Add multiple users to a project
Important
At least one user with the Administrator role must be added to a project in order to start it.
Click Add.
In the Users List modal:
Check users you would like to add to the project.
Click Add.
Returning to the Users by Project tab, for each new user:
Find your new user from the list.
To the very right, click the Group dropdown. It should say “Select”, since the user has not yet been assigned a role group.
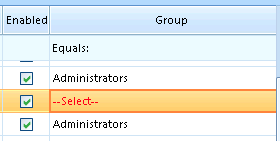
Choose a role group for your user.
Delete a user from a project
Deleting a user in this method only removes them from a project, not from your instance. This will also remove user history and records of artifact ownership in the project. An inventory of the user's work product should be created before deleting a user from a project.
To Delete a user from a project:
Find your user from the list.
From the Delete column, click the
 delete icon.
In the confirmation modal, click Yes.
Warning
Deleting users from Review Manager using the above method should be done with careful consideration. If a user is deleted, you lose the ability to audit the deleted user’s actions and track their prior work product in the database post-removal.
Permanently removing a user from your instance is a task that is performed by the Reveal administrative team. If you have users who have never logged in to a case, or have a specific reason for permanently removing a user, please contact Reveal support to make a removal request.
Reset authentication
Resetting authentication is no longer performed in Review Manager. See Manage Users – Web for instructions on resetting authentication in the web environment.
Enable / disable users
Find your user from the list.
From the Enabled column, click the checkbox.
An
 unchecked box means the user is disabled from the project.
A
 checked box means the user is enabled in the project.
Projects by User tab
.png)
In the Projects by User tab, you can:
Add user to multiple projects
Edit a user’s role group
Edit a user
Add user to multiple projects
Important
At least one user with the Administrator role must be added to a project in order to start it.
Click Add Case.
In the Cases Not Assigned to User modal:
Check projects you would like to assign to the user.
Press Add.
Returning to the Projects by Users tab, for each newly added project:
Find your new project from the list.
To the very right, click the Group dropdown. It should be blank, since the user has not yet been assigned a role group.
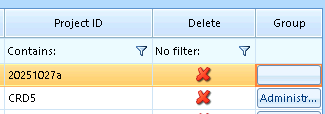
Choose a role group for your user.
Edit a user’s role group
Find your user from the list.
From the Group column, click the role group your user is currently in.
In the Change Group for Users Project modal:
Current Group: the role group your user is currently in.
Select New Group: Click the dropdown and choose a different role group
Click Save.
In the confirmation modal, click OK.
Edit a user
Editing a user is no longer performed in Review Manager. See Manage Users – Web for instructions on editing a user in the web environment.