Auto-redactions automatically apply redaction labels to PII, keywords, or regular expressions in order to streamline your redaction workflows. Once added to the table, auto-redactions will be implemented upon opening a document and be labeled with the redaction code and color of your choice.
This table is filterable by Type (PII, Keyword, Regex) or Enabled (on vs. off) for easier management. Or, you can directly type a keyword or regular expression in the search bar.
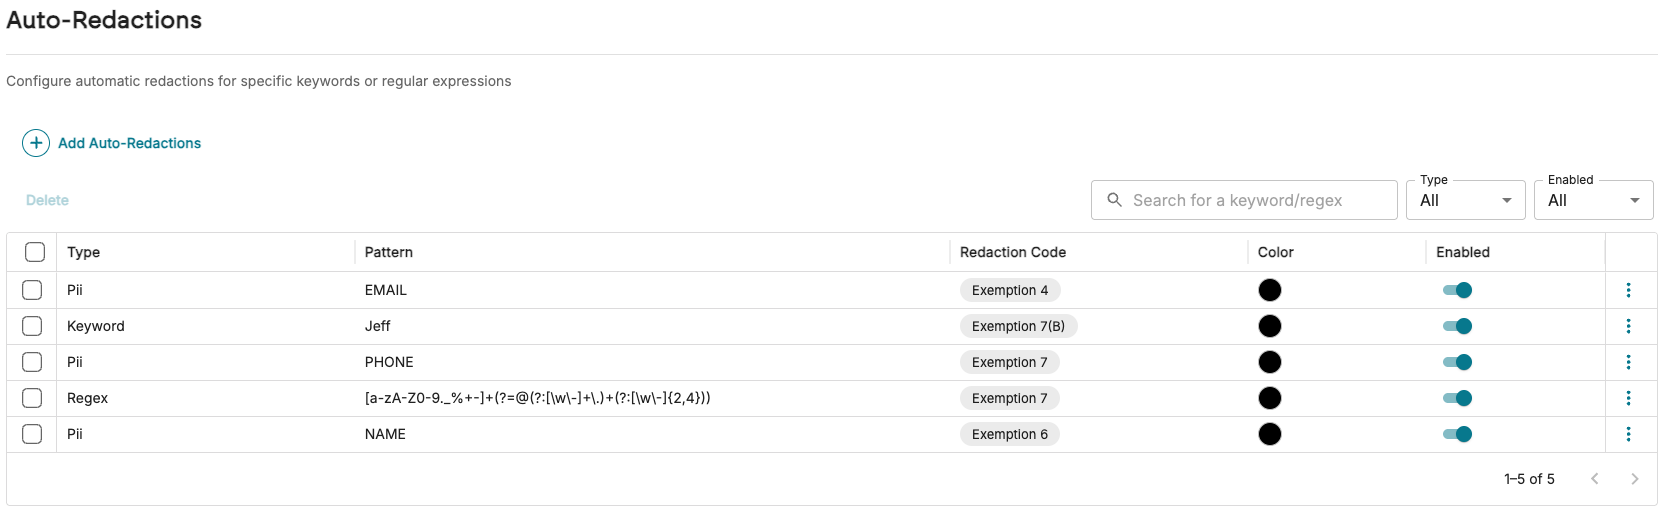
Auto-Redactions can be created and managed in the Redactions tab via My Projects > [your project] >  Project Settings > Redactions.
Entering a document with auto-redactions enabled
When at least one auto-redactions entry is in the table and set to “enabled”, auto-redactions will:
Automatically run through your enabled auto-redactions and redact any keyword, regex, or PII hits.
Tag your document with the Auto-Redactions Triggered tag, even if there were no hits in your document. This prevents auto-redactions from being recreated each time the document is subsequently opened.

Re-apply auto-redactions
A Re-Apply Auto Redactions button is available in the Document Viewer toolbar if you want to manually re-trigger auto-redactions for the document you are in. Be mindful that any auto-redactions manually deleted by users during review will be recreated when pressing this button.
.png)
Automatic redaction merging
Logikcull automatically merges duplicate redactions. If auto-redactions or the PII auto-redaction toggle place a new redaction box directly on top of an existing one, the two will combine into a single redaction. If the redactions have mismatching labels, both labels will be present in the new, combined redaction.
However, redaction merging only works when both redaction boxes are a perfect, pixel-for-pixel match in size and position. In practice, this means the merge will generally not work if:
One or both redactions were drawn manually by a user, rather than generated by the auto-redaction tool.
A redaction was originally created by the auto-redaction tool, but a user later resized the box.
In both cases, the manual action almost always shifts the box just enough that it no longer perfectly aligns with the other redaction, so the merge doesn't trigger.
Create auto-redactions
Click +Add Auto-Redactions
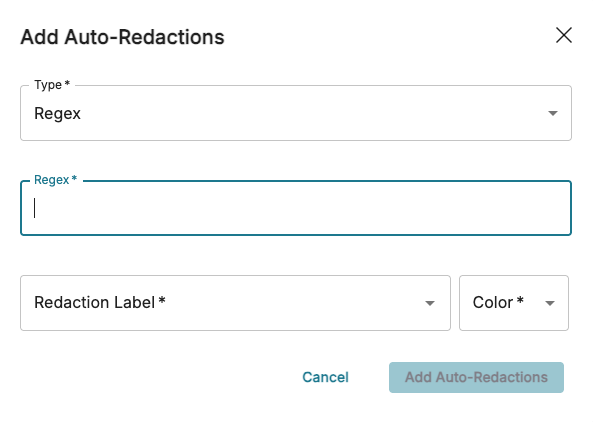
Fill out the Add Auto-Redactions popup.
Type: Choose your content type, either Keyword, PII, or Regex.
Depending on the content type, write your redaction (the keyword itself or the regular expression), or select your PII via dropdown.
Important
Your regex entry should not begin with “regex:” – it should just contain the code alone. The “regex:” prefix is only needed when searching regex hits in Document View.
Redaction Label: Choose your redaction label.
Color: Choose your redaction color.
Click Add Auto-Redactions.
Additional actions
You can also perform the following actions in the Auto-redactions list:
Toggle auto-redactions
Edit auto-redactions
Delete auto-redactions
Edit auto-redaction
On the same row as the auto-redaction, click the
 ellipses icon.
Click Edit.
In the Edit Auto-Redaction popup, adjust fields as needed according to the Create redaction labels section.
Click Save.
Important
Editing an auto-redaction won’t dynamically change all the redactions previously generated by it.
Delete auto-redaction
On the same row as the auto-redaction, click the
ellipses icon.Click Delete.
A Delete Auto-Redaction popup will appear. Click Delete.
Important
Deleting an auto-redaction won’t remove all redactions previously generated by it.
Toggle auto-redaction
Auto-redactions can be enabled or disabled by pressing the  toggle icon.

A popup should appear, confirming your redaction status changed.