Projects in Reveal are databases often equivalent to a specific legal matter, investigation, or analytical assessment. The Project is where users will review and classify documents for analytics and production.
A Company is required in order to create a new Reveal project. Users assigned to the company may then be assigned to projects created within that company and given appropriate role permissions. Clients can be created within the company as well to facilitate billing reporting.
This document will set out how to create projects in Reveal.
Important
If you are a SaaS Customer, it is recommended that you follow the Web-Based instructions below to create Projects within your Reveal instance. If you are an On-Prem customer, you may only have the option to create Projects using the Legacy Web-Based option. If the Web-Based option is not available within your instance, please follow the Legacy Web-Based instructions instead.
Web-Based Instructions
Instructions for creating and managing a project from the Companies page.
Create a Project (Companies)
Getting Started
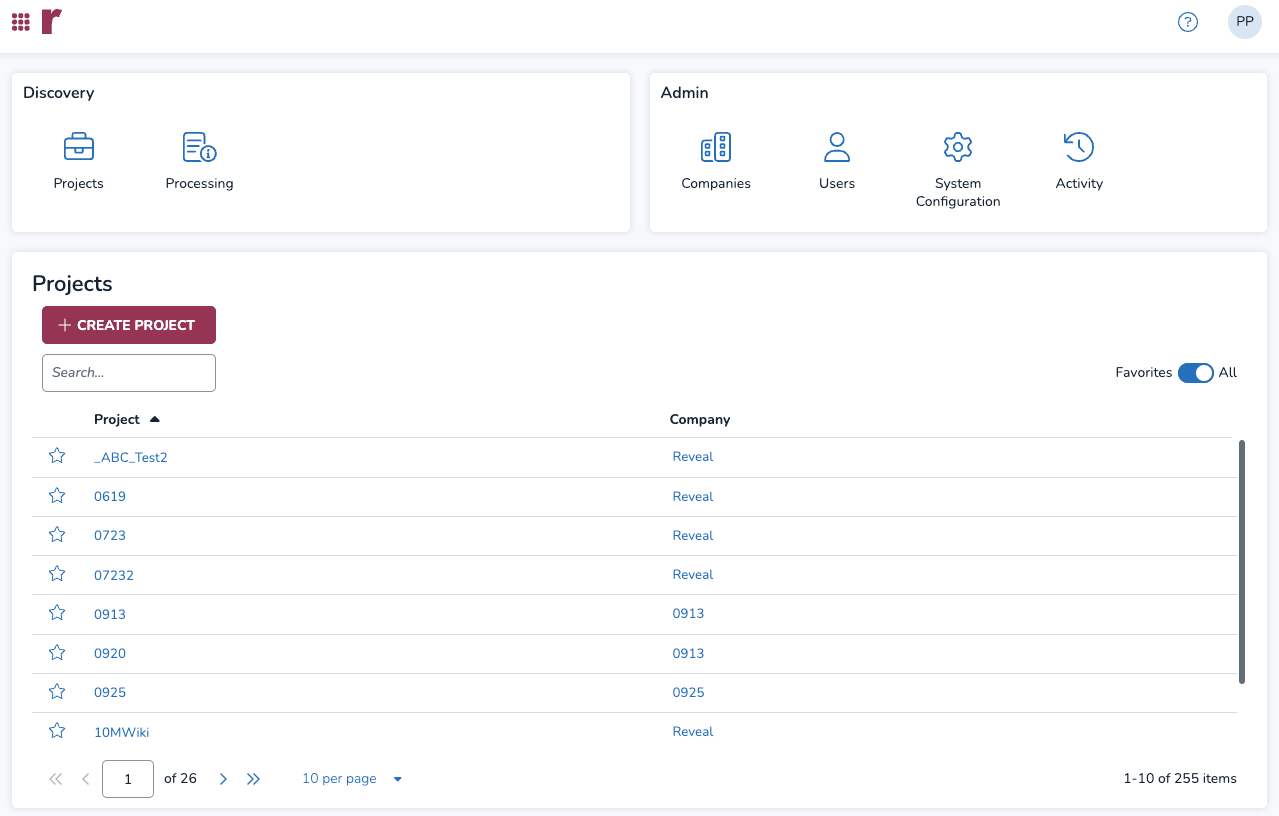
An Instance or Company Administrator will open Reveal to this landing page listing currently available Projects (under Discovery) as a default for all users. Instance and Company Administrators will also see an Admin section in which they can administer Companies and, under each Company, its Users, Clients and Projects. Note that Instance or Company Administrators can see all projects in their purview, whether they are explicitly added to projects or not.
The +CREATE PROJECT button has been added to the landing page to launch the project creation tool. Users may favorite projects by clicking on the star left to the project name. Click the Favorites / All toggle to the right of the search bar to show only favorited projects.

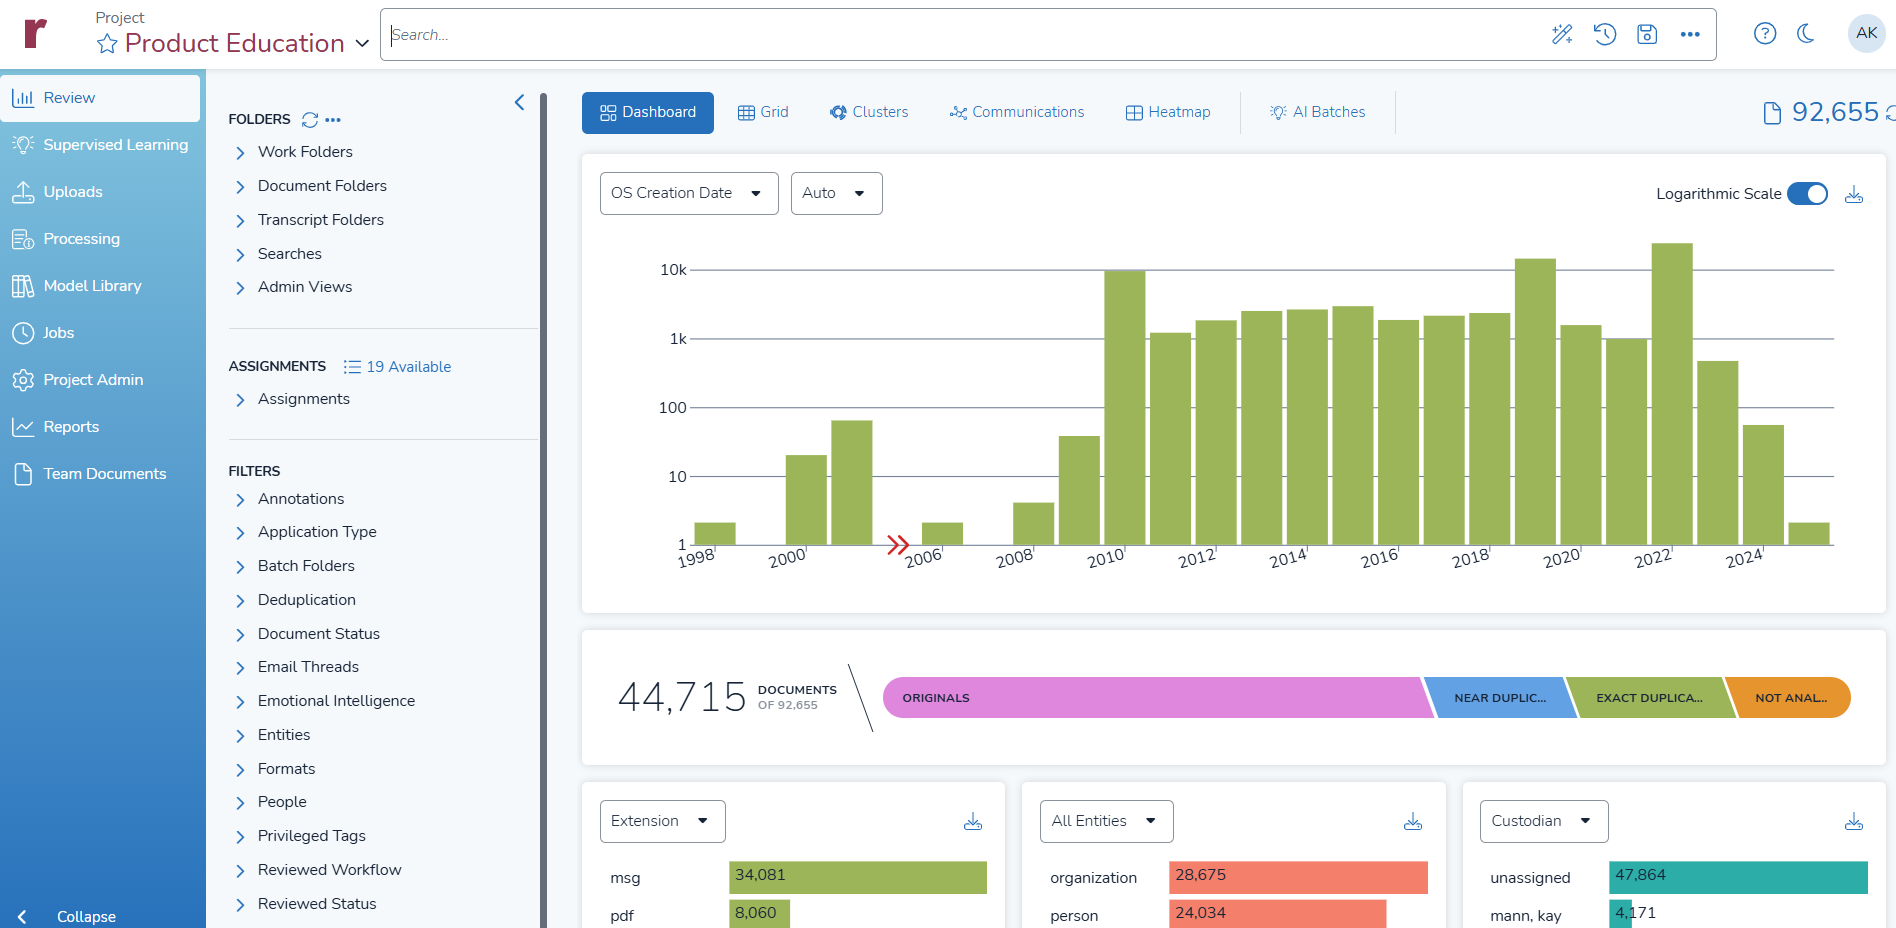
Additionally, users can now favorite a project directly from the Project Overview page by selecting the star icon next to the project. You can also filter Projects and Companies through the Search bar to find what you’re looking for.

Accessing Legacy Company Admin
Previously projects were created and managed under the Company Admin. Users can access that interface from the landing page, then clicking on Companies. To the top right there is a Legacy Company Admin button to launch the previous style interface. Instructions on creating projects in this manner are described in further detail in the Legacy Web-Based Instructions section below.

Setting Up a Project
Open Companies in the Admin box on the landing page.
In the Companies screen, select the company whose projects are to be administered. This will open to the company’s Overview screen.
Click Projects in the Company screen navigation bar to create, configure and populate matters for Reveal.

The Projects screen displays, in addition to the +Create Project button and Search bar through which you can filter on:
Name of project, sortable by clicking the heading and searchable. Clicking the project name will open the project details, not the project itself, as noted above.
ID is the unique identifier of the project.
Documents is the current total number of documents in the project database.
Status shows whether the project is Active or in Cold Storage. Cold Storage, new in Reveal 2024.7, takes a project offline so that it cannot be opened and makes it invisible to users other than administrators, in order that the project not be billed if in Cold Storage for the entire month. If requesting or implementing Cold Storage, please check with your consulting or sales representative as to process and implications. This will be discussed further under Managing a Project below.
Edit opens the project details for editing.

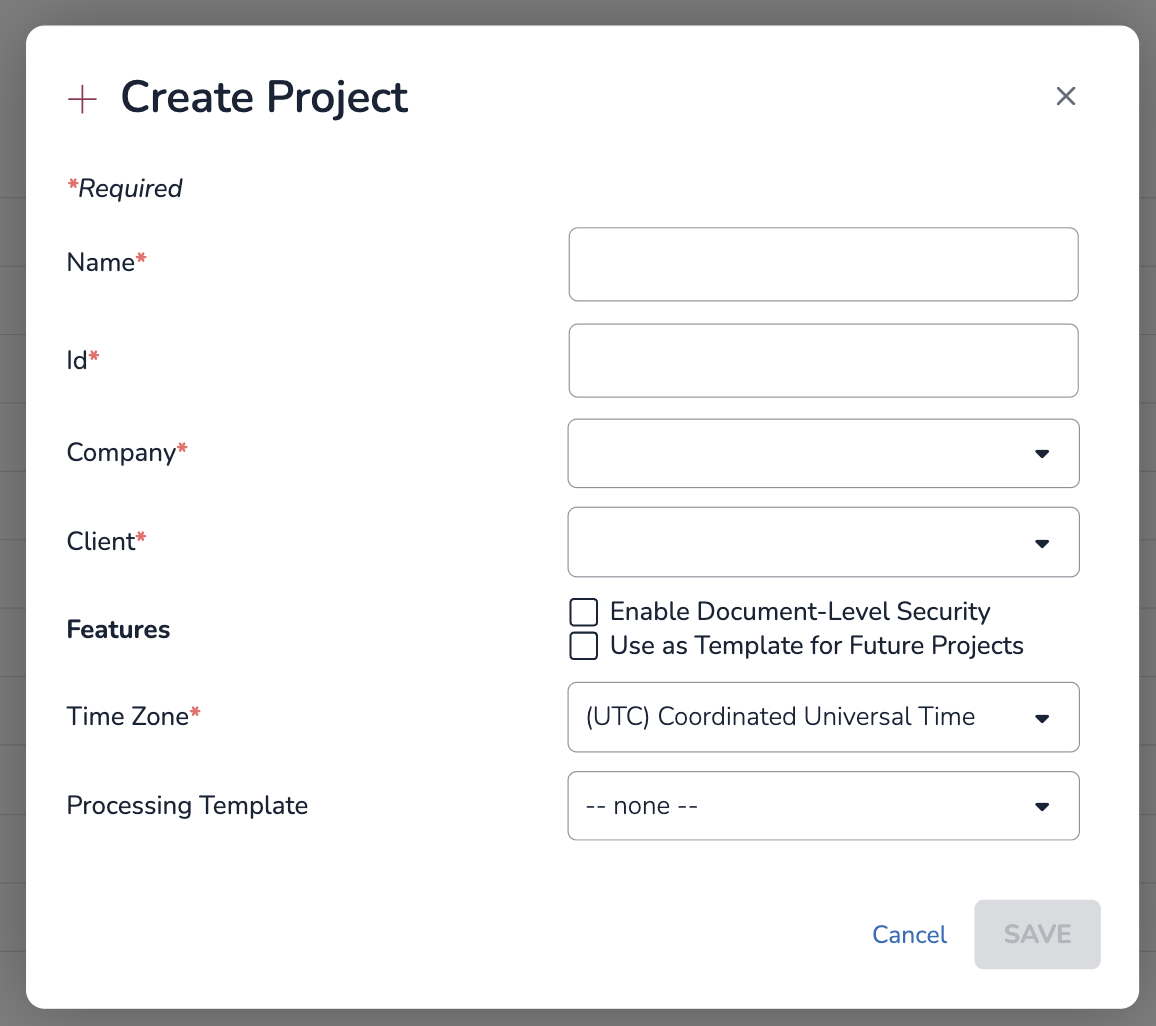
You may click Add Project to enter the following information:

Name - {required} The project name. Project names may be descriptive and can include spaces and certain special characters.
Note
The following characters are not permitted in project names:
\ / : * ? " | ' { [ < } ] > �Id – {required} Short alphanumeric identifier for the project.
Company – {required} Sets the company within which the project is created for Reveal and Processing.
Client – {required} Sets the client within which the project is created for Reveal and Processing.
Features – There are two checkboxes here, neither checked by default:
Enable Document-Level Security to extend Reveal security for Document Access to individual documents.
Use as Template for Future Projects to name and reuse these project settings.
Time Zone - {required} Sets the time zone for project data in Reveal and Processing to automatically normalize email metadata shown in HTML, extracted text and tiff-on-the-fly views to match the time zone that is set for your project here. Reveal will also normalize email metadata shown in images when performing a production or print job.
WARNING:
A project’s time zone cannot be changed after case creation.
Processing Template – Select an existing Processing project template from the drop-down menu.
Save when completed.
A create project status box will open and display the progress of the various stages during the creation of a Reveal project. This includes its processing, database, and analytics components. When complete, the project can be loaded and is ready to be populated with data for review.

Legacy Web-Based Instructions
Instructions for creating a project in the Legacy Company Admin page.
Create a Project (Company Admin)
Projects in Reveal are often associated to a specific legal matter or case. Each project contains Companies and Clients. There may be multiple projects for each Client (along with multiple Clients for each Reveal Company instance). Company Users are grouped and assigned to Projects, security is set, data is loaded and processed.
The creation and management of Projects is done by Instance or Client Administrators within the Company Admin section of Reveal's Web interface. Here are the steps to setting up a new Project in Company Admin in the Reveal user interface.
Create and Set Up Project
Log in to Reveal as an Administrator.
Select Company Admin either from the Projects landing page or from the Navigation Bar within a Reveal project. You may also select Projects from the Discovery administration box.
Company Admin will open to the Projects screen, listing current projects.
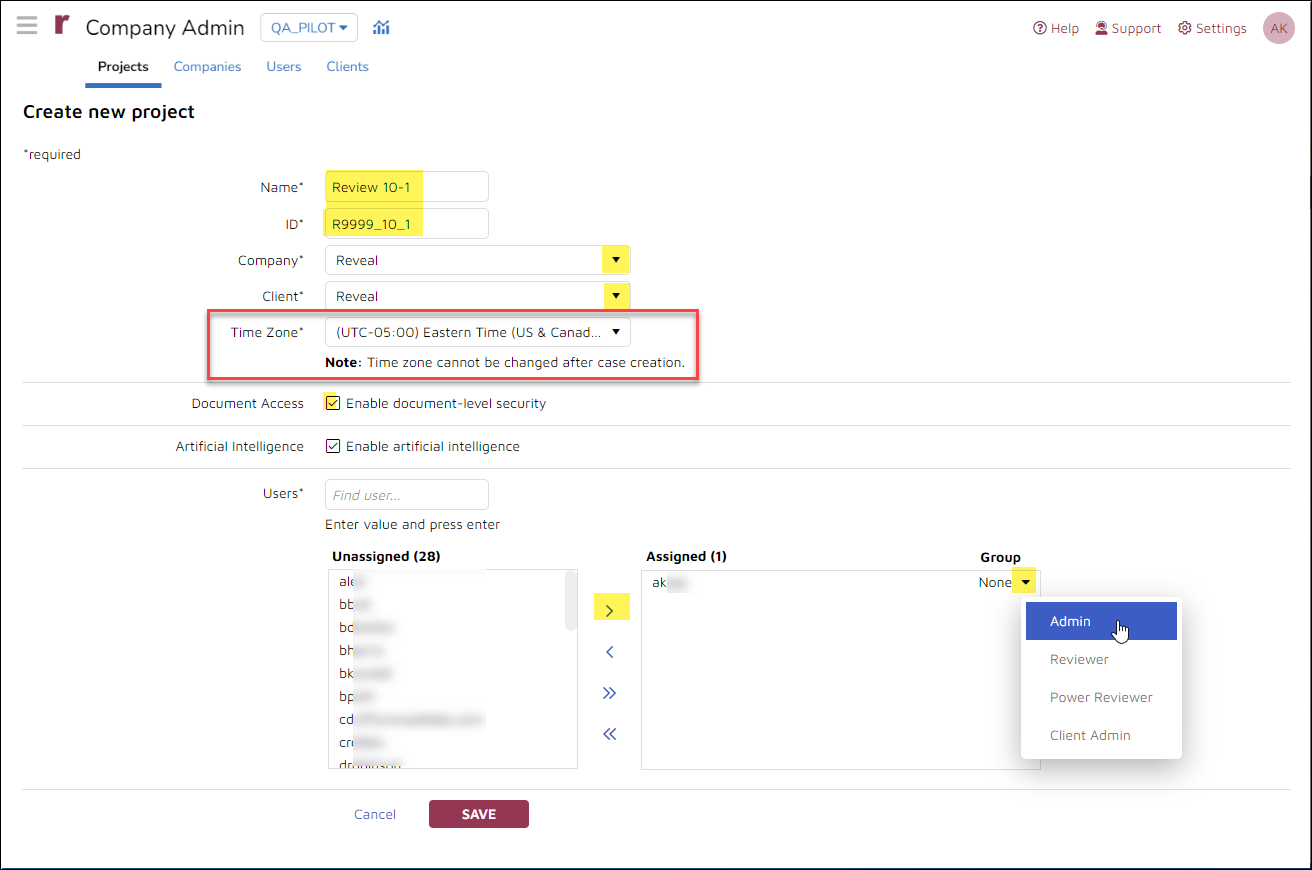
Click the Create new project button in the upper left corner. This will launch the create project screen.
Name the project (required).
Characters permitted in project names as of 2025.5:
Colon ( : ), asterisk ( * ), question mark ( ? ), backslash( \ ), forward slash ( / ), less-than sign ( < ), greater-than sign ( > ), vertical bar ( | ), and the quotation mark ( ” ).
Assign a project ID (required).
Note
A project ID is a billing reference of up to 20 characters that may contain letters, numbers, or underscores. As with the Project Name, an improper ID will be flagged on save.
Associate the project with a Company, selecting from the dropdown list (required). The User list below populates when the Company is selected.
Associate the project with a Client, selecting from the dropdown list (required).
Set your project's review Time Zone to automatically normalize email metadata shown in HTML, extracted text and tiff-on-the-fly views to match the time zone that is set for your project here. Reveal will also normalize email metadata shown in images when performing a production or print job. NOTE: The time zone cannot be changed after case creation.
Select Enable document-level security to extend Reveal security for Document Access to individual documents; this must be selected for use.
Enable artificial intelligence is enabled for all projects by default.
Assign Users to the project.
Select a Group for each user who is added to the project. The group is what is used to assign permissions for the user for this project. You must add at least one user - ideally an Admin or Client Admin - to finish creating a project.
Confirm your information and click the Save button to create the project. It will look like this to show that the project is being created:

A pop-up will notify that the project has been successfully created.
