Overview
The Calibration stage is an iterative process of sending documents to GenAI for review, comparing those ratings to manual human review, then refining your Definition to improve the GenAI rating accuracy. Your aim is to improve your Definition and repeat Calibration Reviews to increase your Agreement Rate, or the percentage of documents GenAI rates that match your own coding decisions.
Calibration is performed by following the below steps:
Start a Calibration Review – Decide where to source your documents and choose how many to review.
Code Documents – Code the documents used in the Calibration Review.
Interpret Calibration Results – Assess your Agreement Rate, read the GenAI reasonings per document, and view citations for positive ratings.
Apply Calibration Findings – If you want to improve your Agreement Rate, edit your Definition and perform another Calibration Review.
I. Start a Calibration Review
Calibration Module
Calibration Reviews are created in the Calibration Reviews module, accessible in the left Modules pane. To start a new Calibration Review, press the ADD button.
.png)
You can also view changes to the Agreement Rate across Calibration Reviews through the Agreement Rate Graph.
Your Calibration Reviews table contains all of your old Calibration Reviews in your aji Workflow. You can click the name of a Calibration Review to see it’s individual results in the Calibration Data Visualizations, discussed further in the Interpret Calibration Results section.
Create Calibration Review Modal
Note
For a quicker way to generate a document set for Calibration, choose Suggest documents automatically. This automatically submits your Definition as an Ask search query, then creates a document set from the results of the Ask search.
From the Calibration Review module, press the ADD button. The Create Calibration Review modal will appear.

Name: Name your Calibration Review.
Make sure you use a naming convention that makes sense to you and for easy reference across all your reviews.
Documents to Review: Select which documents you want aji to send to GenAI for review.
Suggest documents automatically – have aji generate its own set of documents for review. aji will put your Definition(s) through Ask as a search prompt, then use a select number of those documents for Calibration. This option will filter out documents with no text and text sizes greater than the maximum or less than the minimum configured so they are not a part of the generated document set.
Number of Documents to Select: Type the number of documents you want to use for the review.
Use existing document selection – use documents from a previous review.
From the dropdown, choose which aji review you want to reuse documents from.
Create new document selection – use a new set of documents from a Saved Search or Work Folder.
All Documents – Calibrate all documents in your project. This option is not recommended, since the Calibration stage is designed to test a small number of documents from your entire dataset.
Saved Search – Pull your documents from a pre-existing saved search. The Saved Searches modal will appear.
.png)
Choose a saved search. You can click the > arrow to expand and view the saved search as it would appear in the Review Grid search bar.
Click SELECT.
Work Folder – Pull your documents from a pre-existing work folder.
Use the > arrow to find and then choose a work folder.
Definition Suggestions: Check whether or not you would like aji to provide an Auto-Tuned Definition. This will suggest improvements to your Definition based on the Calibration Review results.
See the Apply Calibration Findings section for information on where to find the Auto-Tuned Definition.
Click START.
If you don’t have enough aji Units left in your project to start your Calibration Review, it won’t start and you will be notified via a popup. See our aji Unit Allocation – Instance Admin article for more details on assigning aji Units to projects, and our aji Billing article for details on how to estimate your aji Unit usage for a single Calibration, GenAI, or Hybrid GenAI Review.
II. Code Documents
Review Documents
To manually code your documents, return to the work folder or saved search used in your Calibration Review. If you chose to have aji Select documents automatically, you can find them in an auto-created work folder titled AI Calibration Sets.
.png)
Each aji Workflow will have it’s own designated work folder, titled with the name you provided in the Workflow Name field when you created your workflow. Documents selected automatically by aji can be identified by the number of documents in the Calibration Review and the timestamp it was created.
When you’re tagging documents in Document Viewer, make sure you’re using the correct AI Tag associated your Calibration Review, which can be identified at the bottom of the Manually Reviewed pane from the Calibration Data Visualizations (e.g. “Tag documents with the tag HR-PAYROLL [W1]”).
.png)
Tag Sync
Every 60 minutes, Reveal will automatically initiate a Tag Sync, which syncs your manual coding decisions with aji to update data visualizations and other values, like the Agreement Rate. Tag Syncs take up to 1 hour on average, but could be longer or shorter.
III. Interpret Calibration Results
Once you’ve started your Calibration Review, you can view it by selecting its name from the Calibration Reviews table.
After the Calibration Review completes, only a portion of the Calibration Data Visualizations will load, shown below. The rest of the visualizations will populate upon receiving the manually coded data.
.png)
Important
Since Tag Syncs occur every hour, the data visualizations will update with data—including updating the Agreement Rate value—even if you don’t finish coding all documents. Therefore these visualizations are best interpreted after you have finished reviewing all documents used in your Calibration Review.
Review Information Pane
At the top of your data visualizations, you can see information for your current Review (Calibration, GenAI, or Hybrid GenAI) and information about your aji Workflow.
.png)
Date Created: The date your current review was created.
Last Review: The date your latest review was performed.
Classifier: The Classifier associated with your aji Workflow, used in Hybrid GenAI Reviews.
Status: The status of your current review.
Score Sync: The status of your Score Sync, which syncs the GenAI ratings across the entire Reveal system (aji, Review Grid, Document Viewer, etc.).
This is different from a Tag Sync, which syncs your manually reviewed coding with aji’s data visualizations.
Review By: Who initiated the current review.
Three buttons at the bottom of the pane let you perform the following actions:
Run GenAI Review: Start a new GenAI Review.
Calibrate: Start a new Calibration Review.
Auto-Tuned Definition: Access your Auto-Tuned Definition. If you did not check the box under “Definition Suggestions” when you created your Calibration Review, this button will not be visible.
Results Tab
The Results tab is the central hub for your Calibration Review results. There’s a preview of document counts that were scored and excluded from the aji run. Below that, two donut wheels represent data: Reviewed by GenAI contains the GenAI ratings, and Manually Reviewed contains your coding decisions. Hover your mouse over either donut wheel to see the value of that section of data.
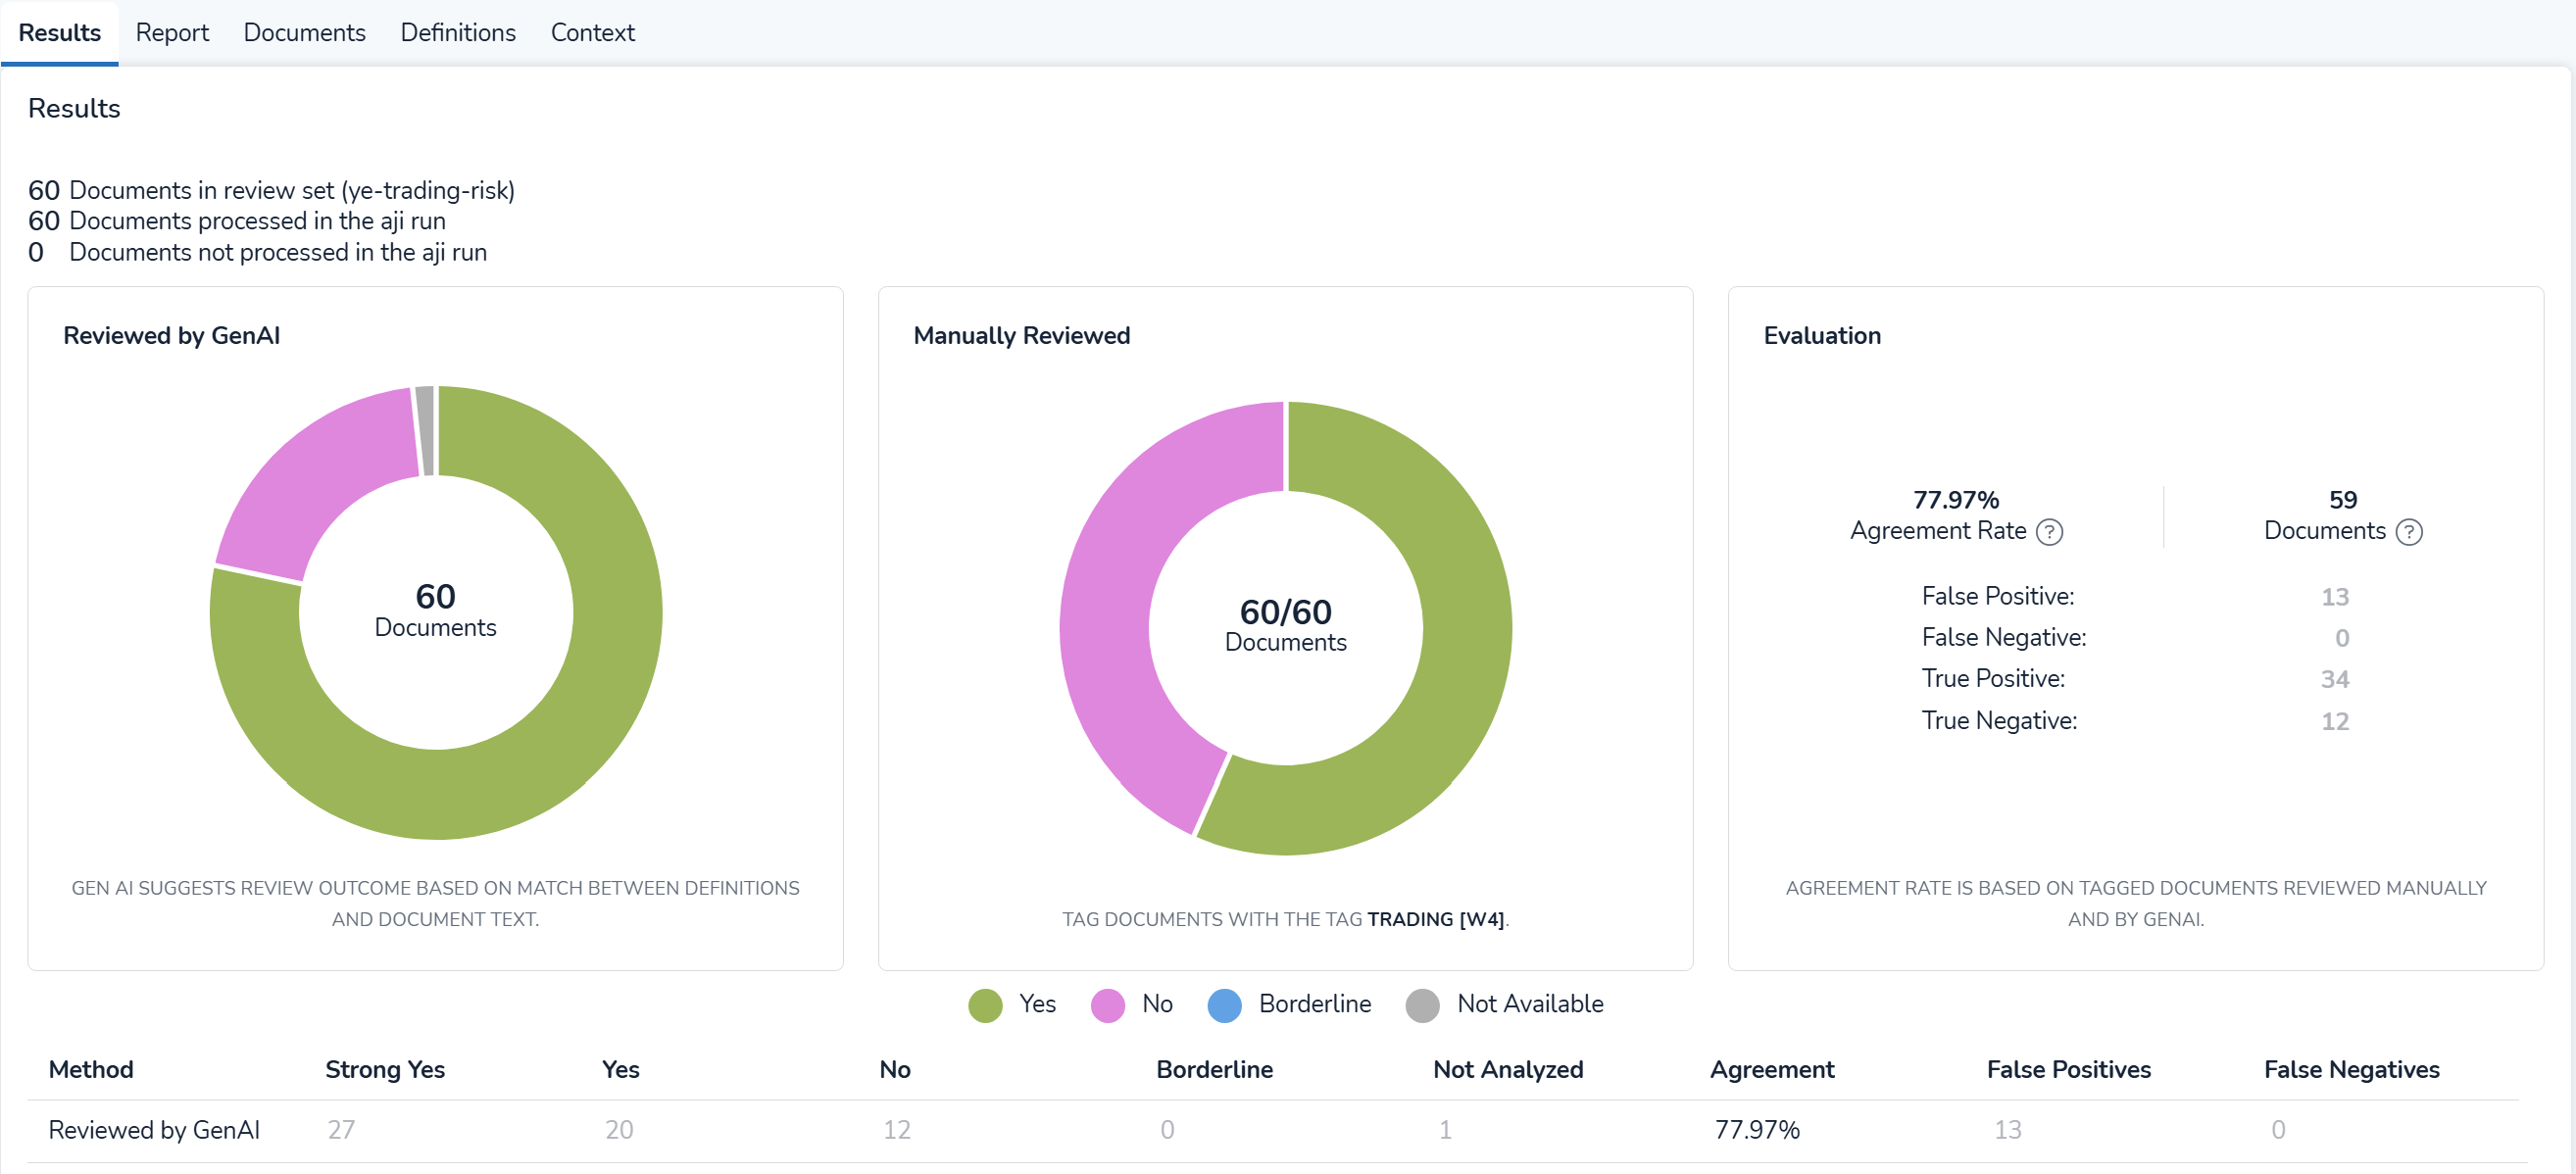
While your manual coding is decided with either a “yes” (relevant) or “no” (not relevant), GenAI ratings follow a more precise scale.
No – The document shows very little or no alignment with the Definition.
Borderline – The document shows partial alignment with the Definition. Some elements are relevant, but important aspects are missing, unclear, or inconsistent, making the overall rating uncertain.
Yes – The document meets the Definition with sufficient relevance. While it may not cover every nuance, it clearly reflects what reviewers are looking for.
Strong Yes – The document strongly aligns with the Definition. It addresses key criteria in a clear, accurate, and comprehensive manner.
Documents that the GenAI has an issue reading or interpreting will be rated Not Analyzed Too Long, Not Analyzed Too Short, No Text Set Found, or Gen AI Analysis Errored, and collectively marked Not Available in the donut wheel.
Note
The green “Yes” section in the Reviewed by GenAI donut wheel represents both Yes and Strong Yes documents.
Evaluation Pane
To the right of the donut wheels, the Evaluation pane is lists the Calibration Review’s metrics, comparing your and the GenAI ratings to provide important feedback about the GenAI rating accuracy. The Agreement Rate can be found here.
There are four possible agreement outcomes between your and the GenAI ratings. Note that, for the purpose of determining agreement, “Borderline” documents are considered a “no”.
Agreement | Your Rating | GenAI Rating |
|---|---|---|
True Positive | “Yes” | “Strong Yes” or “Yes” |
True Negative | “No” | “Borderline” or “No” |
False Positive | “No” | “Strong Yes” or “Yes” |
False Negative | “Yes” | “Borderline” or “No” |
All four outcomes are listed in the evaluation pane with the number of documents for each outcome.
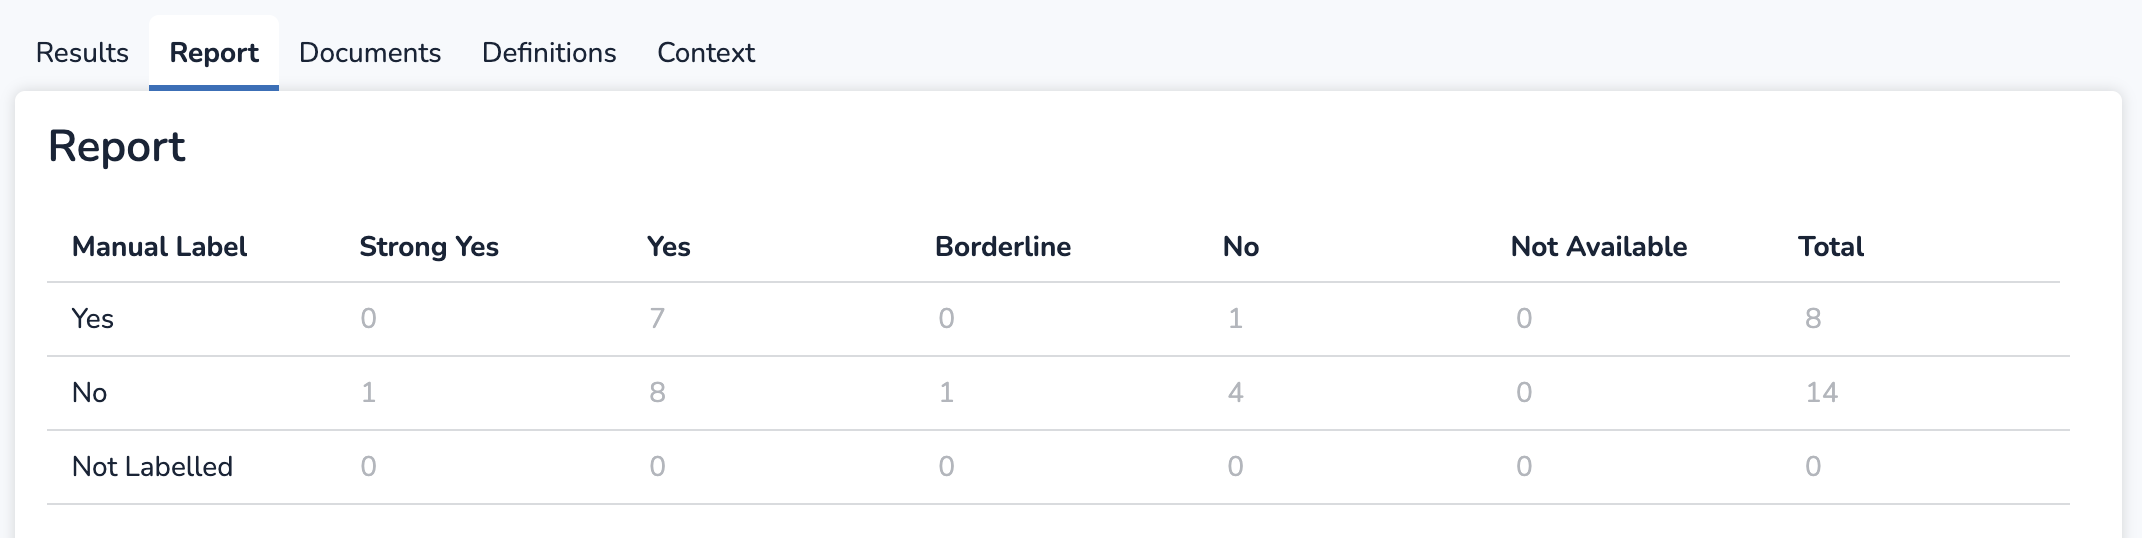
Report Tab
The Report tab contains a contingency table that presents document numbers across your coding and the GenAI ratings. If there are documents you have yet to code, they’ll appear in the “Not Labelled” row.
Documents Tab
The Documents tab is where you go to investigate the GenAI ratings at the individual document level. Clicking any of the BegDoc numbers in the below table opens up Document Preview, where you can read reasonings and citations to understand how the GenAI decided on its rating decision.
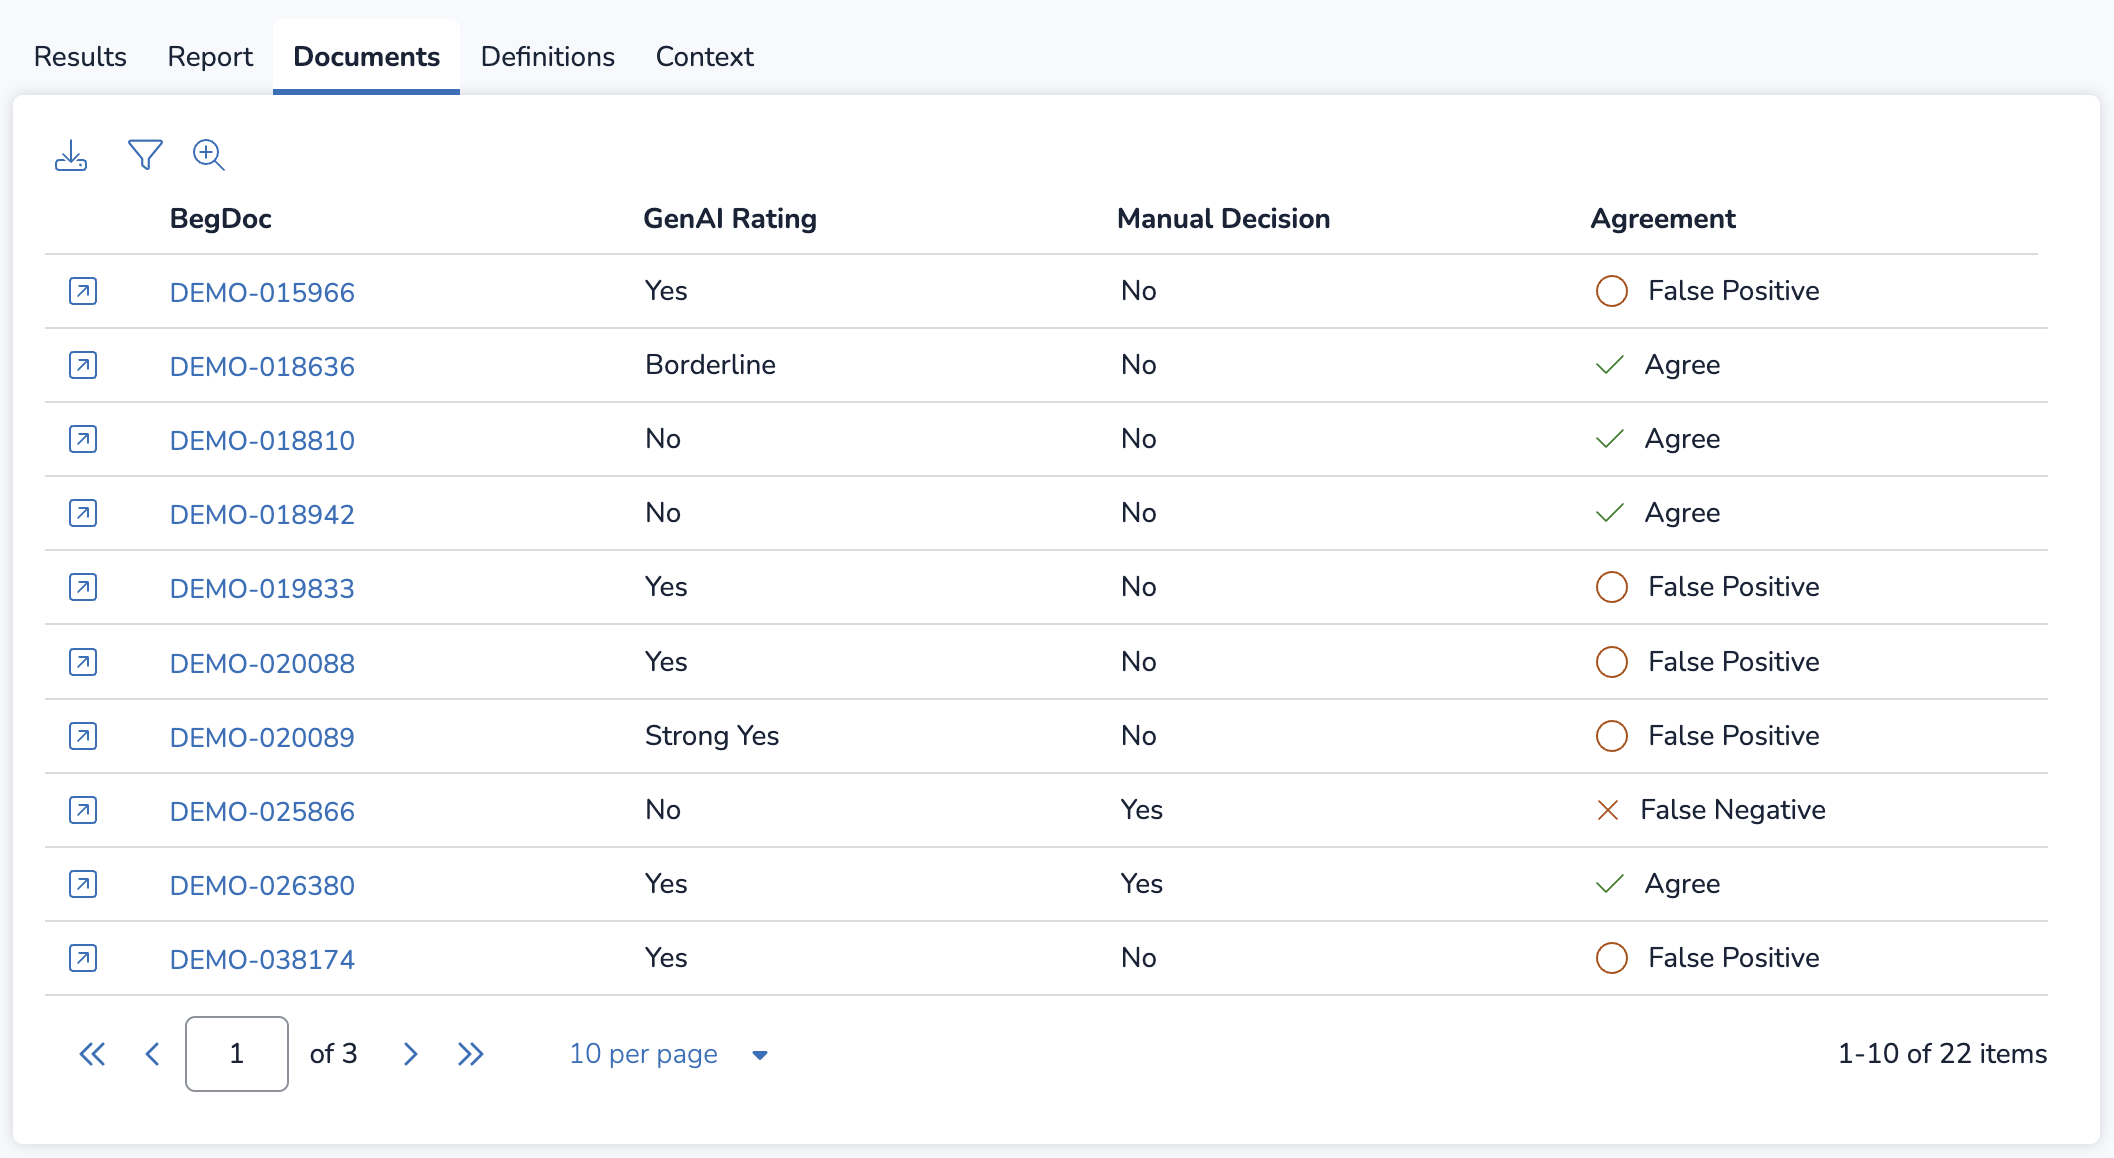
From this tab, you can also perform the following actions:
 Open up one of your documents in Document Viewer, in a new browser.
  Filter the table by GenAI Rating, Manual Decision, or Agreement.
 Create a search in the Review Grid containing all the documents from your Calibration Review, which can be saved.
 Download the table as a spreadsheet file.
Document Preview
The Document Preview window lets you see the overall GenAI Review rating, individual Definitions with their GenAI rating, reasonings, and citations.
.png)
Document content has been intentionally blurred in the above image.
For each Definition, the following are available based on its given GenAI rating:
GenAI Rating | Contains Reasonings? | Contains Citations? |
|---|---|---|
“Strong Yes” | Y | Y |
“Yes” | Y | Y |
“Borderline” | Y | N |
“No” | Y | N |
“Not Analyzed” (too long / short) | N | N |
In the rightmost AI Review pane, the top two dropdowns let you change between any Workflows and Reviews that the document is associated with. Underneath, you can find the GenAI Review Rating at the document level, and Definitions underneath these dropdowns, which can be expanded / collapsed using the > arrow to see reasonings behind the GenAI rating.
Click any of the blue reference numbers in your reasoning to jump to a highlighted citation in your document. You can also copy the reasoning to your clipboard or download it as a text file.
The rightmost toolbar lets you change between three tabs:
.png) Document Explorer, where you can search your document’s text for hits.
Document Explorer, where you can search your document’s text for hits..png) Ask, which lets you ask questions about your document’s content.
Ask, which lets you ask questions about your document’s content. AI Review, where you can see reasonings and citations for each Definition. This opens by default when entering Document Preview through the Documents tab.
IV. Apply Calibration Findings
After exploring all the tabs in the Calibration Data Visualizations, you can use the information you found to improve your Definitions, then see if the Agreement Rate increases with another Calibration Review. To edit your Definition or Context, you can navigate to the Definitions or Context tabs, then click the ![]() pencil icon.
pencil icon.
.png)
Auto-Tuned Definition
If you marked the checkbox for Definition Suggestions in the Create Calibration Review modal, you can access the suggested Definition from the Review Information pane by clicking Auto-tuned Definition. Auto-tuned Definitions are suggestions only; you don’t need to change anything if you prefer your own Definition as is.
Definition and Context History
Any time you edit your Definition Set or Context, Reveal will save your previous version for your records. These can be viewed and referenced in the Definition History and Context History tables, respectively.
To view either table, navigate to the Definitions module or Context module from the upper left navigation pane.
Definition History
.png)
The Definition History table provides a variety of information about your Definition Sets, including the list of reviews that used each Definition Set. Click the Definition Set’s name to see the Definition from a prior save.
Notably, the Applied column lists the number of reviews that are associated with that Definition, each of which is listed in the Reviews column. You can hover over any of the values in the Reviews column to see its content expanded in full.
The full Definition History can be downloaded as a spreadsheet file by pressing the ![]() download icon.
download icon.
Context History
.png)
The Context History table provides a variety of information about your aji Workflow context, including the list of reviews that were associated with each context section. Clicking content in any of the three context columns—People & Roles, Organizations & Entities, or Additional Context—will open up the context from your prior save.
Notably, the Applied column lists the number of reviews that are associated with your Context, each of which is listed in the Reviews column. You can hover over any of the values in the Reviews column to see its content expanded in full.
The full Context History can be downloaded as a spreadsheet file by pressing the ![]() download icon.
download icon.
Perform Another Calibration Review
If you choose to edit your Definitions and rerun Calibration, make sure to select the same Calibration Set from your previous review so you can see the impact of your Definition changes.
.png)
Running a Calibration Review on a prior Calibration Set in the above manner will create a new Calibration Set. This set will contain your new ratings from the next review.